Goal
I have a lot of files. A lot of image files. A lot of image files I downloaded from god knows where and now they're all in one or two big folders and I really really wish I had organized them before hand.
Now, I could sit at my computer for a few days clicking, dragging, making new folders, and etc. But I don't want to do that.
In my mind I'm picturing an interface with a simple two pane layer, the side where you can add in destination folders and that act as buttons for classification, and the main panel with a little queue of data to show me an image file for what I'm classifying.
The questions to answer first
What am I building this in?I want to manipulate files. I COULD probably make an HTML form and then use some server in Node and have it do that, but I'm not really a fan of manipulating files with Javascript. It just feels cludgy to me and gross.
But I really like the File traversal classes from Java. And I know I can make a simple UI with Swing or JavaFX... and if I make it a desktop app, I don't have to care about running a little server or VSCode whenever I want to use it.
So! JavaFx or Swing it is! Onward!
JavaFX or SwingExperience wise I've used Swing more because I learned it in college. Interest wise, I'm intrigued by JavaFX since I know it's somewhat newer and has a paradigm similar to MVC used for web programming that might feel familiar.
But which is going to be easier I wonder... this is a really simple app and probably the hardest thing is going to be loading the image, so, let's just roll with Swing for now and see what happens.
Setup
I decided to use Visual Studio Code for this since it already had a Java project helper, I had java 8 and java 11 installed on my machine but the default suggested version was 17. So, I went ahead with that because why not.
Then I noticed that it hadn't initialized git for me like the last project I did. So, a quick hop to a git bash console since I'm running windows and away we go... Or well, I need an ignore file. I don't remember anything beyond not needing class files, so I added that in and then. bobs your uncle.
And yes, I did check that the thing compiled and said hello world first.
Getting a window going
Next I had to remember the arcane ritual to summon a swing pane. Or a swing container. I don't remember which it is, so, off to the docs we go!
After a false start down the aws.desktop package, I found myself looking at JFrame and Frame. Wondering which I wanted to use. I initially started off wanting to use Frame for fun, but then realized that the oracle documentation distinctly lacks documentation. So, JFrame it was!
Lucky for me, there was a simple example program and that combined with JFrame's javadoc I had myself a working window
DesktopApplication.java
package com.peetseater.filesorter;

import javax.swing.JFrame;

public class DesktopApplication extends JFrame {
    public DesktopApplication() {
        super("File Sorter");
        setDefaultCloseOperation(JFrame.EXIT_ON_CLOSE);
        this.pack();
        // Forward add/setLayhout calls to the rootPane
        this.setVisible(true);
    }
}
Main.java
package com.peetseater;

import com.peetseater.filesorter.DesktopApplication;

public class Main {
    public static void main(String[] args) {
        javax.swing.SwingUtilities.invokeLater((new Runnable() {
            public void run() {
                new DesktopApplication();
            }
        }));
    }
}
Funny enough, the Runnable had a warning on it in my IDE about how I should use a lambda. But then that also had a warning. So, I ended up right clicking and using refactor to convert it into an inner class:
package com.peetseater;

import com.peetseater.filesorter.DesktopApplication;

public class Main {
    private static final class RunnableImplementation implements Runnable {
        public void run() {
            new DesktopApplication();
        }
    }

    public static void main(String[] args) {
        javax.swing.SwingUtilities.invokeLater((new RunnableImplementation()));
    }
}
And then the warning disappeared. And I had a silly little window that did absolutely nothing.

Logging
While I have an IDE at my dispoable, so I can add a breakpoint in, I really do want to log things out to the console or a file if something goes funny. I'm not feeling up to configuring something like log4j or logback, so I'll instead use the standard java.util.Logger framework instead.
You'll sometimes see people complaining about that built in logging, and they have their reasons. But for an ultra simple app like ours? Simple is king. Here's my small wrapping:
package com.peetseater;

import java.io.PrintWriter;
import java.io.StringWriter;
import java.util.logging.ConsoleHandler;
import java.util.logging.Level;
import java.util.logging.LogRecord;

public final class AppLogger {

    private static ConsoleHandler logger = new java.util.logging.ConsoleHandler();

    private AppLogger() {
        // Prevent instantiation of this class since it's meant to just be called statically.
    }

    public static void info(String msg) {
        logger.publish(new LogRecord(Level.INFO, msg));
    }

    public static void warn(Throwable throwable) {
        StringWriter sw = new StringWriter();
        PrintWriter pw = new PrintWriter(sw);
        throwable.printStackTrace(pw);
        logger.publish(new LogRecord(Level.WARNING, sw.toString()));
    }
}
The only note worthy thing about this wrapper is the warn function. It's grabbing the stacktrace from the throwable and then converting it into a string to send out on the log. We have to do this because Swing is hijacking a lot of things it seems. So your average System.out isn't going to cut it here.
A false start on laying it out
Next up, the default layout for a JFrame is borderlayout. I don't remember what that does, so I need to look at my options and decide which makes the most sense for my vision. Luckily for me, there's a
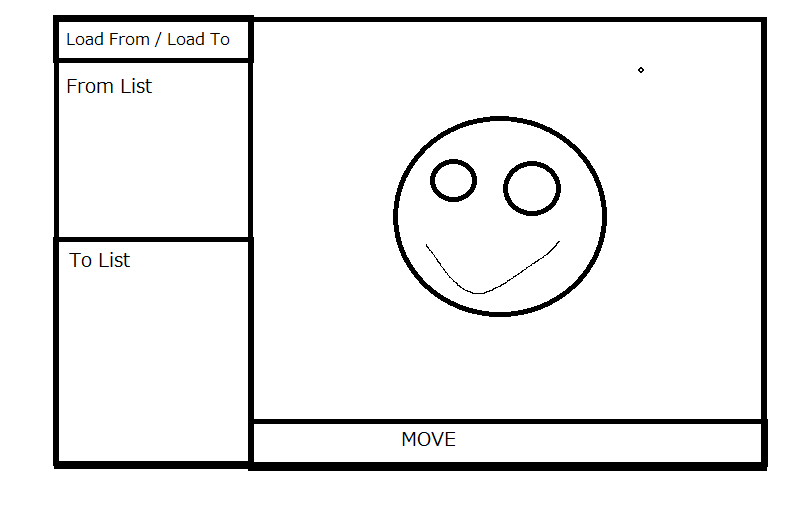
I could use borderlayout and have Left and Right be the two parts of my application, but they'd have equal width which isn't what I want. I know the buttons will be smaller. So, I think I want a flow layout. The buttons along the side will be down in a vertical column, so a box layout would be fine, for the picture it really doesn't matter. So I'll just put it into a borderlayout's center section for simplicity. With the rough idea in mind I drew out a quick sketch:

Then, I got to coding. For about 2 hours I fiddled around, looked at documentation, and made some decent progress. Then I stumbled on a gold mine of a tutorial for me. The split pane was pretty close to what I somewhat wanted. So I decided to revisit my idea for what my layout should be.
Really, I'm making a faster way to move files from one place to another, I was getting bogged down in fancy ideas about creating or adding new folders on the fly and making shortcuts, when actually. Having two file trees would work just fine. So my new idea for a layout was this:
Implementing a File Tree inside of a JPanel
A much more engaging piece of code is handling the file traversal and translating it into a file tree to display in the application. There's a lot to digest about this. But assuming you've fiddled with trees before it won't be too hard to think about.
First off, since there's going to be a bunch of things to display, we'll be putting everything into a JScrollPane. The component we'll be putting into that scrolling pane is the JTree component. This component takes a TreeModel which is responsible for handling our Tree Nodes.
So, what's going to get us the tree nodes in the first place? One of my favorite little classes to use. The FileVisitor! This is a really nice helper that walks up and down the directories you tell it to in a depth-first search manner. In case it's not obvious, this means we can use it to construct our tree on the fly! So, what does that look like?
DefaultMutableTreeNode currentParent = rootNode;
public void loadPath(Path rootPath) {
    try {
        this.rootNode.removeAllChildren();
        this.currentParent = null;
        Files.walkFileTree(rootPath, this);
        this.rootNode = currentParent;
        this.treeModel.setRoot(this.rootNode);
        jTree.revalidate();
        jTree.setModel(treeModel);
    } catch (IOException e) {
        AppLogger.warn(e);
    }
}
This loadPath function takes in a Path that we'll get from a JFileChooser later on. Using this Path we can use Files.walkFileTree to do the hard work for us. But before we do, we set our currentParent to nothing and remove any children from the current rootNode of our tree. Why? Because the first thing we'll do is hit the preVisitDirectory function which will start at the selected folder from the user. This first folder will become our new root node so we need to clear out the state.
@Override
public FileVisitResult preVisitDirectory(Path dir, BasicFileAttributes attrs) throws IOException {
    DefaultMutableTreeNode newChild = new DefaultMutableTreeNode();
    newChild.setUserObject(new FileToMove(dir, dir.getFileName().toString()));
    newChild.setAllowsChildren(true);
    if (currentParent != null) {
        this.currentParent.insert(newChild, currentParent.getChildCount());
    }
    this.currentParent = newChild;
    return FileVisitResult.CONTINUE;
}
You can ignore the FileToMove class for now, that's just the "UserObject" that the DefaultMutableTree is carrying around for us. More important is the understanding that right before we visit a directory during the file traversal this function will fire. A new directory means that we need to update our currentParent node so that individual files will be added to the right place. We're also setting the node behavior to allow children in the first place, which will influence how our TreeSelectionListener behaves. There's a null check for the currentParent that will only happen on the topmost folder the user selects, but if we didn't have it then you'd get an error and never load anything.
@Override
public FileVisitResult postVisitDirectory(Path dir, IOException exc) throws IOException {
    if (this.currentParent.getParent() != null) {
        this.currentParent = (DefaultMutableTreeNode) this.currentParent.getParent();
    }
    return FileVisitResult.CONTINUE;
The yang to the yin of the pre-visit is the postVisitDirectory function. This means we're moving back up the directory tree, so we need to update our currentParent node to be the parent of our currentParent. Confusing to say, easy to understand. Once again, we have a null check becuase otherwise we'd try to make the root node's parent be something that doesn't exist. Which would be kind of odd. It's probably null already, but better safe than sorry.
Lastly, we have the behavior for when we deal with the File itself:
@Override
public FileVisitResult visitFile(Path file, BasicFileAttributes attrs) throws IOException {
    DefaultMutableTreeNode newChild = new DefaultMutableTreeNode();
    newChild.setUserObject(new FileToMove(file, file.getFileName().toString()));
    newChild.setAllowsChildren(false);
    currentParent.insert(newChild, currentParent.getChildCount());
    return FileVisitResult.CONTINUE;
}
The only fun thing to note is the setAllowsChildren call being passed false since if we're on a singular file, then it has no children since it's a leaf node. Besides that, this is just constructing our FileToMove objects and inserting the node into whatever our current parent is. There's another function for the FileVisitor, but it's self-explanatory what it does:
@Override
public FileVisitResult visitFileFailed(Path file, IOException exc) throws IOException {
    throw exc;
}
Now, in order for all of this to work, we need to have some way to choose the Path that we're sending to the loadPath function.
JFileChooser jFileChooser;
JButton browseButton = new JButton("Browse");
...
public FileTreePanel(String browseText) {
    ...
    this.browseButton.setText(browseText);
    browseButton.addActionListener(this);
    this.jFileChooser = new JFileChooser();
    this.jFileChooser.setFileSelectionMode(JFileChooser.DIRECTORIES_ONLY);
    ...
}
...
@Override
public void actionPerformed(ActionEvent e) {
    if (jFileChooser.showOpenDialog(this.getParent()) == JFileChooser.APPROVE_OPTION) {
        File file = jFileChooser.getSelectedFile();
        this.loadPath(file.toPath());
    }
}
The important thing here is the call to setFileSelectionMode. Without this your default JFileChooser is going to only let you select files, which is going to immediatly break since we need our currentNode to get set according to the first directory we visit. And we're not interested in opening a single file, we're interested in opening an entire directory so we can figure out how to bulk move things around. Beyond that, the code is self-evident.
Since I skipped over a little bit of this, here's the commit on github for you see the code in context.
JSplitPane layout for our trees and image
Now, there's a bug in that commit we need to fix. Specifically there's supposed to be TWO trees being displayed. But we only see one. This is because the default layout a FlowLayout, and everything's just getting squashed together. To get the one we want, we need to make a BoxLayout with two rows, one for each pane.
sourcesPanel = new FileTreePanel("Load sources");
destinationPanel = new FileTreePanel("Load destinations");

JSplitPane jSplitPane = new JSplitPane(JSplitPane.HORIZONTAL_SPLIT);
JPanel trees = new JPanel(new GridLayout(2, 1));
trees.add(sourcesPanel);
trees.add(destinationPanel);
jSplitPane.setLeftComponent(trees);
For the image we're going to display on the right hand side, we'll make a simple panel with a button, label, and an icon:
The ImagePanel itself is pretty simple here, a default BorderLayout with the button taking up the PAGE_START area, and the JLabel containing the ImageIcon in the CENTER.
public class ImagePanel extends JPanel {
    JLabel imageContainerLabel;

    public ImagePanel() {
        imageContainerLabel = new JLabel();
        ImageIcon originalImage = new PlaceHolderImage(640, 640);
        imageContainerLabel.setIcon(originalImage);
        imageContainerLabel.setHorizontalAlignment(JLabel.CENTER);
        setPreferredSize(new Dimension(1080, 720));

        setLayout(new BorderLayout());
        add(imageContainerLabel, BorderLayout.CENTER);

        JButton moveButton = new JButton("Move");
        add(moveButton, BorderLayout.PAGE_START);
    }

    void setImage(Path imagePath) throws IOException {
        ImageIcon newImage = new ImageIcon(Files.readAllBytes(imagePath));
        imageContainerLabel.setIcon(scaleIcon(newImage, getWidth(), getHeight()));
    }

    private ImageIcon scaleIcon(ImageIcon imageIcon, int width, int height) {
        Image scaledImage = imageIcon.getImage().getScaledInstance(1080, 720, Image.SCALE_SMOOTH);
        return new ImageIcon(scaledImage);
    }
}
The setHorizontalAlignment function on the JLabel can be used to center the ImageIcon on the screen. And the functions we have for setImage will be used when we click on an element in the tree to load an image. But, until we actually click on one, we need to show something. So we hijack the Graphics of a subclasses ImageIcon to create a simple [x]:
class PlaceHolderImage extends ImageIcon {
    private int width = 32;
    private int height = 32;
    private BasicStroke stroke = new BasicStroke(4);

    public PlaceHolderImage(int width, int height) {
        this.width = width;
        this.height = height;
    }

    @Override
    public void paintIcon(Component c, Graphics g, int x, int y) {
        Graphics2D g2d = (Graphics2D) g.create();
        g2d.setColor(Color.WHITE);
        g2d.fillRect(x +1 ,y + 1,width -2 ,height -2);

        g2d.setColor(Color.BLACK);
        g2d.drawRect(x +1 ,y + 1,width -2 ,height -2);

        g2d.setColor(Color.RED);

        g2d.setStroke(stroke);
        g2d.drawLine(x +10, y + 10, x + width -10, y + height -10);
        g2d.drawLine(x +10, y + height -10, x + width -10, y + 10);

        g2d.dispose();
    }

    @Override
    public int getIconWidth() {
        return width;
    }

    @Override
    public int getIconHeight() {
        return height;
    }
}
All of this is fairly straightforward, We have a white background for the rectangle, then we draw a black border before swapping to a red brush to paint an X from one corner to the other. With this in place, we now have to start wiring up some action listeners and making the various components start talking to each other.
Trees, Panel, Action!!!
So to make the ImagePanel actually get an image when we click on it in the file tree, we need to get a reference of the ImagePanel over to the File Tree's event listener. So, the first idea that came to mind was to just move the listener out into its own class and make it take the panel as an argument:
final class TreeSelectedChangeImageListener implements TreeSelectionListener {
    private FileTreePanel fileTreePanel;
    private ImagePanel imagePanel;

    TreeSelectedChangeImageListener(FileTreePanel fileTreePanel, ImagePanel imagePanel) {
        this.fileTreePanel = fileTreePanel;
        this.imagePanel = imagePanel;
    }

    public void valueChanged(TreeSelectionEvent e) {
        DefaultMutableTreeNode node = (DefaultMutableTreeNode) this.fileTreePanel.jTree.getLastSelectedPathComponent();
        if (node == null) {
            return;
        }

        if (node.isLeaf()) {
            FileToMove fileToMove = (FileToMove) node.getUserObject();
            try {
                imagePanel.setImage(fileToMove.pathToFile);
            } catch (IOException ioException) {
                AppLogger.warn(ioException);
            }
        }
    }

    public void setFileTreePanel(FileTreePanel sourcesPanel) {
        this.fileTreePanel = sourcesPanel;
    }
}
This seems like an okay idea. Or at least, until I circled back to the DesktopApplication code and realized I'd have to do this:
// TODO maybe we subclass the panel instead of making a separate listener...
TreeSelectedChangeImageListener sourcesListener = new TreeSelectedChangeImageListener(destinationPanel, imagePanel);
sourcesPanel = new FileTreePanel("Load sources", sourcesListener);
sourcesListener.setFileTreePanel(sourcesPanel);
As you can see, I already have my TODO note in there because it started feeling gross the moment I noticed the circular dependency between the two. I went ahead and committed the changes because it DOES work. Which is good, but it doesn't really feel right or clean. As indicated by my todo, I think that subclassing my FileTreePanel with the specific behavior we need it to do would make sense since both FileTreePanel's have different behavior. One is for selecting the image to preview before we move it, and the other is for choosing the destination folder we're going to move it to. So The refactor is like this.
- Make the FileTreePanel abstract and remove the setListener methods and unneccesary constructor argument
- Create SourcesFileTreePanel as a subclass and take in the ImagePanel as an argument (no more cirular dependency)
- Create DestinationsFileTreePanel as a subclass
- Fix up the DesktopApplication to piece things together properly again
So, the SourcesFileTreePanel is pretty similar to our TreeSelectedChangeImageListener from before. The main difference is we're calling addTreeSelectionListener for the JTree that the superclass created so we can add ourselves as the listener. This helps avoid the circular dependency from before. In addition, with the ImagePanel argument, we're able to make our valueChanged method set the image to be shown.
public class SourcesFileTreePanel extends AbstractFileTreePanel implements TreeSelectionListener{
    ImagePanel imagePanel;

    public SourcesFileTreePanel(String browseText, ImagePanel imagePanel) {
        super(browseText);
        this.imagePanel = imagePanel;
        jTree.addTreeSelectionListener(this);
    }

    @Override
    public void valueChanged(TreeSelectionEvent e) {
        DefaultMutableTreeNode node = (DefaultMutableTreeNode) this.jTree.getLastSelectedPathComponent();
        if (node == null) {
            return;
        }

        if (node.isLeaf()) {
            FileToMove fileToMove = (FileToMove) node.getUserObject();
            try {
                imagePanel.setImage(fileToMove.getPathToFile());
            } catch (IOException ioException) {
                AppLogger.warn(ioException);
            }
        }
    }
}
The DestinationFileTreePanel is similar to the above as far as the constructor goes, we register ourselves as the instance which will listen for tree selection events, and when we get one, we set the destination path for the ImagePanel. We'll use this value to do the actual move when the user presses the move button inside of the ImagePanel.
public class DestinationFileTreePanel extends AbstractFileTreePanel implements TreeSelectionListener{
    ImagePanel imagePanel;

    public DestinationFileTreePanel(String browseText, ImagePanel imagePanel) {
        super(browseText);
        this.imagePanel = imagePanel;
        jTree.addTreeSelectionListener(this);
    }

    @Override
    public void valueChanged(TreeSelectionEvent e) {
        DefaultMutableTreeNode node = (DefaultMutableTreeNode) this.jTree.getLastSelectedPathComponent();
        if (node == null) {
            return;
        }

        if (node.isLeaf()) {
            FileToMove fileToMove = (FileToMove) node.getUserObject();
            imagePanel.setDestinationPath(fileToMove.getPathToFile());
        }
    }
}
That we're using Path and the Files helpers from java.nio makes thing really simple for the action handler for the button:
@Override
public void actionPerformed(ActionEvent e) {
    AppLogger.info("Moving file from " + currentImagePath + " to " + destinationPath);
    if (currentImagePath != null && destinationPath != null) {
        try {
            Files.move(currentImagePath, destinationPath.resolve(currentImagePath.getFileName()), StandardCopyOption.ATOMIC_MOVE);
        } catch (IOException ioException) {
            AppLogger.warn(ioException);
        }
    }
}
Simple right? For now, I'm capturing any IOException and just logging it, but we'll likely want to put in some code to handle duplicate file names and what have you so that we don't have to deal with coming up with unique names for any files we move. With these changes in place from the refactor, I tested the system and lo and behold it works properly. Letting me move images over from Source to Destination folder with little trouble. The only issue is that we don't remove the tree node when we're done with it. So, how are we going to do that?
Updating the UI
There's a few outstanding things I want to do before I call this little side project done.
- Remove individual files from where they are in the treenode when I've moved them
- Display the destination in the UI as a label, update it when we've moved things
- Fiddle with the image and window size to make the images scale properly.
- Set mnemonics to make it faster to look through and move things
Some of these are braindead simple, so, off we go with the JLabel for visually seeing the status so I don't always have to look at my debug console. it's really simple since we're just adding in a new status label and the ImagePanel already has the source and destiation paths as part of its class variables.
JLabel statusLabel;
...
public ImagePanel() {
    ...
    statusLabel = new JLabel("...");
    add(statusLabel, BorderLayout.PAGE_END);
}

public void setImage(Path imagePath) throws IOException {
    AppLogger.info("Set source image to " + imagePath);
    ...
}

public void actionPerformed(ActionEvent e) {
    ...
    statusLabel.setText("Moved file to " + destinationPath.resolve(currentImagePath.getFileName()).toString());
    ...
}
Next up, I noticed a bug where my previous code was ignoring the non-leaf level directories as a possible destination for the files. This was a result of a copy for the tree in valueChanged from the Sources which has a guard against non-leaf nodes in the tree. So, removing that makes it all work properly. So now DestinationFileTreePanel's valueChanged looks like this
@Override
public void valueChanged(TreeSelectionEvent e) {
    DefaultMutableTreeNode node = (DefaultMutableTreeNode) this.jTree.getLastSelectedPathComponent();
    if (node == null) {
        return;
    }

    FileToMove fileToMove = (FileToMove) node.getUserObject();
    imagePanel.setDestinationPath(fileToMove.getPathToFile());
}
Next, the tree updates. These promise to bit a bit more challenging than a JLabel, so let's think about it a bit, we're about to entire circular dependency mode again because if you recall. The current flow of operations is:
- Users selects Tree Item
- TreeSelectionListener.valueChanged
- ImagePanel.setImage
- User presses ImagePanel Button
- ImagePanel.actionPerformed
And now, we want to circule back up and kick off the user selection again, but without user input. So how do we get a reference to the JTree to trigger this behavior? Simple. We don't! Let's take a page from JSwing way of doing things and tie in another listener, but this time of our own design:
public interface Listener {
    public void doListenerAction();
}
Super simple right? Next, we add a list of listener to the ImagePanel so that other classes can register their own listeners to when that Move button is pressed.
public class ImagePanel extends JPanel implements ActionListener {
    ...
    transient List<Listener> listeners = new LinkedList<>();
    ...
    @Override
    public void actionPerformed(ActionEvent e) {
        ...
        for (Listener listener : listeners) {
            listener.doListenerAction();
        }
        ...
    }
You can see where this is going probably. If we circle back to the class we know is interested in being notified of when the button has been pressed, AKA: another class that wants to be a Listener, we can implement the interface and do what needs to be done:
public class SourcesFileTreePanel extends AbstractFileTreePanel implements TreeSelectionListener, Listener {
    ...
    @Override
    public void doListenerAction() {
        // We listen from the ImagePanel when a user has decided to Move an image, so we can remove it from the tree display
        if (this.currentNode == null) {
            return;
        }

        DefaultMutableTreeNode nextSelection = this.currentNode.getNextSibling();
        treeModel.removeNodeFromParent(this.currentNode);

        // If there is a sibling, move our selection over to it.
        if (nextSelection != null) {
           jTree.setSelectionPath(new TreePath(nextSelection.getPath()));
        }
    }
And lastly, in the setup code for the application we just need to register the listener:
imagePanel = new ImagePanel();
sourcesPanel = new SourcesFileTreePanel("Load sources", imagePanel);
destinationPanel = new DestinationFileTreePanel("Load destinations", imagePanel);
imagePanel.addListener(sourcesPanel);
And we're good! Now when you press the move button, the image is moved to the destination and removed from the sources list. In addition, the next sibling is selected which triggers the next userevent to load the image to check out next. Amd all of that at once with full code context is here in this commit.
Understanding how to change the current selection path programmatically is important since if we're going to get into some heavy shortcutting, then we're going to want to make that help us out a bit. So, let's dive into the mnemonics next before we circle back to trying to get the image scaled properly. I first thought this was going to be some simple oneliners. Something like:
JButton moveButton = new JButton("Move");
moveButton.setMnemonic(KeyEvent.VK_ENTER);
But that's not the case. If I want an application-wide hotkey for a button, I need to do a bit more work than that. Namely, we have to dig into the ActionMap! Now, as much as I'd like to implement the Action interface so I could just pass my instance directly to the put function of the ActionMap, I'm not really sure how they want me to implement the putValue and getValue of the interface. I looked briefly at the AbstractAction class, noted the change of things going on, and decided I wanted nothing to do with it if I could. So instead, in the constructor of the ImagePanel class:
ImagePanel me = this;
moveButton.getInputMap(JComponent.WHEN_IN_FOCUSED_WINDOW).put(KeyStroke.getKeyStroke(KeyEvent.VK_ENTER, 0), "Move");
moveButton.getActionMap().put("Move", new AbstractAction("Move") {
    @Override
    public void actionPerformed(ActionEvent actionEvent) {
        me.actionPerformed(actionEvent);
    }
});
When the window is focused, and we press the Enter key. It's going to fire off the "Move" event. This event is going to get picked up by the actionmap associated with my Button, and then execute the Action I've registered with the same name. This handler is pretty lazy, as it just delegates the event over to the one we already defined since we're an ActionListener already. I can hear you asking already, if we're an ActionListener then why..? Because the Action interface is a subinterface of the ActionListener, so sadly our types don't match up. Since I'm inside of an anonymouse definition of an action, I can't use this to refer to my ImagePanel. So I make a small reference to it outside the inner class and then just refer to that.
With that done, I'm able to press enter after I've selected a destination and a source and it clicks the button for me. Very nice. The next thing I want to do is bind the arrow keys up and down to move me around inside of the Destination tree. The reason being that since the behavior we have for the Destination Tree moves us forward to the next item for consideration, it's more likely I'll want to vary the destination during my long session of organization exercise. This will be straightforward from the action side, but it's the selection that will be a little more fun. Since we're going to have to have some sort of intuitive behavior for when we're at the end of sibling nodes.
So, up and down to move along siblings, and if we're about to run out of siblings move up to the parent level and execute the same action.
class MoveDownAction extends AbstractAction {
    @Override
    public void actionPerformed(ActionEvent e) {
        if (currentNode == null) {
            return;
        }

        DefaultMutableTreeNode nextTarget = currentNode.getNextSibling();
        if (nextTarget == null) {
            // go up to the next parent.
            nextTarget = ((DefaultMutableTreeNode) currentNode.getParent()).getNextSibling();
        }
        if (nextTarget != null) {
            jTree.setSelectionPath(new TreePath(nextTarget.getPath()));
        }
    }
}

...
getInputMap(JComponent.WHEN_IN_FOCUSED_WINDOW).put(KeyStroke.getKeyStroke(KeyEvent.VK_DOWN, 0), "DEST_UP");
getActionMap().put("DEST_UP", new MoveUpAction());
...
The UpAction is the same thing but we use getPreviousSibling instead of getNextSibling. I was testing these and thinking to myself "left and right arrow keys should move you up into the parent list directly or down into one." when I tried it with the app open and noticed that the JTree behavior already has it built in! Of course, it only has it defined for if you've got the component in focus, which makes sense since this lets us navigate the two different JTree panels without messing with each other. That said, it loooks like I don't need to implement this behavior myself. So we can move onto to the last couple of things I wanted to do.
First the image scaling issue we have. Right now, we're squishing or pulling the image around quite a bit. So, let's fix that:
public void setImage(Path imagePath) throws IOException {
    AppLogger.info("Set source image to " + imagePath);
    this.currentImagePath = imagePath;
    ImageIcon newImage = new ImageIcon(Files.readAllBytes(imagePath));
    int width = newImage.getIconWidth();
    int height = newImage.getIconHeight();
    int largest = Math.max(width, height);
    if (largest == width) {
        height = -1;
    } else {
        width = -1;
    }
    imageContainerLabel.setIcon(scaleIcon(newImage, Math.min(width, getWidth()), Math.min(height, getHeight())));
    statusLabel.setText(imagePath.toString());
}
I'm not going to try to support zooming or scrolling the image because I want to be able to just see the image in its entirety. I have some files that are 10k or more pixels high or wide, so, we can find out what the original width or height is, then use that as the defining factor. The other parameter can be set to -1 because the scaling function we have will use that to automatically adjust the value to maintain the aspect ratio with the non-negative one. Nice right?
Handling File Collisions
A mildly naive and very very slow implementation because I don't think I have a lot of files that are going to run into a conflict:
Path desiredPath = destinationPath.resolve(currentImagePath.getFileName());
int next = 1;
while(Files.exists(desiredPath)) {
    desiredPath = destinationPath.resolve("copy" + next + "-" + currentImagePath.getFileName());
    next++;
}
Files.move(currentImagePath, desiredPath, StandardCopyOption.ATOMIC_MOVE);
To be honest there isn't that much to say about this code. You probably want to write if(Files.exists(...)) when you first start thinking about this, but there's no need since the while loop tests the condition anyway.
Wrap up
And there we go. I now have an application that significantly makes it easier for me to preview my images before moving them over to a different folder. Now, I can run it with visual studio obviously, but it'd be ideal if I didn't have to boot that up each time, so, I want to make an executable or something to fire up the application whenever I need to. Thus, jar time.
Setting up the pom file so that maven can build a fat jar for me that includes all my dependencies (all none of them) is pretty simple:
<build>
    <sourceDirectory>src</sourceDirectory>
    <plugins>
        <plugin>
            <artifactId>maven-compiler-plugin</artifactId>
            <version>3.8.1</version>
            <configuration>
                <source>17</source>
                <target>17</target>
            </configuration>
        </plugin>
        <plugin>
            <artifactId>maven-assembly-plugin</artifactId>
            <configuration>
                <archive>
                    <manifest>
                        <addClasspath>true</addClasspath>
                        <mainClass>com.peetseater.Main</mainClass>
                        </manifest>
                </archive>
                <descriptorRefs>
                <descriptorRef>jar-with-dependencies</descriptorRef>
                </descriptorRefs>
            </configuration>
        </plugin>
    </plugins>
</build>
Once this was in the pom, I could run mvn assembly:assembly or click the plugin button in the IDE to create the jar. Then a quick double click and off I was to the organizational races.
This was a fun little project, and it's been a while since I played with Swing and the first time I fooled around with the JTree class which was pretty fun. Definitely nicer to have a built in JTree component than to have to figure out how to link up buttons, labels, and code in a bunch of behavior around indenting them in a tree and whatnot. Not that that wouldn't be pretty fun to do though. Anyway, I hope if you've read to the end you enjoyed this little coding diary entry. I'll see you around if you swing by my stream! Bye!