The log ↩
As with all my projects, I used git so that I could look back at the timeline of changes and keep notes of what was going on. The short form of each commit message is below, and as you can see, I started on the 16th, and certainly didn't live up to the titular "in a weekend" part of the blog post's title.
- 395f44c 2025-12-16: Ray Tracing in one weekend: first sample
- 8248769 2025-12-16: Add scanline count step
- 40adbb9 2025-12-16: Make a few bits of vec3
- 7fed379 2025-12-17: Use std::ops for the overloads from the blogpost
- be96c69 2026-01-04: Implement fmt;:Display for vec3
- 3c8250d 2026-01-04: Align closer to post (immutable negation)
- 32527a5 2026-01-04: more idiomatic negation (according to clippy)
- 294bb8c 2026-01-04: Implement by reference operations for move semantics
- cb7ec91 2026-01-04: Create dot, cross, and unit_vector methods
- c4ded2d 2026-01-04: Add interesting note about inlining that I learned today
- 3ff707c 2026-01-04: Continue fixing up crate ergonomics.
- 3392692 2026-01-04: clippy fmt
- da0d72b 2026-01-04: Formatting, but not cargo fmt
- ed1077a 2026-01-04: write_color method, probably bad way to do write!()
- 5c56e75 2026-01-04: Add note on write_color parameter expectation
- 635181b 2026-01-04: Formatting (not cargo fmt yet though)
- 0c590a1 2026-01-04: Update main program to use write_color
- 4343d3d 2026-01-04: Avoid passing lock, use Write trait for ostream equavalent from c++
- 7a00b6e 2026-01-04: Explode if we can't write a pixel
- 2cb2a0f 2026-01-04: cargo fmt color.rs
- 42a7024 2026-01-04: Cargo fmt main.rs
- f2c7071 2026-01-04: Add Point3 type alias
- fd742bf 2026-01-04: Remove unused import
- 1e80960 2026-01-04: Fix negation to not mutate
- be7a23d 2026-01-04: Avoid references where Copy is fine
- 6d91089 2026-01-04: Ray class
- e82f63a 2026-01-04: Create ray_color method
- 3fc2095 2026-01-04: Use camera to determine color of the pixel on the screen
- c42d9ea 2026-01-04: Lerp blue and white based on y to create ray color
- 2cf8b1a 2026-01-04: Make dot product more ergonomic
- 1207c14 2026-01-04: Draw a red circle, or sphere rather
- e2c89c2 2026-01-04: Rendering sphere normals
- e5e5ebe 2026-01-04: math simplifications
- f046c2b 2026-01-04: Create HitRecord + Hittable trait
- 31b605c 2026-01-04: Make hit record fields public for ease of use
- 38f8685 2026-01-04: Add Sphere struct + Hittable impl for it
- df57bb8 2026-01-04: Address compile warnings about unused things and non-mut etc
- 5c676ad 2026-01-04: Update HitRecord with set_face_normal method
- d360cd8 2026-01-04: Make set_face_normal public
- 96f23a9 2026-01-04: Update sphere hittable to set face normal
- b9b077e 2026-01-04: Move hittable to own file
- 8083aab 2026-01-04: Rewrite hittable#hit to return Option rather that mutate input
- 3311a93 2026-01-04: Implement Hittable list
- acb9609 2026-01-04: Add #add to HittalbleList
- bf3c2c6 2026-01-04: Add rtweekend util.
- 2b1ea68 2026-01-04: Add note while working on cargo fmt settings
- 806f5e7 2026-01-04: Make constants public
- e227667 2026-01-04: Use Hittable world to render scene.
- 07aeaa4 2026-01-04: minor formatting
- 58a0a5f 2026-01-04: Fix z coordinate of small sphere
- 7d71514 2026-01-04: updating bookmark for blogpost reading
- ba0e371 2026-01-04: Remove dead code
- 4170053 2026-01-04: Create Interval struct and constants
- fd74ad7 2026-01-04: Update Hitable to use interval
- 3b9a1be 2026-01-04: Fix logic for root checking within sphere hit
- 6dd7f7a 2026-01-04: Start skeleton-ing the camera 'class'
- 9ca0d3a 2026-01-04: Refactor setup for camera into camera module and clean up main
- c156f55 2026-01-04: Add rng module
- 4078a6c 2026-01-04: Include rng into main
- dcffc62 2026-01-04: formatting on rng
- 5e1ff26 2026-01-04: Setup interval with clamp + prepare for pixel sampling
- ff8fb57 2026-01-04: Add samples_per_pixel field + calculated scale property
- 72d9687 2026-01-04: add missing import
- bf75fa5 2026-01-04: some documentation is always good :)
- 723cd12 2026-01-04: Implement anti-aliasing via pixel sampling
- fdc5595 2026-01-04: Use Cell to avoid &mut spreading like the plague
- 453d5cc 2026-01-04: style tweaking
- f446fb3 2026-01-05: Create random vec3 methods
- cabdf1e 2026-01-05: Initial random_unit_vector method
- f18d026 2026-01-05: rnd vec on hemisphere method
- 8b6aefe 2026-01-05: Update ray color with 'material' but not working yet
- 5575ba6 2026-01-05: Fix bug in ray_color method that was preventing greys
- 4273125 2026-01-10: Put a bounds on max recursion per pixel ray
- 3e39f8c 2026-01-10: Handle "shadow acne" - yes that is the technical term
- 736ba9c 2026-01-10: Lambertian distribution for diffusion
- 7016a16 2026-01-10: Gamma correction for the colors
- 373d679 2026-01-10: Add initial materal struct suggestion
- a097660 2026-01-10: Fix material to be a trait
- 4c269ca 2026-01-10: Add Vec3#near_zero
- 0242a63 2026-01-10: Implement lambertian material
- f1d5d1f 2026-01-10: Reflect rays helper function
- 07a12f0 2026-01-10: Implement reflect + vec on vec multiplication
- 7b5e586 2026-01-10: Add metal material and make albedo pub
- e64dc99 2026-01-10: Make hit records aware of what material they just hit
- 5789052 2026-01-10: Compute color based on material being hit by ray_color
- 56f8856 2026-01-10: Make colors match post
- 3d1564e 2026-01-10: Add fuzz factor for metal
- d04a070 2026-01-10: add note about fuzzing
- bfd13da 2026-01-10: remove unused
- 2e03f04 2026-01-10: Add refract method
- fc01ec4 2026-01-10: Always refract when possible, reflect otherwise.
- d1fca49 2026-01-10: Refract a sphere in water.
- 0c8eb97 2026-01-10: fix positioning to match blogpost
- 33ee691 2026-01-10: Use sclicks approx for reflectance
- d4b4d44 2026-01-10: Still trying to troubleshoot black sphere when ri = 1.5
- 3a24679 2026-01-10: Fix black sphere issue
- f167185 2026-01-10: Air bubble!
- 607d6b3 2026-01-10: Add vertical field of view to camera
- b1b039f 2026-01-10: Setup new scene for testing new fov for camera
- cf5f1fe 2026-01-10: Make cross easier to use
- e6c81f8 2026-01-10: Setup position and orienting capabilities for camera
- 2b9292e 2026-01-10: Render the bubble scene from a different perspective
- 108a557 2026-01-10: Add new random method for defocusing
- 9bd653a 2026-01-10: Update camera to be able to defocus (blur) as desired
- 30b2dd7 2026-01-10: Render scene for blurred angled view of balls
- ccf530d 2026-01-11: Render final image
While I don't expect you to read every little bit and know what each was talking about (yet), there's probably at least one or two things clear. This was more than just a copy and paste exercise from a post. The "in a weekend" part of the tutorial I think assumes that you're
- familiar with the language the blogpost is in
- familiar with the language you're writing in
- aren't busy watching Christmas movies and hanging out with friends
As you can see by the date distribution, I basically took 2 weeks off in the middle of it all, and then the bulk of the work was done on the 4th and the 10th. This isn't just me trying to defend my programmer pride1, but I took my time working through this because there's a lot of math to refresh on, and the difference between its source language C++, and my target language Rust, led to some interesting design changes from the original post.
Those are the real subject of today's blog post. If you want to understand all the math, the various terms, and how raytracing works in detail, then I highly recommend reading through the post yourself. Or better yet, read through it and implement it yourself! The great thing is that the image format uses PPM files which you can create in any language because it's just string data.
So! Choose your favorite language, have some fun. And, when you're ready, come listen to my tale…

C++ to Rust: ostreams ↩
The initial creation of a basic PPM file is a very straightforward port, with the only real translation difference being that in C++ you write
cout << "foo";
and in rust, you write
print!("foo");
The usual ascii escape sequences work as expected for displaying the scanline counts on the
same line, however the translation gets a little bit rougher when we start writing up the
helper methods for the vec3 class. In C++ we're instructed to create an overload
of the insertion operators:
inline std::ostream& operator<<(std::ostream& out, const vec3& v) {
    return out << v.e[0] << ' ' << v.e[1] << ' ' << v.e[2];
}
this must be straightforward and easy in rust, right? It's IO! Hello world uses IO! Come on,
how hard could it be? Well, one way to do this would be to implement Display
use std::fmt;

impl fmt::Display for Vec3 {
    fn fmt(&self, f: &mut fmt::Formatter<'_>) -> Result<(    ), fmt::Error> {
        write!(f, "{} {} {}", self.e[0], self.e[1], self.e[2])
    }
}
Then, we can take any vector and call the print! macro on it. But, the tutorial proceeds
to ignore the operator it just defined, and instead, it has us create a write_color
method, which makes sense later on, but seems odd to do the work on some helpers and then never use them:
using color = vec3;
void write_color(std::ostream& out, const color& pixel_color) {
    auto r = pixel_color.x();
    auto g = pixel_color.y();
    auto b = pixel_color.z();

    // [0,1] to byte range [0,255].
    int rbyte = int(255.999 * r);
    int gbyte = int(255.999 * g);
    int bbyte = int(255.999 * b);

    out << rbyte << ' ' << gbyte << ' ' << bbyte << '\n';
}
This function is harder to translate though. It's one thing to create a format implementation,
but it's another to have a helper method that wants to take an interchangeable target to spit out onto
either std err, std out, or some other stream (in C++). "Well just make a Display for color!", I can't.
color is just an alias for the vec3 type, so you can't have two different
implementations of the same trait for the same struct. And so, I had to learn a little bit more about
rust and its funny business around IO streams.
If you look at the rust std io documentation, you'll see some examples like this:
use std::io;
use std::io::prelude::*;

fn main() -> io::Result<()> {
    io::stdout().write(&[42])?;
    Ok(())
}
Okay, great, so io::stdout() can give me something similar to c++'s ostream maybe?
Yup, documentation notes that it gives you a handle,
and that
Each handle returned is a reference to a shared global buffer whose access is synchronized via a mutex.
If you need more explicit control over locking, see the Stdout::lock method.
Ah, well, if I'm passing it in, maybe I want the lock? I mean, that's something I can pass and the compiler is happy, so…
pub type Color = Vec3;

pub fn write_color(pixel_color: &Color, f: &mut io::StdoutLock) -> io::Result<(    )> {
    let r = (pixel_color.x() * 255.999) as u32;
    let g = (pixel_color.y() * 255.999) as u32;
    let b = (pixel_color.z() * 255.999) as u32;
    write!(f, "{} {} {}\n", r, g, b)
}
and this does work. But it feels a bit silly to use something that explicitly cites standard out. After all, the C++ code is any old ostream. So this didn't feel like the right translation. But, what does feel better is the trait mentioned by the StdoutLock docs:
This handle implements theWritetrait, and is constructed via theStdout::lockmethod.
And that mention leads us over to the implementation I ended up going with, and the one that I believe matches the C++ intent the best. Take in any old writeable and send the PPM on its way:
pub fn write_color<W: Write>(pixel_color: &Color, f: &mut W) -> io::Result<(    )> {
    ... same as before ...
}
The call site still uses the locking of the handle, but its as flexible as the C++ code and so I figured I was in good shape for whatever places we might be spitting out vectors or colors or anything else aliased that we'd be using.
C++ to Rust: Operator overloads and inlines ↩
The rust book must have gone over operator overloading at some point 2, because I knew it existed. But I had never actually had any reason to write an operator overloada before. Granted, I'm still not 100% convinced it's a good idea, especially after dealing with the compiler errors while translating C++ code like:
inline vec3 operator*(double t, const vec3& v) {
    return vec3(t*v.e[0], t*v.e[1], t*v.e[2]);
}
into rust code like
impl ops::Mul<f64> for Vec3 {
    type Output = Vec3;
    fn mul(self, t: f64) -> Self {
        Self {
            e: [
                self.e[0] * t,
                self.e[1] * t,
                self.e[2] * t,
            ]
        }
    }
}
impl ops::MulAssign<f64> for Vec3 {
    fn mul_assign(&mut self, t: f64) {
        self.e[0] *= t;
        self.e[1] *= t;
        self.e[2] *= t;
    }
}
you may notice immediately that one of these is 3 lines of code, and the other is not. While that's the obvious dig at rust, it's not the thing that's the most annoying about this code. What's annoying about this code is illustrated by the following example:
let v = vec3::Vec3::from(0.0, 0.0, 0.0);
let works = v * 2.0;
let doesnt = 2.0 * v;
the last line fails to compile with the following error:
error[E0277]: cannot multiply `{float}` by `Vec3`
  --> src/main.rs:18:22
   |
18 |     let doesnt = 2.0 * v;
   |                      ^ no implementation for `{float} * Vec3`
   |
   = help: the trait `Mul<Vec3>` is not implemented for `{float}`
This threw me off at first, if I defined multiply, why can't you multiply? And it's because the trait is explicit about which is the left hand, and which is the right hand side of the equations. It felt a bit odd at first, c++ doesn't care, why does rust? Why must you further complicate my life, rust?!
The reason why rust cares is because rust tracks lifetimes much more explicitly than c++. In C++ if you say that object X and Y multiply, they do their operations and move along with their lives, ready to be de-allocated by your code later on in life when you manually clean them up.
In rust, if one side takes over ownership of the value (like x = x + y), then that
matters. And so, rust keeps the traits explicit when it comes to which side of the
operator your value is on. Similar, you need to define the assignment for the operator
seperately from the actual operator. So you don't just define * with Mul
but also *= with MulAssign.
This… let's call it paradigm shift, was a small thorn in the translation side the entire time I was working through it. Any time the c++ code was a bit loose in the order of operations with the math, or wanted to express it in the same way as the math formulas that had been derived, I had to ensure I tweaked it so that the vector was on the left, the number was on the right.
Not the end of the world, but not a pleasant time either. That said, you'll also notice
that the C++ code explicitly requests inline as part of its definition. But,
our rust code does not. Is that an oversight on my part? Nope! The rust compiler will
inline our code as needed wiithin the crate. The #[inline] annotation on a
function actually indicates whether or not the compiler should inlne the method when doing
cross-crate compilation.
So if you want your method to get inlined when its used from another crate, then you want to mark it up. But if you're writing a bunch of code in one little crate like I did for the project, it's not needed! The compiler will do it all for you and be clever about it. 3 That said, there's a whole section about inlining in the "perf book" that you can read if you'd like more info, and there's a couple stackoverflow questions that touch on it as well if you want to see some chatter. For me, that meant I have a little less code to write as I copied and translated.
C++ to Rust: Mutable in-out arguments ↩
When I got the section 6.3 of the blogpost it started to get into how to define the objects in the scene in an abstract way. Everything was "hittable", and the C++ code to do so was an abstract class:
class hit_record {
  public:
    point3 p;
    vec3 normal;
    double t;
};

class hittable {
  public:
    virtual ~hittable() = default;

    virtual bool hit(const ray& r, double ray_tmin, double ray_tmax, hit_record& rec) const = 0;
};
For my rust translation, I initially started off the same, not thinking too much and doing a rote translation:
pub struct HitRecord {
    p: Point3,
    normal: Vec3,
    t: f64
}

pub trait Hittable {
    fn hit(
        &self,
        ray: &Ray,
        t_min: f64,
        t_max: f64,
        record: &mut HitRecord
    ) -> bool;
}
The &mut HitRecord felt a little odd, but eh, let's follow along. I implemented the function
for the sphere struct, and looked at the way we returned a boolean and also mutated the hit record and felt
my inner functional programmer screaming at me to use an Option. But, until I got to
the call site, I didn't tweak anything since I didn't have to deal with ergonomics of defining an empty hit
record just to pass it in.
But man. The moment I got to that point and had the question of what do I set the defaults to? I gave in to my better judgement and swapped it over to this:
pub trait Hittable {
    fn hit(
        &self,
        ray: &Ray,
        t_min: f64,
        t_max: f64,
    ) -> Option<HitRecord>;
}
Options are sort of an implicit boolean. The pattern you often see in C or C++ where a flag or boolean
is returned from a function to indicate if some mutable struct you just passed in was populated with
anything is not a pattern we need to follow in rust. The semantics of returning a Some
of whatever struct we populate with data or a None if we'd be returning false just reads
better and leaves less room for questions like: oh hey did I re-use that struct that I got back without
checking if it was initialized properly or not? Nah, in rust world, if we've got Something,
then we know we've got data that's been initialized with something for us to use. Way better.
C++ to Rust: Camera construction ↩
Speaking of things that need initialization, the seventh section goes into creating the camera class. This also runs into a bit of an awkward C++ vs Rust moment. While rust does have public and private fields for structs and their methods, it's a bit awkward when the C++ code starts doing things like this:
class camera {
  public:
    double aspect_ratio = 1.0;  // Ratio of image width over height
    int    image_width  = 100;  // Rendered image width in pixel count

  private:
    int    image_height;   // Rendered image height
    point3 center;         // Camera center
    point3 pixel00_loc;    // Location of pixel 0, 0
    vec3   pixel_delta_u;  // Offset to pixel to the right
    vec3   pixel_delta_v;  // Offset to pixel below


    void initialize() {
        ... bunch of code setting the private methods
        ... based on the public methods that have been
        ... set, all without ever setting the private
        ... fields until this moment.
    }
};
This is awkward becuase unless you want to write some unsafe really
really gross looking code,
you can't create a half initialized struct. So we're left with a couple options, like,
one could use the builder pattern to create a CameraBuilder of sorts and then
call ::build to have it figure out all the private calculated fields and whatnot.
This felt like overkill though. Another option is that we could declare all the private
fields as Option<T> and then… unwrap and map a million times whenever
we want to use one of those values. Ew.
And so, the halfway option that I decided to go with was this:
pub struct Camera {
    /// Ratio of image width over height
    pub aspect_ratio: f64,
    /// Rendered image width in pixel count
    pub image_width: u64,
    calculated: CalculatedProperties
}

struct CalculatedProperties {
    image_height: u64,
    center: Point3,
    pixel_00_location: Point3,
    pixel_delta_u: Vec3,
    pixel_delta_v: Vec3,
}
And the initialize method from C++ became a passthrough to the
constructing method for the calculated properties, which uh, proceeds to calculate
the properties!
pub fn initialize(&mut self) {
    self.calculated = CalculatedProperties::from(
        self.aspect_ratio,
        self.image_width,
    );
}
Over the course of the blogpost, more fields are added in to both the public (9), and the private (8) properties of the struct, and it did make me wish that I had gone for the full builder approach. But, at the same time, eh, the post also set all the properties outside of its defaults anyway:
let mut camera = camera::Camera::new();
camera.aspect_ratio = 16.0/9.0;
camera.image_width = 1200;
camera.samples_per_pixel = 500;
camera.max_ray_bounce_per_pixel = 50;
camera.vfov = 20.0;
camera.lookfrom = vec3::Point3::from(12.0, 2.0, 3.0);
camera.lookat = vec3::Point3::from(0.0, 0.0, 0.0);
camera.vup = vec3::Vec3::from(0.0, 1.0, 0.0);
camera.defocus_angle = 0.6;
camera.focus_dist = 10.4;
so would this have really been worth it if I was just writing this:
let mut camera = camera::Camera::builder()
    .aspect_ratio( 16.0/9.0 )
    .image_width( 1200 )
    .samples_per_pixel( 500 )
    .max_ray_bounce_per_pixel( 50 )
    .vfov( 20.0 )
    .lookfrom( vec3::Point3::from(12.0, 2.0, 3.0) )
    .lookat( vec3::Point3::from(0.0, 0.0, 0.0) )
    .vup( vec3::Vec3::from(0.0, 1.0, 0.0) )
    .defocus_angle( 0.6 )
    .focus_dist( 10.4 )
    .build();
I'm not sure. It's basically the same, but that build step is basically
a call to the init method in C++ that does all the calculations anyway. About the only
other thing worth mentioning was that to set the default properties that the c++ code
was doing, I implemented the Default trait for the camera and used that:
impl Default for Camera {
    fn default() -> Camera {
        let aspect_ratio = 1.0;
        let image_width = 100;
        let samples_per_pixel = 10;
        let max_ray_bounce_per_pixel = 10;
        let vfov = 90.0; // degrees, converted to radians during init
        let seeded_and_should_be_overridden = Cell::new(Rng::new(0xDEADBEEF));
        let lookfrom = Point3::from(0.0, 0.0, 0.0);
        let lookat = Point3::from(0.0, 0.0, -1.0);
        let vup = Vec3::from(0.0, 1.0, 0.0);
        let defocus_angle = 0.0;
        let focus_dist = 10.0;


        Camera {
            aspect_ratio,
            image_width,
            samples_per_pixel,
            max_ray_bounce_per_pixel,
            vfov,
            lookfrom,
            lookat,
            vup,
            defocus_angle,
            focus_dist,
            rng: seeded_and_should_be_overridden,
            calculated: CalculatedProperties::from(
                aspect_ratio,
                image_width,
                samples_per_pixel,
                vfov,
                lookfrom,
                lookat,
                vup,
                defocus_angle,
                focus_dist
            )
        }
    }
}
And yes, there's more properties in the above snippet because that's what the end result looked like
after we got those 17 other fields into play. Cameras sure are complicated little buggers, huh? But,
probably the strangest one in that list, if you're paying really close attention is that rng
field. That's not in the C++ code after all. Clearly, I've expanded the camera into new dimensions
and broken free from following the blog as a tutorial and created something truly unique and wonderful!
C++ to Rust: global RNG vs local RNG ↩
When you look at C++ code like this:
inline double random_double() {
    // Returns a random real in [0,1).
    return std::rand() / (RAND_MAX + 1.0);
}
and crack your fingers to translate it over to rust, you might be surprised when you discover a rather strange fact about the language.
Uh.
Rust doesn't have a standard random function.

Okay, so they do have an experimental module defined if you want to use a nightly build. But, for regular old rust, nope. If you want random numbers, you've got to bring in a dependency like rand or create something yourself.
I was very much enjoying how fast my build times were, and that tends to change when you start adding dependencies, so I was hoping to avoid that if I could. Luckily for me, I remembered that there's perfectly acceptable ways to get non-cryptographic RNG on your own, so that's exactly what I did! I remember hearing about the fast inverse squart root hacks from quake and it led me down a number of fun rabbitholes, one of which was XORShifts, the most famous of which is George Marsaglia's:
#[derive(Clone, Copy)]
pub struct Rng {
    state: u32,
}

impl Rng {
    pub fn new(seed: u32) -> Self {
        Rng { state: seed }
    }

    pub fn next_u32(&mut self) -> u32 {
        let mut x = self.state;
        // George Marsaglia’s xorshift paper (2003).
        x ^= x << 13;
        x ^= x >> 17;
        x ^= x << 5;
        self.state = x;
        x
    }

    pub fn next_f32(&mut self) -> f32 {
        // 24 bits of precision for f32 mantissa
        (self.next_u32() >> 8) as f32 * (1.0 / (1u32 << 24) as f32)
    }

    pub fn next_f64(&mut self) -> f64 {
        let hi = (self.next_u32() >> 5) as u64; // 27 bits.
        let lo = (self.next_u32() >> 6) as u64; // 26 bits
        let bits = (hi << 26) | lo;             // 53 mantissa bits

        bits as f64 * (1.0 / (1u64 << 53) as f64)
    }
}

/// Random f64 between [0,1)
pub fn random_f64(rng: &mut Rng) -> f64 {
    rng.next_f64()
}
This works well enough for the purposes of raytracing. We only need pseudo-RNG, we're not doing cryptography here so fast and cheap is ideal. I'm sure that the rand crate and friends are actually faster and cheaper and more robust and every other thing better. But. This code is easy to use, simple, and doesn't increase my build time!
It does require mutating from one state to the next on every call though.
So, if you're including an RNG as part of a classes internals, you've either got
an infectious &mut self to include everywhere, or you
go with some hidden internal mutability. As teased in the last section, I went
with internal mutability, though it wasn't without its own little glitch as I did
so. Within the Camera struct I declared:
pub rng: Cell<Rng>
If you haven't worked with a Cell
before, it's a container that holds onto something mutable and then lets you modify it
if you take it out of its little home, then put back the changed result. All without ever
having to let a caller know that their call to something that was using &self
was really sorta kinda like a call to &mut self
Here's how I used the cell within the camera's ray_color method.
pub fn ray_color<T: Hittable>(&self, r: Ray, depth: u64, world: &T) -> Vec3 {
    let mut rng = self.rng.get();
    let result = self.ray_color_impl(r, depth, world, &mut rng);
    self.rng.set(rng);
    result
}

fn ray_color_impl<T: Hittable>(&self, r: Ray, depth: u64, world: &T, rng: &mut Rng) -> Vec3 {
    ...
        if let Some((attenuation, scattered)) = hit.mat.scatter(&r, &hit, rng) {
    ...
As you can see, I call .get and I also call .set on the container.
The reason I do this around the other call is that I need that mutable reference for
the rng to be able to provide more than one value at a time to the actual implementation. Like
I said, I ran into a bit of a glitch at first because I initially wrote this code inside of ray_color:
...
let mut rng = self.rng.get();
let direction = hit.normal + random_on_hemisphere(&mut rng, hit.normal);
let color = self.ray_color(
    Ray::new(hit.p, direction),
    depth - 1,
    world,
) * 0.5;
self.rng.set(rng);
return color;
There is a bug here! Can you spot it? You have a bit of a hint given what we were just talking about, but it's a somewhat subtle bug. Most easily visible by visualizing the call stack and what's going on with the value of the rng. Assume that this is the first time we've used this source of randomness and so it starts off at the seed value.
| Stack Depth | self.rng |
| 0 | 0xDEADBEEF |
| 1 | 0xDEADBEEF |
| 2 | 0xDEADBEEF |
| we do stuff and stop the recursion | |
| 2 | 0xABADBABE |
| 1 | 0xABADBABE |
| 0 | 0xABADBABE |
Oops. I'm making up the end value here4
but the values should illustrate what the bug is. The issue being that when we take the value
out of self.rng, we get the value that's set in it. Well duh! you say. But,
if we recurse into another call to ray_color before we ever call self.rng.set
to put the mutated random value back into its box for the next bit of code to use…

Yup. The value each call within the stack ends up using the exact same value for the random number. Not really what we intended. And so,
pub fn ray_color<T: Hittable>(&self, r: Ray, depth: u64, world: &T) -> Vec3 {
    let mut rng = self.rng.get();
    let result = self.ray_color_impl(r, depth, world, &mut rng);
    self.rng.set(rng);
    result
}
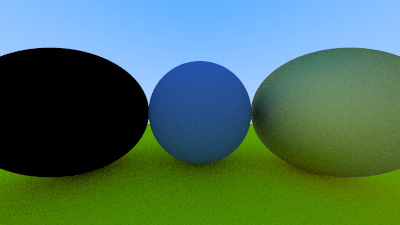
deals with this since the internal implementation method receives the mutating reference across all of its recursive calls. Sort of a fun little gotcha. When I fixed this, the images I was producing with the code became a bit less "blocky" I'd say. Probably because all the vectors were flying around in the same direction rather than randomly, which then produced a "fuzzier" image. When I noticed it and fixed the bug was also while I was implementing materials on the spheres, so the materials of the before and after image for the fix are different, but I think you can sort of see what I'm talking about below:
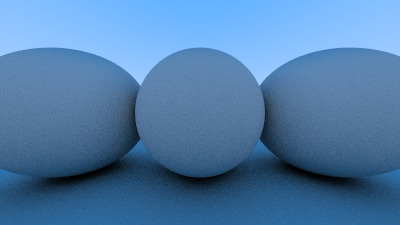
the left image is before I fixed the RNG, the right is after. The fixed version feels more random when you look at the pixels. Maybe it's just me. But it does make a difference to not use the same random number across the samples that determine the pixel color I think!
Black spheres during refraction ↩
What's also interesting is that the entire time I was generating these images, I had another bug lurking in the shadows. One that didn't show up within the diffuse materials work, or the metal section. Nope. This weirdo bug didn't appear until I started implementing the section that covered dielectrics.
But, the problem code was back in section 6.3 when we were creating spheres. Kind of funny how you can go 5 sections with an incorrect implementation and not notice it until the vectors bouncing around start, or well, stop bouncing. Here's the original C++ code that was part of deciding whether or not your vector has hit a sphere or not:
auto sqrtd = std::sqrt(discriminant);
// Find the nearest root that lies in the acceptable range.
auto root = (h - sqrtd) / a;
if (root <= ray_tmin || ray_tmax <= root) {
    root = (h + sqrtd) / a;
    if (root <= ray_tmin || ray_tmax <= root)
        return false;
}
What this is doing is checking if our vector line is passing by, grazing, or passing through the sphere:
And then, here's the first pass of my rust implementation:
let sqrtd = discriminant.sqrt();
// Find nearest spot that lies in the acceptable range
let root = ( h - sqrtd ) / a;
if !interval.surrounds(root) {
    // check the _other_ solution to the quadratic formula too:
    let root = ( h + sqrtd ) / a;
    if !interval.surrounds(root) {
        return None;
    }
}
Notice anything? The code is totally right, right? Not a shadow of a doubt?

The fixed version is this:
// Find nearest spot that lies in the acceptable range
let mut root = ( h - sqrtd ) / a;
if !interval.surrounds(root) {
    // check the _other_ solution to the quadratic formula too:
    root = ( h + sqrtd ) / a;
    if !interval.surrounds(root) {
        return None;
    }
}
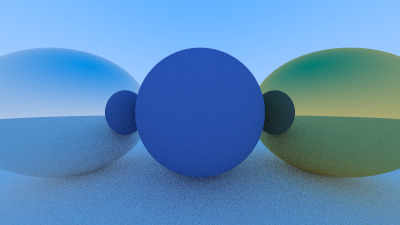
As you can see, the fix was to make the root be mutable. Because if we don't then in the case that the first root wasn't touching the sphere, but the second does, then the root value never changed after we got out of the first if statement. So, even though the second root defined the hit, we end up passing along the first root to the calculations that follow after this code.
Which resulted in this nonsense:
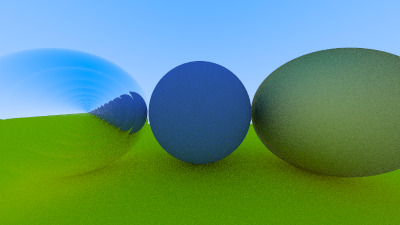
The left was what I saw at first, and then, when I added in a bit of code to have the vectors reflect, rather than refract, when the vectors landed on the wrong side of the sphere's surface, I got that funny wobbly glass water look.
Thankfully, after banging my head against it, wondering if RNG was betraying me, and reimplementing the refraction material code 3 times, I did a search and found myself on github where a user posted the same issue and called out that they had accidentally shadowed their root within the sphere code. Which, funnily enough, was also someone doing this in rust, and also my exact same problem.
So I suppose the lesson is to be careful when it comes to shadowing when you're translating between C++ and rust.
A final image ↩
I didn't run into any other major bugs along my implementation journey. For the most part, I spent most of the time falling asleep on my couch while watching shows with my family over the holidays and doing my best to try to tap out a few lines of code each day. Then, when I got some more time on the weekend, I dug in a bit more and made something pretty neat.
It's not new, anyone can follow the raytracing series and do it themselves. The math is explained mostly well, I think some of the simplification of formulas and assumptions were a bit tougher to follow due to how much, or how little, I recall about matrix operations and how all that math worked or not. Like, yes. I recall that you need to be careful of MxN NxM versus MxN MxN type size match ups, but remember the rote operation of how to add, multiply or which things do what when you cross product things is uh. Not gonna happen. Thankfully I can read code so I suppose that helped out, but yeah. I spent a lot of time trying to refresh on that math and not actually coding, which slowed me down a bit.
Okay, maybe a bit more than a bit, I started on the 16th of last month and am publishing this little blog post on… oh neat. The 16th of this month! Woah! Totally not planned! 5
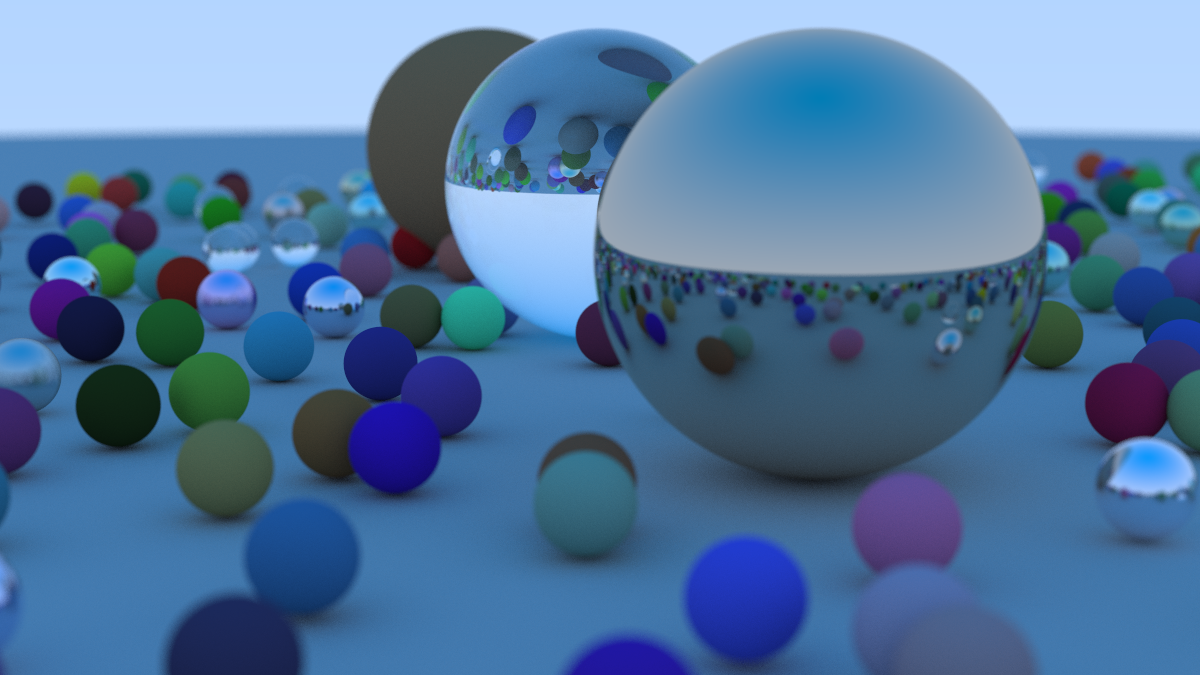
The final part of the raytracing post is to spawn a bunch of random balls with a few big ones hanging out in specific areas to reflect and do cool things. And, as you can see, it's pretty neat how computing the intersection of some lines from a camera point to spheres, plus doing some random vectors bouncing off of them, results in a full scene like this.
I'll see you next time! I want to get back to the 20 games challenge soon, and maybe we'll try a couple new things while we're at it.
 If you'd like to see the full code I wrote, check it out here: on github