Specifically, what are we doing? ↩
As I said above, the level editor is pretty bare bones. In fact, it's not even really an "editor" so much as "one shot creator good luck" type program. So, first things first, I think we make it possible to open existing levels for editing in the program.

Yup. Like I said, it's a "one shot creator" type program, which is to say that you can only create new levels. Never modify old ones, and if you wanted to: you'd need to painstakingly re-create both the PPM and PBM input every time. Certainly not a good flow for level development. So, obviously, that's thing #1 we are doing in this post.
Thing two 2 for this post is that none of the levels I created that are currently in the game have any guarantees about whether or not they're solvable without guessing. And so, this post is actually going to accomplish ensuring that when we create a level, there's a good indication of whether or not it's a good puzzle or not.
Funnily enough, creating a puzzle solver was actually reason #2 that I even decided to make the logic paint game in the first place. Reason #1 being that it didn't seem that hard, and I was curious to try making it since it seemed simple enough for our first game done in rust. But, over the course of creating the game I started running out of time for my self-imposed deadline, and so I put aside the solver until now.
And that's basically all we're doing today. I also want to pull out the code I used to do layouts for the grids and maybe highlight that in another follow up post that might benefit folks who don't want to read a 4 hour long post but want a valuable trick. But, we'll do that later. Or maybe in this post. Kind of depends on how much time and effort it takes to accurately describe a solver here. To facilate the potential that I hit this third thing here, let's stop the rambling and get on with it, shall we? Take my hand, let's boldly march into the future together!
.png)
Context for those with little time ↩
By "those with little time", I'm specifically referring to not having enough time to read the entire post about creating the logic paint game. I'm not going to ask you to do that, it's a big time commitment, but since our first task isn't the stand alone solver type code that can exist in a vacuum, you need to know at least a little bit of context about the code before we add opening and saving to it.
Thankfully, since we're only focused on the level editor portion, I really only need to explain three things for you to get up to speed! First off, the structs that our data is stored in are very simple grids of booleans and RGB triplets:
pub struct Pbm {
    pub width: usize,
    pub height: usize,
    pub cells: Vec<bool>,
}

pub struct Ppm {
    pub width: usize,
    pub height: usize,
    pub max_value: u16,
    pub cells: Vec<[u16; 3]>,
}
These are both netpbm file types that can represent images. PBM represents simple black and white images, and also, our solved solution state for a nonogram puzzle. PPM represents a colorful image, which has precision for representing an RGB triplet up to its max value, which is commonly 255 for 8 bit or 65536 for 16 bit colorscales. The RGB data is stored without gamma correction, which isn't important for our purposes as Egor will take care of that for us, but it is important if you were doing something like raytracing.
In our level editor, one of each of these files is created and stored next to a .level file
which has a 0 or 1 indicating of the puzzle has been cleared or not yet.
This in turn influences whether or not it appears on the level select page of the game:
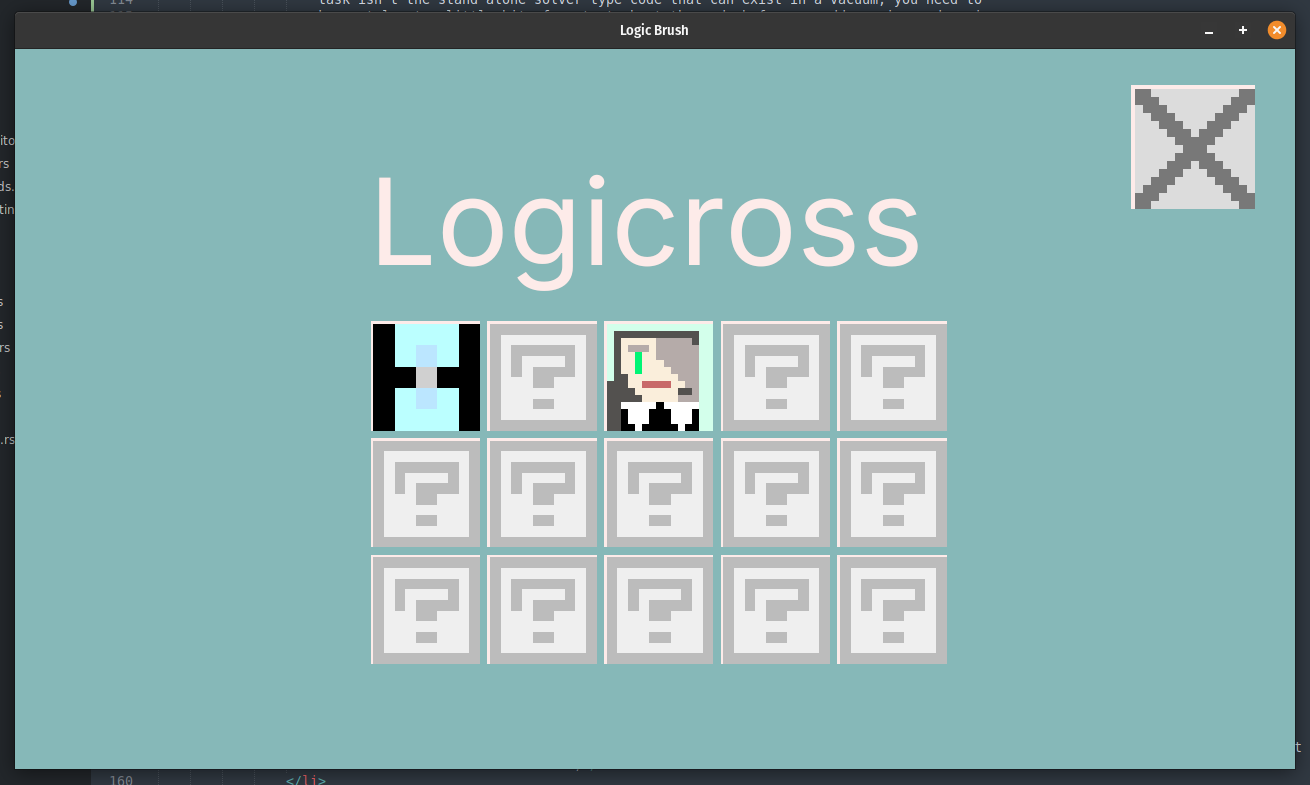
The second thing I need to explain to you, is that we're using Egor, which sit on top of egui and therefore, we have access to all the goodies that egui has to offer us. For example, the settings page with the buttons you see in the editor screen shots is all egui:
Window::new("Settings")
    .anchor(Align2::LEFT_TOP, egor::app::egui::Vec2::ZERO)
    .default_size([100.0, 500.0])
    .show(egui_ctx, |ui| {

This is great! Though egui doesn't appear to have a file dialog, so well deal with that later. Egor itself sits as our main program loop runner with code like
App::new()
    .window_size(1280, 720)
    .title("Logic Brush Level Editor")
    .run(move |frame_context| {
and the frame context provides us all the handles to graphics handlers for drawing text, shapes, textures, and everything else we might need for our basic 2d game type stuff.
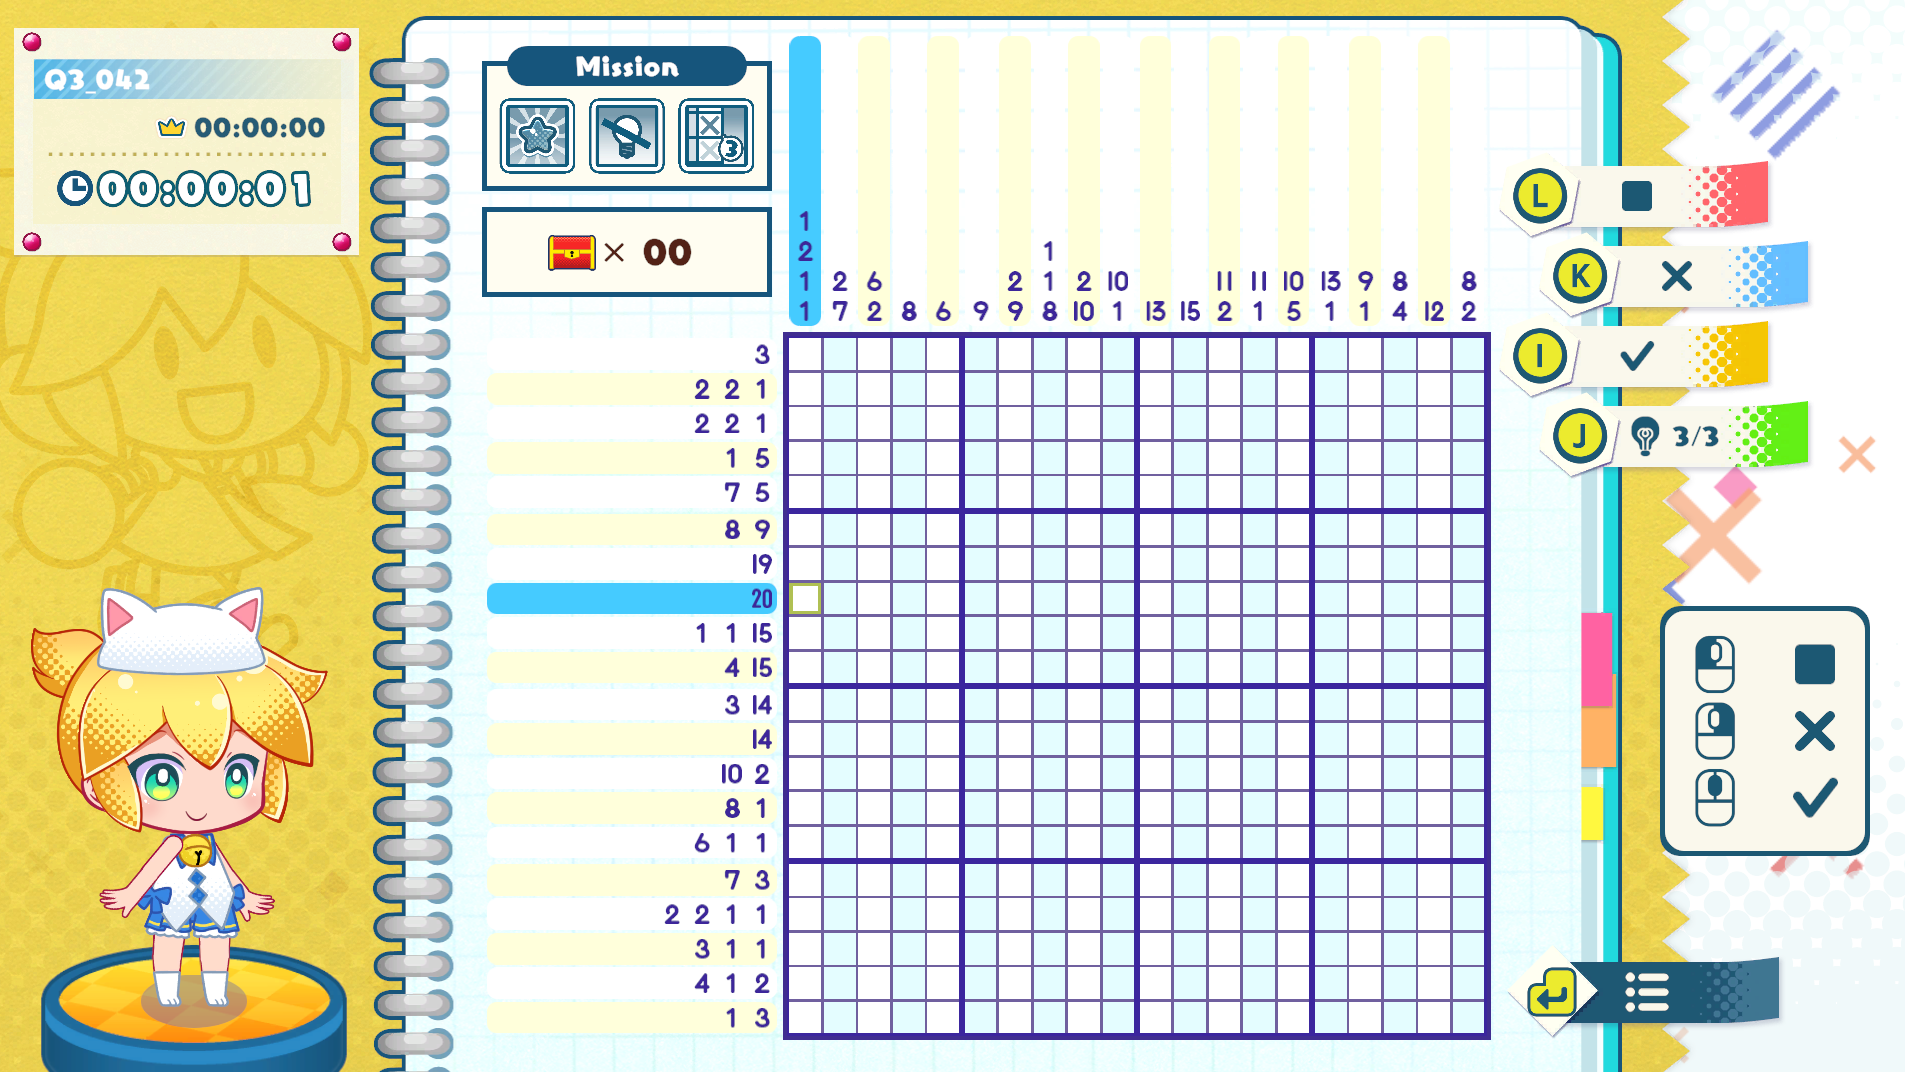
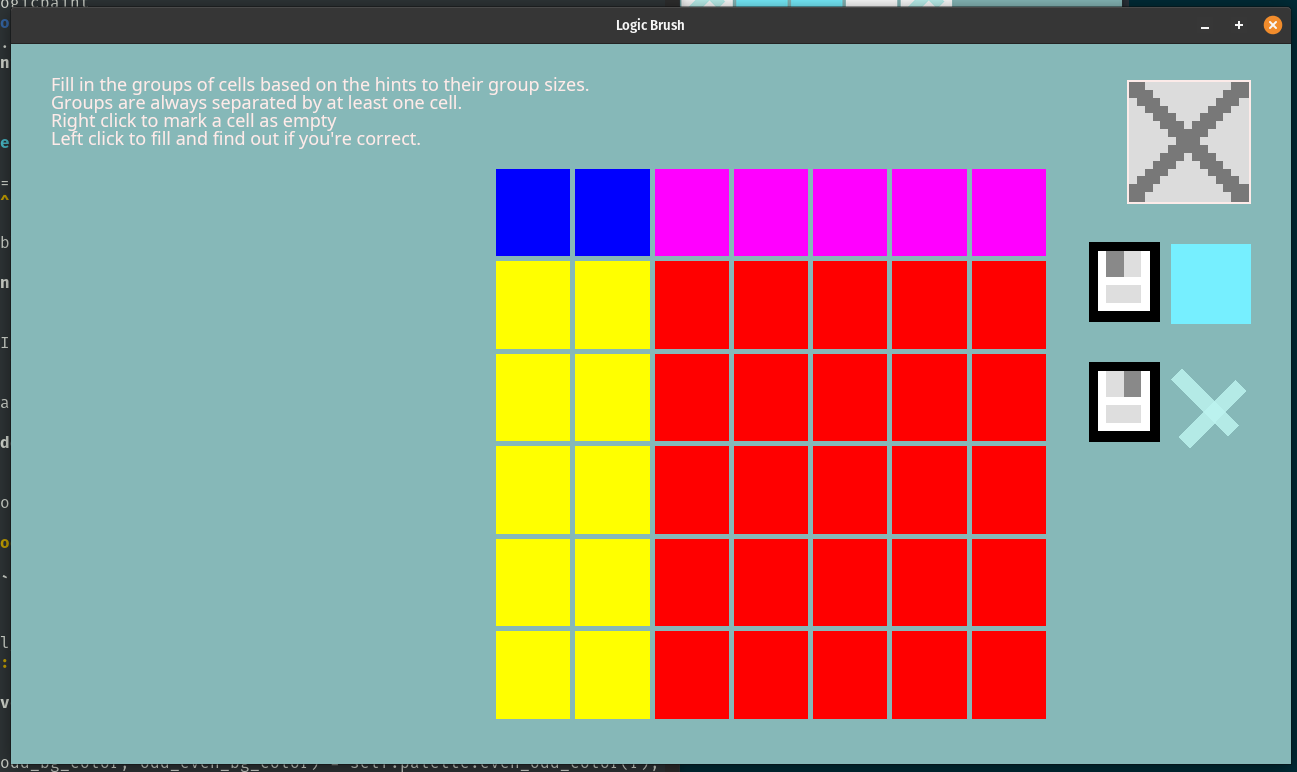
The third and last thing you need to know, is what the heck a nonogram is, or what picross or logic paint are. They're all the same thing really, and it's just a fun little logic puzzle at its heart. Whether it's a row or column you're observing, you're told that there are N groups of cells within it. Your goal is to guess which cells are filled in that satisfy that constraint.
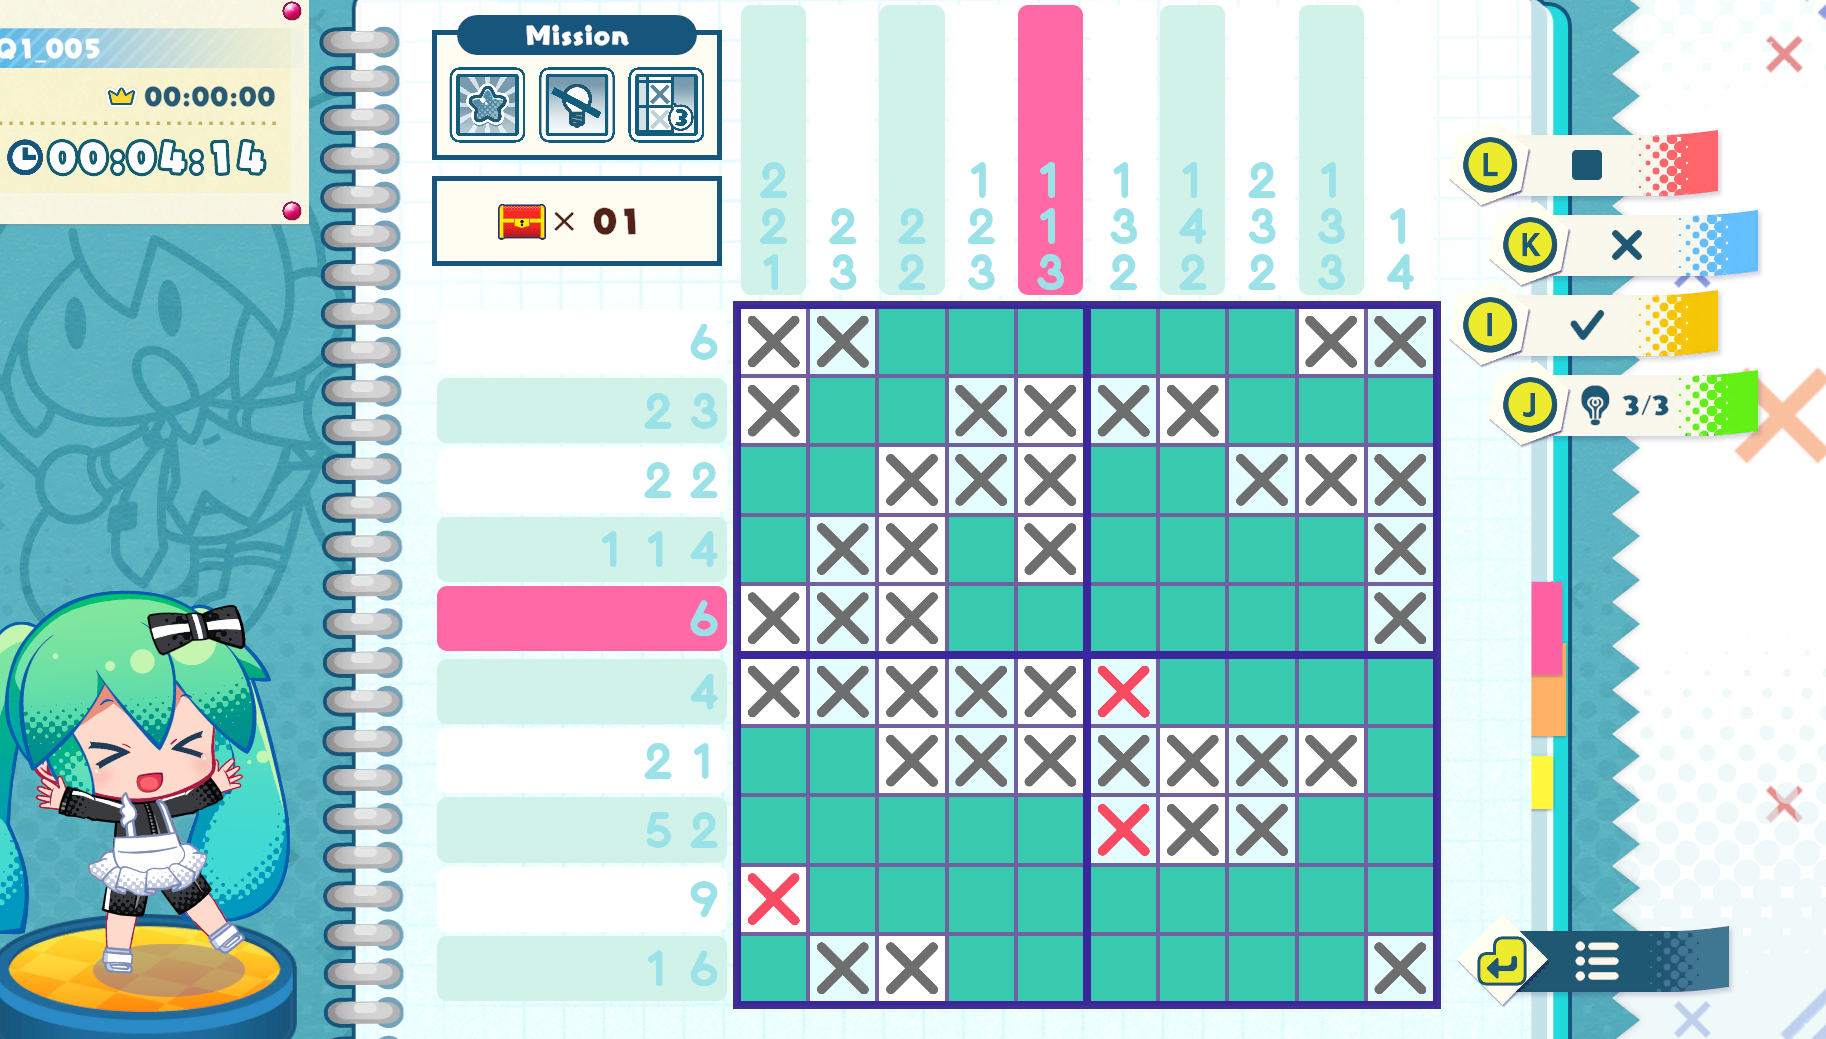
So, as you can see in the highlighted row and column the constraints are 6 cells in a row in one group, and then in the column, three groups of 1, 1, and 3. Of course, when the game starts, you have nothing on the grid at all, and so you have to use logic to paint in the cells. You could guess of course, but a proper nonogram puzzle has 1 solution and it's a unique solution that a user can discover without having to make any guesses at all.
And with all that out of the way, I think we can jump into figuring out how to make the level editor be something that can actually edit existing levels.
Loading and editing existing levels ↩
Now, it's not actually hard for us to convert a given file into the structs we need. I already have code that does this that we use in the primary game to load up all the levels:
pub fn load_level(level_file: PathBuf) -> LevelsLoadResult<Level> {
    let contents = read_to_string(&level_file).map_err(|e| LevelLoadError::Io {
        path: level_file.clone(),
        source: e,
    })?;

    let completed = contents.trim() == "1";

    let pbm_path = level_file.with_extension("pbm");
    let ppm_path = level_file.with_extension("ppm");

    let pbm: Pbm = read_to_string(&pbm_path)
        .map_err(|e| LevelLoadError::Io {
            path: pbm_path.clone(),
            source: e,
        })?
        .parse()
        .map_err(|e| LevelLoadError::ParsePbm {
            path: pbm_path.clone(),
            source: e,
        })?;

    let ppm: Ppm = read_to_string(&ppm_path)
        .map_err(|e| LevelLoadError::Io {
            path: ppm_path.clone(),
            source: e,
        })?
        .parse()
        .map_err(|e| LevelLoadError::ParsePpm {
            path: ppm_path.clone(),
            source: e,
        })?;

    Ok(Level {
        info: pbm,
        image: ppm,
        completed,
        path: level_file.clone(),
    })
}
As you can see by the use of parse and ? we have implementations of
FromStr defined for the PBM and PPM structs to parse the string contents of a file
into the structs I've shared in the previous section. We also have implementations of std::error::Error
and Display for our error enum so that we can write easy to read code that early
returns when something goes wrong. The enum we're using is decently comprehensive about what's
going on:
pub enum LevelLoadError {
    Io {
        path: PathBuf,
        source: std::io::Error,
    },
    ParsePbm {
        path: PathBuf,
        source: LoadPbmErr,
    },
    ParsePpm {
        path: PathBuf,
        source: LoadPpmErr,
    },
    InvalidDirectory(PathBuf),
}
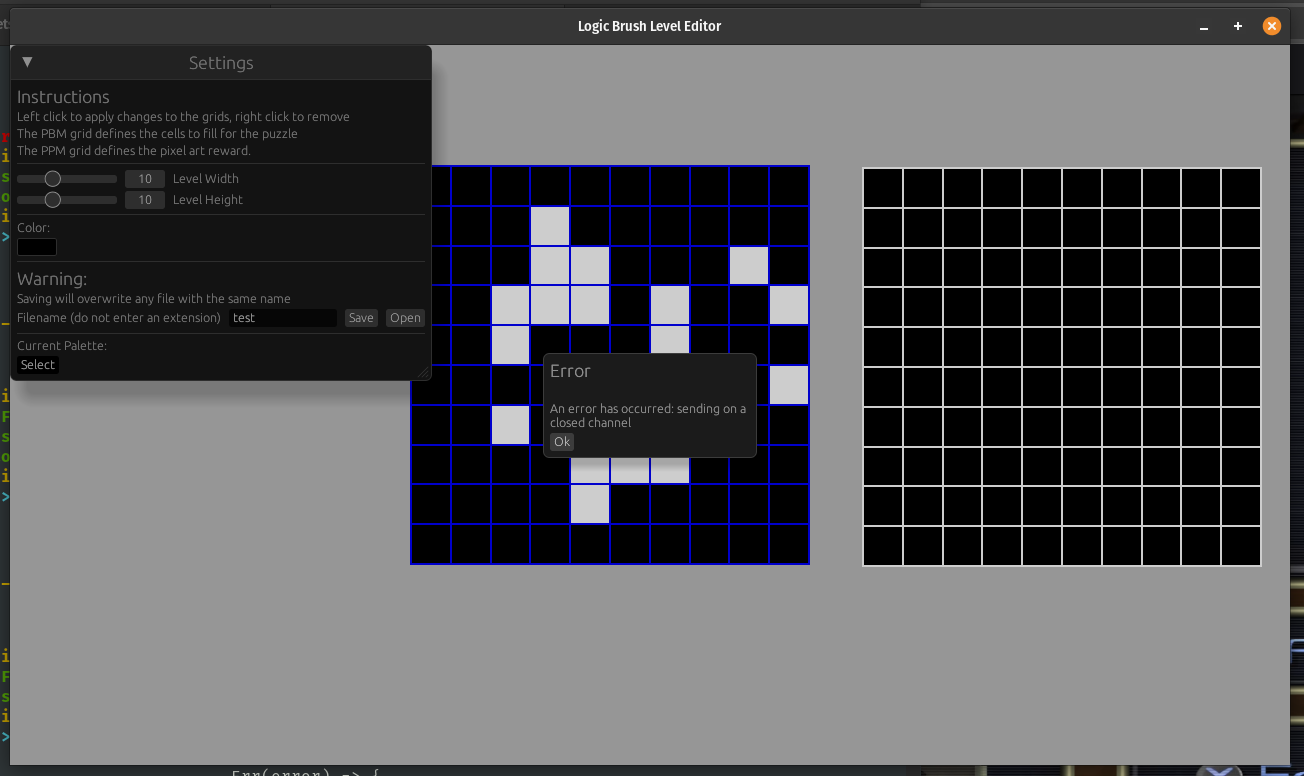
And this allows us to bubble things up to our pop up code if and when something happens, like if you run the editor somewhere there's no level folder to save to:

So really, the only thing missing for loading the files on behalf of an editor is the actual UI controls to do so. And that's where our rubber hits the road on decisions to make. Looking at the egui website, there isn't anything calling out a file dialog as an option.
So my first instinct, powered by NIH, is to use the Tree components to list off directories starting near the currently running path of the executable. That would work, be crossplatform, and require no additional dependencies. But also, it would mean that the typical OS dialogs that one is used to using for file selection would be ignored, and that's not really what I want to do. I think IntelliJ does something like this with its project picker, and I always really hate how I lose all my bookmarks and shortcuts when I use it. It makes you manually click up and down arrows to traverse your system, and it's just a pain.
Assuming that I just needed to look harder, I did a quick search of the repository and spotted a few things. The most obvious being the question we just asked in the readme:
### How do I create a file dialog?
…ee example app here https://github.com/woelper/egui_pick_file
which also has a demo available via [gitub pages](https:…
Following that link to the egui_pick_file repository I can see we've got a 3 year old project that uses rfd to display a file dialog. This seems promising, because even if the 3 year old repo is a bust, we at least have a reference to the underlying library we can use instead. Looking in its toml file I see the example is pretty old:
[dependencies]
egui = "0.25"
eframe = { version = "0.25", default-features = false, features = [
    "accesskit",     # Make egui compatible with screen readers. NOTE: adds a lot of dependencies.
    "default_fonts", # Embed the default egui fonts.
    "glow",          # Use the glow rendering backend. Alternative: "wgpu".
] }
rfd = "0.13"
log = "0.4.19"
As the version that egor 0.10.0 is using is "0.32.3", given that egui is in its
0th major version. Then by the assumed laws of semantic versioning, it can change at any point
and break its API as much as it would like since it's an alpha and not a 1.x type release. That
said, actually looking at the code
in the repository, it doesn't look that bad.
The most important thing is the use of channels here, that's how it's avoiding hanging the main thread. As a general rule, doing things that stop the world on the main graphics thread is always a bad idea. But, RFD's examples do include a synchronous option:
use rfd::FileDialog;
let files = FileDialog::new()
    .add_filter("text", &["txt", "rs"])
    .add_filter("rust", &["rs", "toml"])
    .set_directory("/")
    .pick_file();
And I can't help myself. I want to know how bad it is if we do that. We can add
the library easily eonugh, and the way I have the settings window set up is that
there's a struct that tracks the various settings you see such as the current
width, palette, and other aspects of the editor. I use a ui method
to consolidate all the UI related to any mutable changes to the struct, so naturally,
that's where we can add our terrible idea:
// In my terminal
$ cargo add rfd

// in my editor_settings file
impl LevelSettings {
    ...
    pub fn ui(&mut self, ui: &mut Ui) -> UiActions {
        ...
        if ui.button("Unleash Hell").clicked() {
            let files = FileDialog::new()
                .add_filter("text", &["txt", "rs"])
                .add_filter("rust", &["rs", "toml"])
                .set_directory("/")
                .pick_file();
            eprintln!("{:?}", files);
        }
        ...
    }
}
This… isn't as bad as I thought it'd be. Honestly, if I don't click into the window
and try to click on the now unresponsive grid, I don't even get that unresponsive warning.
But still, we should be good and avoid spawning that dialog on the main thread so we don't
tie things up. Thankfully, channels aren't really that hard to work and we can just use the
good ol mpsc (multiproducer, single consumer) type of channel to create a
dedicated worker thread.
But before we do that, let's confirm that if we use a new thread and some channels we don't block the egui event loop. Refreshing my memory with this quick example, we can whip up some test code really quick. First off, to keep things mostly decoupled across the ui helper methods, I'll update my enum that signals what action to take with a new one:
pub enum UiActions {
    Nothing,
    SaveLevel,
    RecomputePalette,
    OpenLevel,
}
Then nix the previous synchronous file dialog code and make the button text say "Open" instead of "unleash hell". In the main code checking those action signals, a simple handler that spawns a new thread every time we need a dialog will suffice to do the check we want, then if it works, we can setup a dedicated worker thread. But first,
use std::thread;
use std::sync::mpsc::{ Receiver, Sender, channel };
use std::path::PathBuf;
...
let mut io: (Sender<PathBuf>, Receiver<PathBuf>) = channel();
App::new()
    .window_size(1280, 720)
    .title("Logic Brush Level Editor")
    .run(move |frame_context| {
        ...
        if let Ok(to_open) = io.1.try_recv() {
            eprintln!("Open plz {:?}", to_open);
        }
        ...
        Window::new("Settings")
            .anchor(Align2::LEFT_TOP, egor::app::egui::Vec2::ZERO)
            .default_size([100.0, 500.0])
            .show(egui_ctx, |ui| {
                match level_settings.ui(ui) {
                    UiActions::OpenLevel => {
                        let sender = io.0.clone();
                        std::thread::spawn(move || {
                            let files = FileDialog::new()
                                .add_filter("level", &["level"])
                                .set_directory("/") // TODO set to startup area
                                .pick_file();
                            if let Some(file) = files {
                                let _ = sender.send(file);
                            }
                        });
                    }
                    ...
                }
            });
    });
And now we can open a dialog and still interact with the editor. No freezes!
But creating a new thread every time we need to do this isn't the best idea. There are some notes about macs specifically that seem to suggest that we need to be careful about this. So, what we can do is simply spawn the thread ahead of time and have a sort of worker loopy dude who will listen to messages from our egui update loop and it should all work out.
My current code has actually been sort of… Naughty? I guess, in that I do actually do file IO on the main thread whenever we save the game. But I'm not here to try to refactor that right now, so, as far as the messages go that we need to pass between the two threads, let's just keep things simple:
pub enum IOWorkerRequest {
    OpenFileDialog,
    Shutdown,
}

pub enum IOWorkerResponse {
    IoOpenChoice(PathBuf),
}
You'll note that I'm not returning an option here. Because if the user cancels the dialog and decides to not select anything, then why should I even bother sending a message over to the main thread and wasting its time? That's right, let's not. Now, we could wrap things up in a struct and pass it around and etc etc, but I think that, since channels are built into the language, we can just use those until we run into a situation that demands otherwise:
fn spawn_io_worker(start_directory: PathBuf) ->  (Sender<IOWorkerRequest>, Receiver<IOWorkerResponse>) {
    let (main_thread_sender, main_thread_reciever) = channel::<IOWorkerRequest>();
    let (worker_thread_sender, worker_thread_reciever) = channel::<IOWorkerResponse>();
    thread::spawn(move || {
        while let Ok(request) = main_thread_reciever.recv() {
            match request {
                IOWorkerRequest::Shutdown => break,
                IOWorkerRequest::OpenFileDialog => {
                    let selected_file = FileDialog::new()
                        .add_filter("level", &["level"])
                        .set_directory(&start_directory)
                        .pick_file();
                    if let Some(file) = selected_file {
                        match worker_thread_sender.send(IOWorkerResponse::IoOpenChoice(file)) {
                            Ok(something) => {
                                eprintln!("OK: {something:?}");
                                // TODO dont break things
                                break
                            },
                            Err(error) => {
                                // TODO
                                break;
                            }
                        }
                    }
                },
            }
        }
    });
    (main_thread_sender, worker_thread_reciever)
}
I'm being a bit verbose here. The general pattern I often see is using tx and rx
for the transmitting sender channel and receiving channel. While I'm not allergic to the general "we are afraid
to have variables that are longer than 8 characters" feeling, I find it somewhat useful to be a bit more verbose
when I'm working with two channels at the same time. Though I guess something like main_cmd and worker_cmd and
friends would work too. Anyway, in my main.rs before the egui event loop starts up we add the start up
let base = base_dir();
let (io_sender, io_reciever) = spawn_io_worker(base);
And base_dir is my own platform agnostic code that figures out exactly where the binary
is currently running. This at least sets us up to not force the user to click 5000 times to navigate
from their / path down. The updates within the egui event loop are basically swapping out what we
already had with interactions with our new io sender/receiver channels. The only new thing here is that
we're sending along a shutdown method when the user hits escape and we shut the program down:
if frame_context.input.key_pressed(KeyCode::Escape) {
    let _ = io_sender.send(IOWorkerRequest::Shutdown); // I dont care if this fails, the program is stopping.
    std::process::exit(0);
}

if let Ok(io_response) = io_reciever.try_recv() {
    match io_response {
        IOWorkerResponse::IoOpenChoice(to_open) => {
            eprintln!("Open plz {:?}", to_open);
        }
    }
}
And this all works as expected, and the break I've left inside of the
io worker thread on either path allows us to see the error state of the
system, not just the happy path.
OK: ()
Open plz "/home/peetseater/src/personal/logicpaint/levels/ringbell.level"
Uh oh SendError { .. }
This is important, because while this is all still working with the code we already had
before, it gives us an easy way to test bad things happening. In the case of a busted
io worker, we should probably shut down since not being able to open files anymore is
not the best state to be in. Especially if we refactor things to push out saving into
the dedicated IO thread. Luckily for me, I already have a PopUp struct
we can use to easily a message to the user like you'd mostly expect.
UiActions::OpenLevel => {
    match io_sender.send(IOWorkerRequest::OpenFileDialog) {
        Ok(_) => {}
        Err(error) => {
            save_pop_up = Some(PopUp {
                heading: "Error".to_owned(),
                msg: format!("An error has occurred: {}", error).to_owned(),
                visible: true,
            });
        }
    }
}
Is this the most user friendly error? No. Not really, but I can workshop the error
string as needed. More importantly, let's figure out what to actually do
with our PathBuf we get from the file dialog. Now, obviously,
load_level takes a path, and so we can create a level. Duh. But what
after that? And what about before that? If load_level fails, then…
if let Ok(io_response) = io_reciever.try_recv() {
    match io_response {
        IOWorkerResponse::IoOpenChoice(to_open) => {
            match load_level(to_open) {
                Err(error) => {
                    save_pop_up = Some(PopUp {
                        heading: "Error".to_owned(),
                        msg: format!("Could not load level: {}", error).to_owned(),
                        visible: true,
                    });
                },
                Ok(level) => {
                    load_level_in_editor(level, &mut level_settings, &mut grids);
                }
            }
        }
    }
}
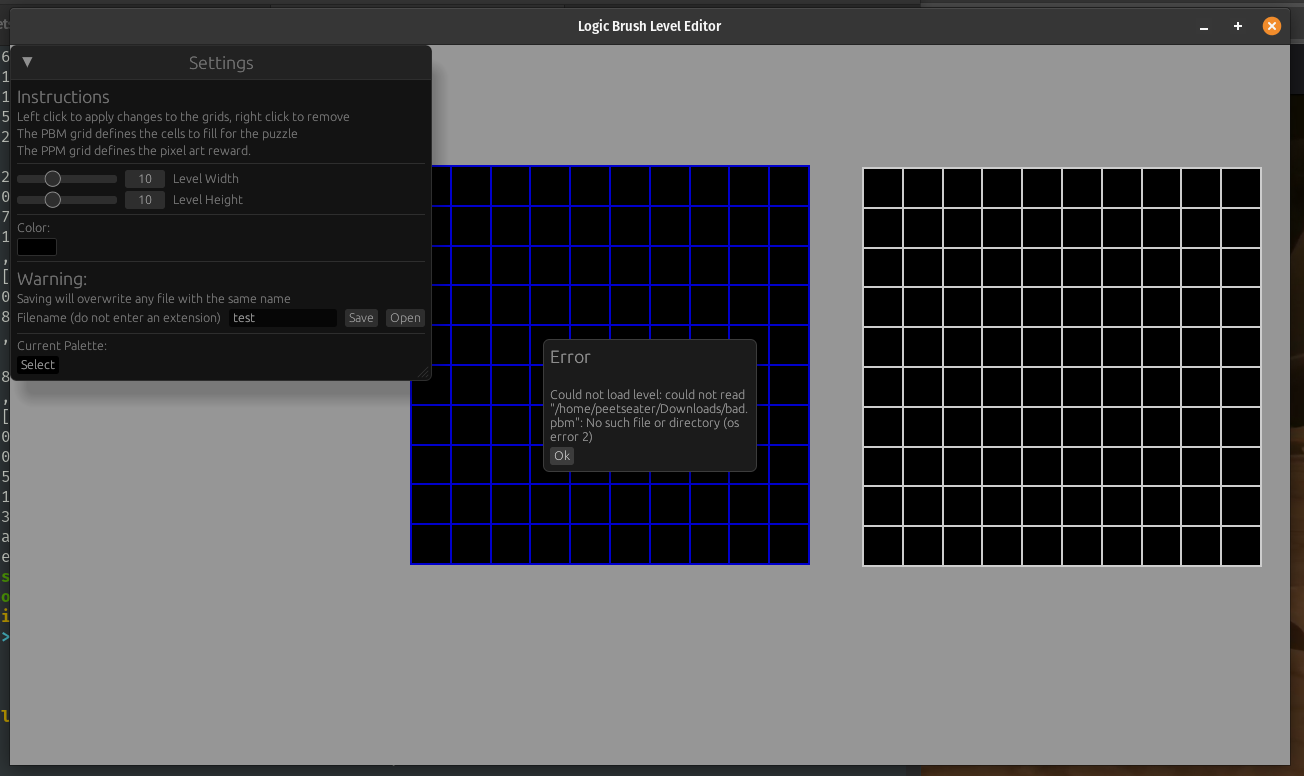
The work I did in the original post to make the errors useful is paying off. The image above shows what happens if you try to load a level file that doesn't have a pbm file next to it. Pretty descriptive I think. Now, onto the the success case. In order to load the level into the editor, we need to update the state of the two grids we're displaying, and also ensure that the width, height, filename, and other properties of the editor settings are all correct.
As you're missing a little bit of context still, the editor grids don't actually store a proper pbm or ppm, rather, we just store what becomes it:
pub struct EditorGrids {
    pub pbm_grid: Vec<Vec<bool>>,
    pub ppm_grid: Vec<Vec<[f32; 4]>>,
    pub size: Vec2,
    pub top_left: Vec2,
}
The reason for this is that it makes it easier for the user to change the height and width on the fly. The two grids are both 20x20 always, it's just a matter of controlling what we show to the user in the visible area. That's controlled by the current settings:
pub struct LevelSettings {
    pub width: usize,
    pub height: usize,
    pub filename: String,
    pub current_color: [f32; 4],
    pub palette: Vec<[f32; 4]>,
    pub max_colors: usize,
}
So, as you can probably imagine. Loading the level is just a matter of setting these to the appropriate
values. It's not so hard to do, since we already have mutable references to the data and a bunch of handy
helper methods defined for both PBM and PPM! Specifically, the rows method on both gets us
exactly what we need. And the to_rgba helper easily converts from the ppm format of integral
numbers to an f32:
impl EditorGrids {
    pub fn load_level(&mut self, level: &Level) {
        for (r, row) in level.info.rows().into_iter().enumerate() {
            for (c, b) in row.into_iter().enumerate() {
                self.pbm_grid[r][c] = b;
            }
        }
        for (r, row) in level.image.rows().into_iter().enumerate() {
            for (c, triplet) in row.into_iter().enumerate() {
                self.ppm_grid[r][c] = level.image.to_rgba(triplet);
            }
        }
    }
    ...
Similar, in the LevelSettings struct, we can define a similar method:
impl LevelSettings {
    pub fn load_level(&mut self, level: &Level) {
        self.filename = level
            .path
            .file_stem()
            .map(|os| os.to_string_lossy().to_string())
            .unwrap_or(String::from("unknown"));
        self.width = level.info.width;
        self.height = level.info.height;
    }
    ...
The level settings width control the visible portion of the grids, you might ask why I don't track this info in the grids instead, or why I don't use the width and height of the grid's rows and columns. Easy, because when they're independent of each other, we can do fun things like this:
This video is from an early iteration, which is why the UI looks different. But the concept is the same.But you'll notice I'm not setting the palette in our load function though. Not because I can't do this, but because if I do it one level up, it's much easier and can re-use the helpers I already have defined:
fn load_level_in_editor(level: Level, level_settings: &mut LevelSettings, grids: &mut EditorGrids) {
    grids.load_level(&level);
    level_settings.load_level(&level);
    level_settings.refresh_palette_with(grids.unique_colors());
}
And with that, we have a functional way to open and edit levels:
While there are still some minor tweaks we could do related to this work. I think that we've got what we set out for, so let's move onto the next task. It's a bigger one for sure, but we'll tackle it just like we did the last one. One step at a time.

Strategies for solving nonograms ↩
Welcome to part of the core reason why I made my logic paint game in the first place. The miku logic paint game is really cute, and fun, and it's also the first time I've ever played a nonogram game properly. Like, I've heard about picross from a friend of mine who's obsessed with them. And I think I've ever been given some form of the puzzle in the past in mini-games in some games I've played.
But as I was playing them, thinking to myself, ah yes, because of this and that you know that there must at least be one cell filled in… here. And it was pretty satisfying, as I was playing the pattern matching started kicking in, and so I started finding myself with a list of rules of sorts to fall back on to hunt for fully constrained cells.
For example, the two most obvious cases are
- A line has 0 groups
- A line's length and its clue's count is the same
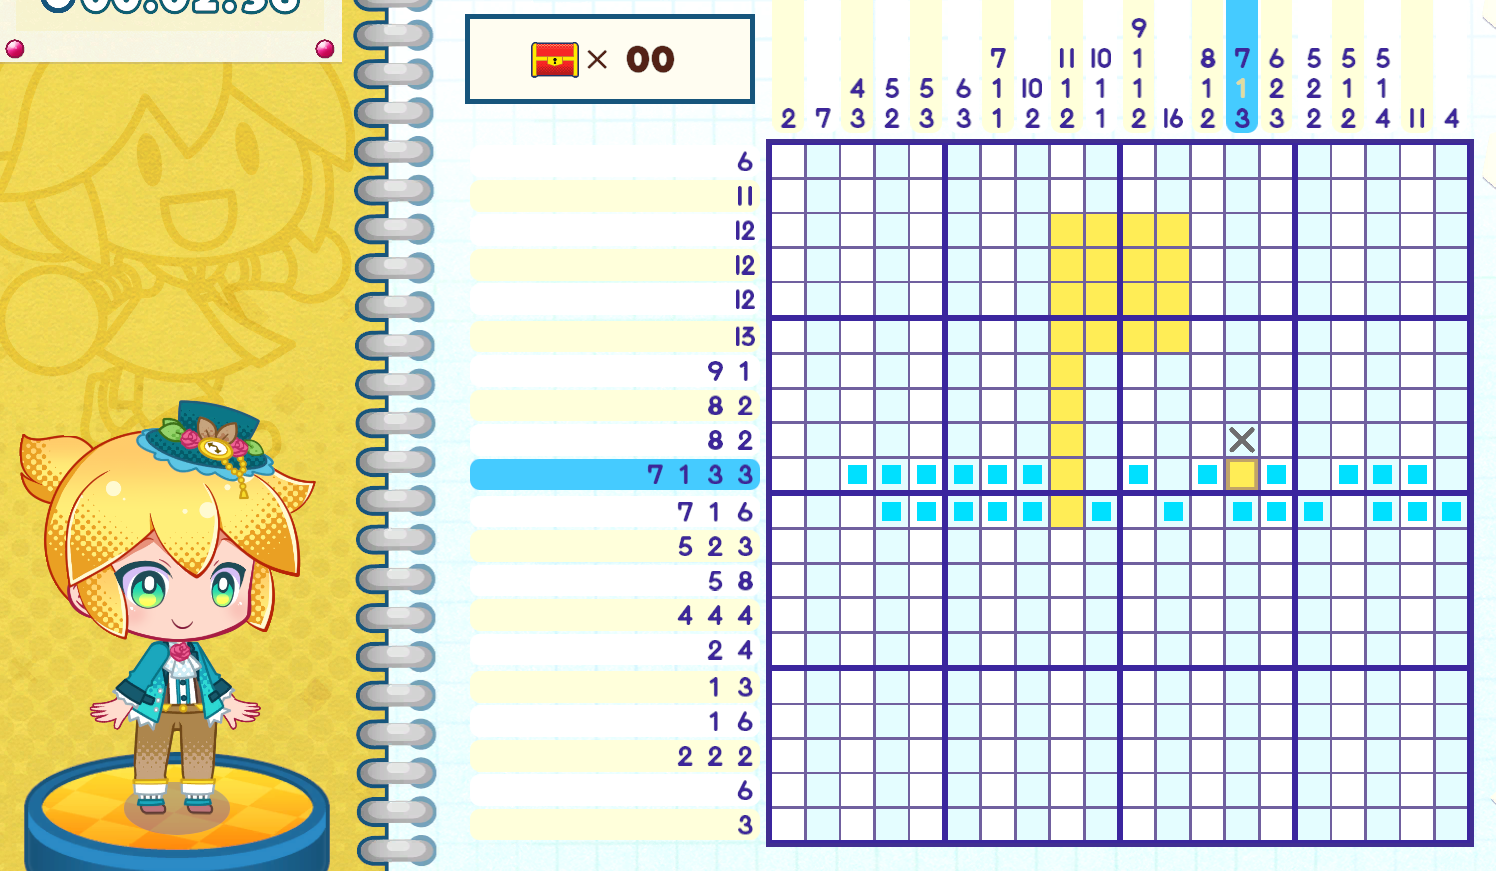
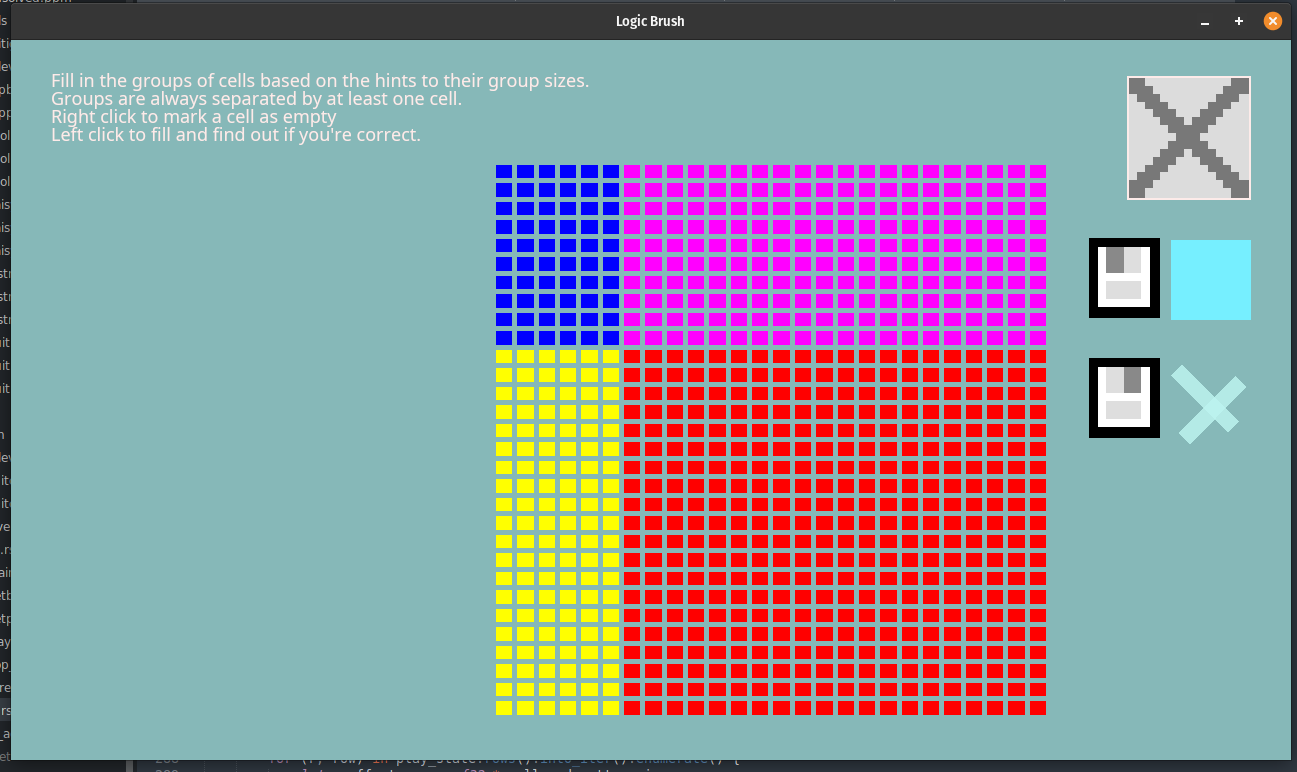
Any one who reads the instructions on how these games work understands those two. But, what one typically figures out next is what you can see here on row 10, two lines underneath the cell highlighted in this image:
There's a clue that there are two groups, a 4 and a 15. They must be separated by at least one cell, which means that if you count up the total constraints here you'll see we've accounted for all 20 cells in the line. So, obviously and only, the row must be filled in from the left for four blocks, skip one, then the rest filled in. So this leads us to a new rule
- If grouped cell count + dividers = available empty spaces, fill it in
This helps solve a pretty solid class of puzzles, though you still need to do some degree of backtracking and searching when there aren't any obvious things available. But the way you figure out how to get to the point where you can make the deduction is by considering different patterns of constraints.
For example, in the row above the highlighted cell in the above image, it says there are 19 cells filled in. Can I fill in the entire group? No. Not at all, but I can fill in 18 cells, so long as I don't go beyond my known bounds. And there's sort of a formula for this. It's sort of a weird guy that gets constrained mostly by even numbers, but it does work. Consider this:
| 3 |
If this is a line of 5, with a group of 3 cells in it, you know that the middle is fillable. This might be visually intuitive, but as far as figuring it out goes, your mind is probably doing something like this:
| 3 |
| 3 |
| 3 |
Besides feeling positively Christmas-y, the red and green pattern makes it (hopefully) obvious and apparent that if you have a pattern of cells that can be applied, and you consider the combinations it may do so, then anywhere every single pattern agrees there must be a cell: there must be a cell.
And the neat thing is that this works across multiple groups! If you can determine that within the bounds of a set of groups, they all agree that a cell is filled, then even though you might not know which group it belongs to, you can still fill it in now, which of course then further constrains other lines around it and then results in you being able to figure things out more and more. Here's an example from the miku game I ran into last night:
I had found the highlighted cell, then because I know it's not the 1 group, it must be the 7
since you can't fit a 7, 1, and 3 together before the cell I already have:

So if I count from the other side, assuming the two 3 groups start from either side,
then they agree on one particular cell, which I then fill in:
This is actually how difficulty in nonogram puzzles works. An easy puzzle is one which you can lock down cells quickly, while the harder puzzles require more iterative steps to discover the known cells that then unlock more known cells. Either way, we have another rule:
- If all possible patterns of a group agree on a cell placement, it should be filled
And these four rules basically are all we need I think. Other sorts of inductive reasoning basically boils down to applying these in sequence. And, if one couldn't possibly fill in any other cells, then you could always resort to the worst option: full enumeration of the remaining possibilities. But if one does that, then you still at least have a proper starting point so long as a puzzle only has one solution. I don't think it'd be fair to give a puzzle that has more than one solution, especially if we're trying to align it to a cute picture like the miku game.
Everything I just said is stuff I figured out as I played the game, and I think we could make a decent solver with it. But, out of an abundance of curiosity, I ended up looking around for research papers related to nonograms and I found this one from 2013 called An Efficient Approach to Solving Nonograms3 and noticed something horrifying! The keywords for the paper:
Index Terms—Backtracking, fully probing (FP), nonogram, NP-completeness, painted by number, puzzles

NP-completeness?! Oh no. I've accidentally chosen to make a fun little logic game and stumbled into a wampa cave! Besides staring at the ceiling wondering about why I was so drawn in my playing an NP complete puzzle game, I figured that since solving these, in the general sense, results in an intractably large search space that can't run within a reasonable time (a rough definition of NP-complete if you're not familiar), that it would probably be a good idea to read this paper.
So, I read it, and pestered and bothered my nerd friends with screenshots like these
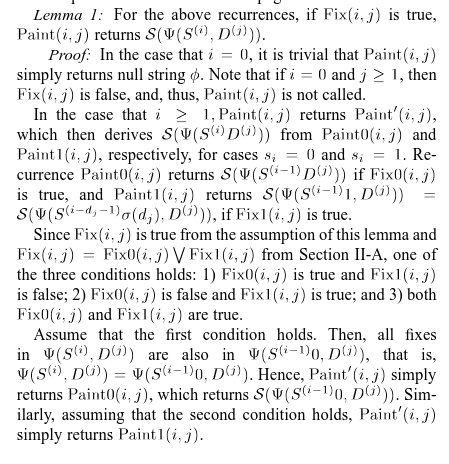
Which, if I'm reading it right, is a ton of literal Greek saying the much simpler English: "we return early to not check dead ends"

I did read through the rest of the paper, trying to make as much sense of it as I could. And I think basically, they do the same rules I just described? But with more prose, symbols, and definitions. It all basically boils down to "solve this line as far as you can" "check it against the others" "keep what sticks". There's obviously more to it since they won a computer olympiad with their algorithm LaLaFrogKK. But I'm probably missing whatever novelty there is to grasp because the terminology is way too dense and I haven't read a research paper since college.
But we've done enough research! Now it's time to tackle this NP-Complete problem with our super power: code!
Solvin' incomplete levels, NP-Completely doable↩
Working backwards first, in the editor we'll want to show some sort of result to the level designer about their puzzle. I'm pretty sure there's really just three states we could potentially be in when we try to run a solver against a game in progress:
pub enum SolvedState {
    Unsolvable,
    UniqueSolution,
    MultipleSolutions,
}
But what does the input to the solver look like in the first place? Obviously, I could re-use some of our code that represents the grid, but the solver doesn't really need to know the goal state or anything, that's cheating. What it actually needs are those group clues, just like a human would have at the start. I suppose it will also need to know the limits of the grid too, how wide and tall the thing is so that we don't go out of bounds anywhere while solving.
So, I really just need to construct an initial game state! The structs for that data look like this:
pub struct PlayState {
    cells: Vec<CellState>,
    pub column_groups: Vec<Vec<Group>>,
    pub row_groups: Vec<Vec<Group>>,
    goal_state: Vec<CellState>,
    num_rows: usize,
    num_columns: usize,
}

pub struct Group {
    pub num_cells: usize,
    pub filled: bool,
}
And! I've also already got an implementation of
impl From<&Pbm> for PlayState {...}
Floating around too! So as far as translating the current editor grid states over to a proper puzzle to be solved, that's easy, it's just two transformations and away we go:
pub fn editor_to_initial_state(level_settings: &LevelSettings, grids: &EditorGrids) -> PlayState {
    let pbm: Pbm = (level_settings, grids).into();
    (&pbm).into()
}
It feels so good when we get to re-use code we already wrote for new things.

Though, I think we do need some new representations though. While having a list of cells like the pbm does is easy to use for the game code, and I'm not paying the price for it at all since everything is so straightforward and simple, that research paper did do something pretty neat in its appendix. Using the bits and bobs of the computer to take a O(kl^2) runtime down to a O(1) operation by just using bitwise operations!
So, while I've got the groups themselves as a higher abstraction, I think we can massage
things down even further by representing the patterns we need to find within the puzzle as
a sequence of bits. Luckily for me, I'm never going to have a puzzle greater than 20 cells
big, which means, that we can just use a u32 to represent a line's pattern.
type LinePattern = u32;
And then we can really simply check the special cases of totally empty and totally full with really simple operations:
// is_empty p == 0
// is_full? p == u32::MAX
Much like the paper, iterating across a vec<bool> takes O(N) but asking the
computer to check out the bits is done in one instruction on modern machines! Woohoo! Ok, and
since we're representing patterns this way, it also means that generating a bunch of them isn't
going to take up too much space. When I first saw NP-complete, I paused and thought
"oh no, permutations!? This is like advent of code! Oh No!!!", but then I realized that since
we have a fixed set of positions for the clues, that this isn't a permutation problem at all!
It's the name of the class that taught my friends in college (that I never took) about them!
Combinations!
Wait no. Reading the intro to that page says that the order doesn't matter. Order does matter here… but we don't care about ALL the permutations, only the ones that follow the order that the group says to do. You know what, let's put the math jargon aside, whether this is technically a permutation, combination, or a combination of some permutations doesn't really matter. The important thing is that we know that the space is tractable!
If I plug in that there are 5 cells, and we need to fill in 3 of them
this calculator then tells me
that there are 60 permutations… that's definitely wrong. Hold on. I think I need to pull
an Ace Attorney and turn my thinking around here. We're not counting combinations of individual
cells, but rather the groups themselves and to some extent the space between them. So something
like [1 1 0 1 0] is more about the fact that we can shift the last bit of space to
the left and that's a new combination of the groups of 2 and 1.
This is apparently a composition problem and not a combination one. Man. This thing mentions "partitions" too and now I'm wondering if that's actually what we're doing… There's a link to Henry Bottomley's partition calculator output and most importantly, he says that there are sixteen compositions of five. That's a pretty small number! Makes me feel a little better about filling my RAM up with all the possible combinations…
Let's just write some code and see if reality allows for my ignorance of math or not. First off, life will be easier if we make a little helper method to create left aligned bits. Mainly because then we can print these out and compare them to what we think the cells of 1's and 0's should look like.
const MAX_BITS: usize = 32; // this should match to LinePattern. Always!

pub fn bitblock_of(size: usize, at: usize) -> LinePattern {
    assert!(at < MAX_BITS);
    let one_bit_on_the_left = u32::MAX ^ (u32::MAX >> 1);
    let mut base_pattern = 0;
    for _ in 0..size {
        base_pattern = (base_pattern >> 1) | one_bit_on_the_left;
    }
    assert!(size + at - 1 < MAX_BITS);
    base_pattern = base_pattern >> at;
    base_pattern
}
I don't think this is too tricky, but if you're unfamiliar with bitwise operations. We're basically
creating a 1 at the leftmost bit, then shifting it over, then adding in another 1, and
repeating this until we have as many ones at the start of the bit vector as size asked
us to. Then it's just a matter of shifting it over all the way to wherever at asked us
too. Unit tests help illustrate this a bit if my explanation was poor: 4
#[test]
fn bitblock_works_as_expected() {
    let block = bitblock_of(1, 31);
    assert_eq!(0b00000000000000000000000000000001, block);
    let block = bitblock_of(2, 30);
    assert_eq!(0b00000000000000000000000000000011, block);
    let block = bitblock_of(2, 2);
    assert_eq!(0b00110000000000000000000000000000, block);
    let block = bitblock_of(32, 0);
    assert_eq!(0b11111111111111111111111111111111, block);
}

#[should_panic]
#[test]
fn bitblock_panics_as_expected() {
    bitblock_of(33, 0);
}
As you can see, I've included some asserts into the helper to ensure that we don't accidentally
go out of bounds without meaning to. My hope being that this will prevent us from running into any problems
later on, or at least getting a fast failure to dive into the right place to examine.
Now for the next part, recall our last rule from above:
- If all possible patterns of a group agree on a cell placement, it should be filled
We're going to do this recursively because it makes the most sense to me, and later on, if needed, we can probably do some memoization of the data for similar patterns across rows and what have you as an optimization if we need to. As always with recursion, it's kind of important to have a base case, which in our case is the first rule we defined above:
- A line has 0 groups
pub fn generate_line_pattern(remaining_space: usize, groups: &[usize]) -> Vec<LinePattern> {
    // If no groups remain, the line is empty so it can be filled as desired by the caller
    if groups.is_empty() {
        return vec![0];
    }
This will make sense in a moment, but you might be able to infer from the signature's variable names that we're going to be decreasing the amount of space available to be filled over time. As the space decreases, we'll also be able to consider fewer and fewer groups. However, the caller area will be the place where our code is basically asking to find out if there's any roadblocks in its way for sliding rightward. On that note, we can have another base case considered, but this time, rather than returning empty cells to be filled, there's nothing to do, so return nothing at all:
    if remaining_space == 0 {
        return vec![];
    }
But, assuming that we do have some space to fill, and there is a group to slide around
within that space, we can go ahead and pull that group out and any remaining groups with one handy
dandy helper split_first:
    let Some((group, others)) = groups.split_first() else {
        return vec![0];
    };
split_first returns an Option, and specifically None if the list being
split is empty and there's nothing to provide as the first item. But we could technically add an assert
like assert!(false, "This code will never be reached"); if we wanted to because our very first
base case check does this exact check already. I could also technically have pulling the groups out be a way
to do that check, but I prefer the readability of groups.is_empty since this code is recursive
and recursion confuses my brain at last 1 day of the week every week, so on the off chance the day I'm
looking at this code isn't one of the other 6, I want as many helping guide posts as I can get.
All that said, once we have the group, we can easily check one of our other rules! Rule two:
- A line's length and its clue's count is the same
    let size_of_first_group = *group;
    if size_of_first_group == remaining_space {
        return vec![bitblock_of(size_of_first_group, 0)];
    }
You'll notice that we're checking size_of_first_group, which might be a little misleading
since we haven't gotten to the rest of the code yet. But by "first", just think of this as the leftmost
for now. Which is also why our helper to create a run of 1's is creating the pattern being returned here.
If we manage to make it past this point though, we're in the slide things around phase of our function. Remember how in the 3 green, 5 gray example above we slide the 3 blocks from the left to the right? Consider how far you can slide if there wasn't just the one group:
| 2 1 | |||||
| 2 1 |
Not terribly far huh. So, if you're thinking about taking a block of bits and sliding it from left to right, you've got to ensure you reserve enough space for both the group cells and any padding around them, like so:
    let reserved = if others.is_empty() {
        0
    } else {
        others.iter().sum::<usize>() + (others.len() - 1)
    };
And how far will we be able to shift those blocks to the right? As far as we can! So long as we take the size of the actual blocks we're pushing and that reserved space we just mentioned into account:
    let max_shift = remaining_space
        .saturating_sub(size_of_first_group)
        .saturating_sub(reserved);
And here you see how our remaining_space variable is coming into play here. At the start of a
call it will be the entire line, then it will shrink as we lock in the leftmost piece, this will recursively
apply to each group within the line until we've hit our base cases. With all of this in mind, we can look
at the meat of the whole function. The shifting of the leftmost block downward and the running aggregation
of any and all patterns we find while doing so:
    ...
    let base_pattern = bitblock_of(size_of_first_group, 0);
    let mut patterns = Vec::new();

    for inset in 0..=max_shift {
        // If there is no space at all, then skip.
        if max_shift == 0 {
            continue;
        }
        let pattern = base_pattern >> inset;

        // Remaining space AFTER placing first group + separator
        let remaining_after_group = remaining_space
            .saturating_sub(inset)
            .saturating_sub(size_of_first_group)
            .saturating_sub(if others.is_empty() { 0 } else { 1 });

        let other_patterns = generate_line_pattern(remaining_after_group, others);

        let shift = inset + size_of_first_group + 1;
        for other in other_patterns {
            patterns.push(pattern | (other >> shift));
        }
    }
    patterns
}
And there's our recursion finally showing up! I think the variable names should make this mostly followable
if you spend some time studying it. But if it helps, it took me a few hours to bang my head against this
and get all my unit tests passing properly. The max_shift == 0 especially was a funny one to
wrap my head around. I did a good amount of debug printing things like this:
+eprintln!(
+    "Add pattern \n{:032b} to \n{:032b} with shift {shift} to make \n{:032b}",
+    other,
+    pattern,
+    pattern | (other >> shift)
+);
...
Shifting by 1 with remaining_space 5 (max shift: 2)
Add pattern
10000000000000000000000000000000 to
01100000000000000000000000000000 with shift 4 to make
01101000000000000000000000000000
To troubleshoot when construction of helpful patterns like 2 1 within a line of size 5
was misbehaving and to keep track of the shifts and which blocks of the line were being combined.
Importantly though, I also discovered
this extremely useful post about how many actual permutations there are for a nonogram line!
That let me write tests like this:
#[test]
fn confirm_number_of_compositions_aligns_to_formula_test() {
    //(25 - 2 + 1) choose 1 aka
    let patterns = generate_line_pattern(25, &[1]);
    assert_eq!(patterns.len(), 25);

    //(25 - 2 + 1) choose 2 aka
    let patterns = generate_line_pattern(25, &[1, 1]);
    assert_eq!(patterns.len(), 276);

    //(25 - 3 + 1) choose 3 aka
    let patterns = generate_line_pattern(25, &[1, 1, 1]);
    assert_eq!(patterns.len(), 1771);

    //(25 - 4 + 1) choose 3 aka
    let patterns = generate_line_pattern(25, &[1, 2, 1]);
    assert_eq!(patterns.len(), 1540);
}
Which was handy not just for verification of the overall function, but also to prove out that yes, generating all of these values isn't actually that time intensive, even for a line length that's long than any puzzle I allow to be made! Super useful, but not as useful as tests like these which really help to flush things out:
Click here to see all the tests!
#[cfg(test)]
mod pbm_tests {
    use super::*;

    fn print_patterns(patterns: &[u32]) {
        eprintln!("Debug pattern list:");
        for pattern in patterns {
            eprintln!("{:032b}", pattern);
        }
    }
    #[test]
    fn empty_line_handled_correctly() {
        let empty: Vec<usize> = vec![];
        let patterns = generate_line_pattern(1, &empty);
        print_patterns(&patterns);
        assert_eq!(patterns.len(), 1);
        assert_eq!(0, patterns[0]);
    }

    #[test]
    fn can_gen_the_only_option_as_needed() {
        let mut patterns = generate_line_pattern(1, &[1]);
        patterns.sort();
        print_patterns(&patterns);
        assert_eq!(patterns.len(), 1);
        // 1000...
        assert_eq!(bitblock_of(1, 0), patterns[0]);
    }

    #[test]
    fn can_gen_a_10_and_01_type_pattern() {
        let mut patterns = generate_line_pattern(2, &[1]);
        patterns.sort();
        assert_eq!(patterns.len(), 2);
        print_patterns(&patterns);
        // 0100...
        assert_eq!(bitblock_of(1, 1), patterns[0]);
        // 1000...
        assert_eq!(bitblock_of(1, 0), patterns[1]);
    }

    #[test]
    fn can_gen_a_1_across_3_cells_pattern() {
        let mut patterns = generate_line_pattern(3, &[1]);
        patterns.sort();
        print_patterns(&patterns);
        assert_eq!(patterns.len(), 3);
        // 001...
        assert_eq!(bitblock_of(1, 2), patterns[0]);
        // 010...
        assert_eq!(bitblock_of(1, 1), patterns[1]);
        // 100...
        assert_eq!(bitblock_of(1, 0), patterns[2]);
    }

    #[test]
    fn can_gen_two_1s_in_a_3_pattern() {
        let mut patterns = generate_line_pattern(3, &[1, 1]);
        patterns.sort();
        print_patterns(&patterns);
        assert_eq!(patterns.len(), 1);
        // 101
        let one_in_3rd_place = bitblock_of(1, 2);
        let one_in_1st_place = bitblock_of(1, 0);
        assert_eq!(one_in_1st_place | one_in_3rd_place, patterns[0]);
    }

    #[test]
    fn can_gen_two_groups_in_five_example() {
        let mut patterns = generate_line_pattern(5, &[2, 1]);
        patterns.sort();
        print_patterns(&patterns);
        assert_eq!(patterns.len(), 3);
        let one_in_1st_place = bitblock_of(1, 0);
        let one_in_2nd_place = bitblock_of(1, 1);
        let one_in_3rd_place = bitblock_of(1, 2);
        let one_in_4th_place = bitblock_of(1, 3);
        let one_in_5th_place = bitblock_of(1, 4);
        /*  Only valid patterns are:
            11010
            11001
            01101
        */
        let one_one_zero_one_zero = one_in_1st_place | one_in_2nd_place | one_in_4th_place;
        let one_one_zero_zero_one = one_in_1st_place | one_in_2nd_place | one_in_5th_place;
        let zero_one_one_zero_one = one_in_2nd_place | one_in_3rd_place | one_in_5th_place;
        assert_eq!(zero_one_one_zero_one, patterns[0]);
        assert_eq!(one_one_zero_zero_one, patterns[1]);
        assert_eq!(one_one_zero_one_zero, patterns[2]);
    }

    #[test]
    fn can_gen_three_1s_in_a_5_pattern() {
        let mut patterns = generate_line_pattern(5, &[1, 1, 1]);
        patterns.sort();
        print_patterns(&patterns);
        assert_eq!(patterns.len(), 1);
        // 101
        let one_in_5th_place = bitblock_of(1, 4);
        let one_in_3rd_place = bitblock_of(1, 2);
        let one_in_1st_place = bitblock_of(1, 0);
        assert_eq!(
            one_in_1st_place | one_in_3rd_place | one_in_5th_place,
            patterns[0]
        );
    }

    #[test]
    fn can_gen_two_2s_in_a_5_pattern() {
        let mut patterns = generate_line_pattern(5, &[2, 2]);
        patterns.sort();
        print_patterns(&patterns);
        assert_eq!(patterns.len(), 1);
        // 101
        let one_in_1st_place = bitblock_of(1, 0);
        let one_in_2nd_place = bitblock_of(1, 1);
        let one_in_4th_place = bitblock_of(1, 3);
        let one_in_5th_place = bitblock_of(1, 4);
        assert_eq!(
            one_in_1st_place | one_in_2nd_place | one_in_4th_place | one_in_5th_place,
            patterns[0]
        );
    }

    #[test]
    fn can_gen_two_2s_in_a_6_pattern() {
        let mut patterns = generate_line_pattern(6, &[2, 2]);
        patterns.sort();
        print_patterns(&patterns);
        assert_eq!(patterns.len(), 3);
        // 101
        let first = bitblock_of(2, 0);
        let second = bitblock_of(2, 3);
        assert_eq!(first >> 1 | second >> 1, patterns[0]);
        assert_eq!(first | second >> 1, patterns[1]);
        assert_eq!(first | second, patterns[2]);
    }

    #[test]
    fn confirm_number_of_compositions_aligns_to_formula_test() {
        //(25 - 2 + 1) choose 1 aka
        let patterns = generate_line_pattern(25, &[1]);
        assert_eq!(patterns.len(), 25);

        //(25 - 2 + 1) choose 2 aka
        let patterns = generate_line_pattern(25, &[1, 1]);
        assert_eq!(patterns.len(), 276);

        //(25 - 3 + 1) choose 3 aka
        let patterns = generate_line_pattern(25, &[1, 1, 1]);
        assert_eq!(patterns.len(), 1771);

        //(25 - 4 + 1) choose 3 aka
        let patterns = generate_line_pattern(25, &[1, 2, 1]);
        assert_eq!(patterns.len(), 1540);
    }
Since there's so many of them I've wrapped them up in a details
element. Which is a fun little trick I learned from watching a really neat
CSS Talk by Dylan Beattie
that you should totally watch if you like learning neat things about CSS and how to
avoid javascript where it doesn't belong.
Ahem, but we're not here to bash on javascript5! We're here to solve griddlers! So moving right along, we can generate all the potential line patterns for a given set of groups, now we need to actually use them. The goal of course is to take everything, then constrain it as far down as we can, so we'll want to keep track of the rows and column patterns applied to each place like this:
pub struct TheMultiVerseOfLines {
    pub rows: Vec<Vec<LinePattern>>,
    pub columns: Vec<Vec<LinePattern>>,
}
I'm having a little bit of fun with the naming here. But if you think about it, when you're considering a whole bunch of possibilities and trying to collapse them all down to one proper path, it sort of kind of is like some weird quantum universe where you made your decision and now you're stuck with it. So, for now we'll have our fun. Given a play state, our helper can generate all the potential patterns per row:
impl TheMultiVerseOfLines {
    pub fn new(play_state: &PlayState) -> Self {
        let mut multiverse = Self {
            rows: Vec::new(),
            columns: Vec::new(),
        };
        for r in 0..play_state.num_rows {
            let row_groups: Vec<usize> = play_state.row_groups[r]
                .iter()
                .map(|g| g.num_cells)
                .collect();
            let row_patterns = generate_line_pattern(play_state.num_columns, &row_groups);
            multiverse.rows.push(row_patterns);
        }
        for c in 0..play_state.num_columns {
            let column_groups: Vec<usize> = play_state.column_groups[c]
                .iter()
                .map(|g| g.num_cells)
                .collect();
            let column_patterns = generate_line_pattern(play_state.num_rows, &column_groups);
            multiverse.columns.push(column_patterns);
        }
        multiverse
    }
}
Then it's time to do the actual solving part! This isn't the most efficient it could be, but I tried to make things as follow-able as possible because when it comes to doing bitmasking and bitshifting, one tends to try to get clever with it and therein lies bugs. Since we're just starting out, I think it's a good idea to stay simple and test heavily. So, if we keep in mind that all our test patterns are stored in bits, we know that when it comes time to say "does the cell at row R and column C say it should be filled or empty" we'll want to be able to do that easily, and since we're working on lines and constraints, we'll want to say "does cell (r,c) correspond to the right thing for this constraint pattern's (r,c)?"
This terrible pre-amble is my way of saying, we need to be able to tell if two bitstrings have the same bit at the same place:
pub fn bit_agreed_at(line1: LinePattern, line2: LinePattern, idx_1: usize, idx_2: usize) -> bool {
    let bit1 = (line1 >> idx_1) & 1;
    let bit2 = (line2 >> idx_2) & 1;
    bit1 == bit2
}
And bit_agreed_at can be easily tested with a few trial cases:
#[test]
fn bit_agreed_at_works_as_expected() {
    assert!(bit_agreed_at(1, 1, 0, 0));
    let three_on_left_offset_one = bitblock_of(3, 1);
    let three_on_left_offset_two = bitblock_of(3, 2);
    // zero
    assert!(bit_agreed_at(
        three_on_left_offset_one,
        three_on_left_offset_two,
        31,
        31
    ));
    // 1 and 0 disagree
    assert!(!bit_agreed_at(
        three_on_left_offset_one,
        three_on_left_offset_two,
        30,
        30
    ));
    // aligned again with overlap
    assert!(bit_agreed_at(
        three_on_left_offset_one,
        three_on_left_offset_two,
        29,
        29
    ));
}
The logic isn't too crazy here either. Just move whichever bit we're interested in over to the
far right side, then mask it off with 1 (which is all 0's besides the rightmost ...0001)
and check if they're the same. But before we can use it, we'll need one more helper method(s):
pub fn get_assured_row_cells(&self, row_idx: usize) -> (LinePattern, LinePattern) {
    Self::assured_cells(&self.rows[row_idx])
}

pub fn get_assured_column_cells(&self, column_idx: usize) -> (LinePattern, LinePattern) {
    Self::assured_cells(&self.columns[column_idx])
}

fn assured_cells(patterns: &[LinePattern]) -> (LinePattern, LinePattern) {
    let mut all_filled_together = LinePattern::MAX;
    let mut all_empty_together = 0;

    for &pattern in patterns {
        all_filled_together &= pattern;
        all_empty_together |= pattern;
    }

    let must_be_filled = all_filled_together;
    let must_be_empty = !all_empty_together;
    (must_be_filled, must_be_empty)
}
What's an "assured" cell? It's a place where every single pattern agrees that we should definitely fill in a cell based on the available patterns we've got. As you can see we've got a simple one pass that bitwise AND's and OR's the patterns together just like our previous red and green table examples showed us. One really important bit here (haha) though: the places where we know a cell should be empty is filled in with a 1! This will be handy later, promise. What's handy now is confirming we didn't screw anything up, so unit test ahoy:
#[test]
fn get_no_assurances_about_anything_when_not_enough_constraints() {
    let tps = test_play_state();
    let multiverse = TheMultiVerseOfLines::new(&tps);
    let (must_be_filled, must_be_empty) = multiverse.get_assured_row_cells(0);
    let must_fill = 0;
    let empty_first_5 = LinePattern::MAX >> 5;
    // For debugging when fail:
    print_patterns(&[must_fill, must_be_filled, must_be_empty]);
    assert_eq!(must_fill, must_be_filled);
    assert_eq!(empty_first_5, must_be_empty);
}
Without knowing what test_play_state is doing, you're probably nodding your head,
skimming, and not thinking too much about it all. The debug grid we're using is a lovely little
triangle:
#[rustfmt::skip]
fn test_play_state() -> PlayState {
    let pbm = Pbm {
        width: 5,
        height: 5,
        cells: vec![
            true , false, false, false , false,
            true , true , false, false , false,
            true , true , true , false , false,
            true , true , true , true  , false,
            true , true , true , true  , true,
        ]
    };
    (&pbm).into()
}
Small enough to be easily debuggable, but not big enough to cause too many patterns to think about. It's also definitely line solvable, since both row and column 1 are completely filled. Which would make a human very happy since they can just count up from an edge and win. Easy dopamine.
Row 3 is our exact case from our example before though, which is why it makes for a nice test,
since we know that that pattern for being filled in should be 00100 and we can't
know anything about its empty state from an initially empty grid of cells:
#[test]
fn get_assured_row_cells_3_in_5_pattern() {
    let tps = test_play_state();
    let multiverse = TheMultiVerseOfLines::new(&tps);
    let potential = multiverse.get_assured_row_cells(2);
    let must_fill = bitblock_of(1, 2);
    let empty_first_5 = LinePattern::MAX >> 5;
    // For debugging when fail:
    print_patterns(&[must_fill, potential.0, potential.1]);
    assert_eq!(must_fill, potential.0);
    assert_eq!(empty_first_5, potential.1);
}

#[test]
fn get_assured_col_cells_3_in_5_pattern() {
    let tps = test_play_state();
    let multiverse = TheMultiVerseOfLines::new(&tps);
    let potential = multiverse.get_assured_column_cells(2);
    let must_fill = bitblock_of(1, 2);
    let empty_first_5 = LinePattern::MAX >> 5;
    // For debugging when fail:
    print_patterns(&[must_fill, potential.0, potential.1]);
    assert_eq!(must_fill, potential.0);
    assert_eq!(empty_first_5, potential.1);
}
With the ability to get the known cells that should be filled or empty, as well as the ability to check if bits agree between lines, we can finally write our first pass at a row collapse function. If you've played a nonogram puzzle, you know that it takes multiple iterations of checking constraints, and we're going to do that, but not quite yet. This is just a single pass over the available rows:
fn collapse_rows(&mut self) -> bool {
    let mut changed = false; (1)
    for r in 0..self.rows.len() {
        let (must_be_filled, must_be_empty) = self.get_assured_row_cells(r); (2)
        for c in 0..self.columns.len() {
            We are LEFT aligned, so row and column must be translated!
            let number_patterns = self.columns[c].len();
            self.columns[c].retain(|&pattern| {
                let row_bit = MAX_BITS - 1 - r; (3)
                let column_bit = MAX_BITS - 1 - c;
                if (must_be_filled >> column_bit) & 1 == 1 {
                    let fill_agree =
                        bit_agreed_at(must_be_filled, pattern, column_bit, row_bit);
                    if !fill_agree {
                        return false;
                    }
                }
                if (must_be_empty >> column_bit) & 1 == 1 {
                    let empty_agree =
                        bit_agreed_at(must_be_empty, !pattern, column_bit, row_bit); (4)
                    if !empty_agree {
                        return false;
                    }
                }
                true
            });
            changed = changed || number_patterns != self.columns[c].len(); (5)
        }
    }
    changed
}
This is all we need to solve the rows of the nonogram if the puzzle is "line solvable" aka: no guesswork or backtracking forced on the user. As you can tell by my highlighter yellow callouts above, there's a few things of note for you to grasp:
-
We care if trying to constrain the rows ended up changing what patterns in the columns were valid or not.
Visually speaking, if you have a row
10000and the column pattern says that it knows that the first cell should be shaded, then that column pattern is fine and kept, but if the pattern says it should definitely be something else, then you can put on your blue suit, red tie, and point at any nearby passersby and scream "Objection!" and ditch the pattern since it's got a contradiction and should be thrown out of court. 6 -
Since this function is collapsing the multiverse down by rows, we obviously use the
get_assured_row_cellsmethod. If you write the column version, it would use the other. But either way, this gives us the left aligned bit mask for which cells ought to be filled in or empty. - As my comment notes, we're left aligned, so in order to convert the (column, row) space to bits, we need to actually shift away from the left side. So, (0,0) is bit (31, 31) if you've got a mask for a row and column to shift into. Index into? Shift into. Also of import here, that if statement verifying that the current bit we're looking at in the column patterns? Very very important. If we don't do this, we'll collapse everything down to nothing and fail to solve anything. 7
-
Importantly, we must negate the pattern here. The
must_be_emptyhas a 1 whereever there definitely is an empty space. But the pattern will have a 0 for the same. For them to agree on a bit and align, we can flip every bit in the pattern, then compare them. Easy. -
Lastly, as I said, we care in (1) if the number of valid patterns changes. But also, we care about this across
all the rows, so we can't just return early here, that'd waste iterations that we could handle here
if we just keep the loop going and
||the results together as we go along.
In order to actually solve a puzzle we need to constrain the rows by the column groups, and the columns by the row groups. If that trips you up, just remember, row goes horizontal, but each cell is influenced not by other rows, but by the column groups you've got running along the top of the grid:
If you write up a column version yourself, you'll notice very quickly that you end up writing the exact same code as the above, except flipped on its side. I don't like the idea of trying to troubleshoot bugs in similar code if something goes wrong, so I'd rather refactor things a little bit like this:
fn collapse_rows(&mut self) -> bool {
    Self::collapse_lines(&self.rows, &mut self.columns)
}

fn collapse_columns(&mut self) -> bool {
    Self::collapse_lines(&self.columns, &mut self.rows)
}

fn collapse_lines(lines: &[Vec<LinePattern>], patterns: &mut [Vec<LinePattern>]) -> bool {
    let mut changed = false;
    for l in 0..lines.len() {
        let (must_be_filled, must_be_empty) = Self::assured_cells(&lines[l]);
        for p in 0..patterns.len() {
            let valid_patterns = patterns[p].len();
            // This is no longer row and bit, but just source and target sorta, or line and pattern idx
            let line_idx = MAX_BITS - 1 - l;
            let pattern_idx = MAX_BITS - 1 - p;
            patterns[p].retain(|&pattern| {
                if (must_be_filled >> pattern_idx) & 1 == 1 {
                    let fill_agree =
                        bit_agreed_at(must_be_filled, pattern, pattern_idx, line_idx);
                    if !fill_agree {
                        return false;
                    }
                }
                if (must_be_empty >> pattern_idx) & 1 == 1 {
                    let empty_agree =
                        bit_agreed_at(must_be_empty, !pattern, pattern_idx, line_idx);
                    if !empty_agree {
                        return false;
                    }
                }
                true
            });
            changed = changed || valid_patterns != patterns[p].len();
        }
    }
    changed
}
It might not seem better. Maybe it's a bit more confusing to think of line and pattern, rather than row and column, but it's basically the same thing as running the previous row constraining code on a list of potential options where the rows and columns are rotated into each others place. Either way, the important thing is that we can constrain both sides of the equation here, and if we repeat it until the board settles into a steady state, then we've got a solver. Or at I'm referring to it as, a multiverse collapser:

pub fn collapse(&mut self) {
    loop {
        let mut changed = false;
        changed = changed || self.collapse_rows();
        changed = changed || self.collapse_columns();
        if !changed {
            break;
        }
    }
}
If we were writing up NASA grade software, I think we'd want to also include a max loop count here, but until we run into an actual problem, I think we'll let the loop stay as is. I'm fairly certain that the loop will always stop since once all the patterns have converged, you end up with only 1 possible value per row and column, or multiple non-contradicting ones, or none at all! In fact, that's exactly how we can tell if our puzzle is solved or not!
pub fn state(&self) -> SolvedState {
    // If we collapsed and found no options, there is a contradiction
    // or guesswork required, so fail it because we only want line solveable
    // puzzles!
    if self.rows.iter().any(|p| p.is_empty()) {
        return SolvedState::Unsolvable;
    }
    if self.columns.iter().any(|p| p.is_empty()) {
        return SolvedState::Unsolvable;
    }

    // But if each has a unique pattern left, then it is solveable with only 1 way!
    for pattern in &self.rows {
        if pattern.len() > 1 {
            return SolvedState::MultipleSolutions;
        }
    }
    for pattern in &self.columns {
        if pattern.len() > 1 {
            return SolvedState::MultipleSolutions;
        }
    }
    SolvedState::UniqueSolution
}
We could collapse some of these loops into each other, but this isn't really where our
program spends its time. That'd be in collapse code we just wrote. But, with
the ability to check the state, we can write up some unit tests to confirm that collapse
is working as expected!
#[test]
fn has_one_solution() {
    let tps = test_play_state();
    let mut multiverse = TheMultiVerseOfLines::new(&tps);
    multiverse.collapse();
    eprintln!("{multiverse}");
    assert_eq!(SolvedState::UniqueSolution, multiverse.state());
}

#[test]
fn requires_guessing_multi_solution() {
    let tps: PlayState = {
        let pbm = Pbm {
            width: 2,
            height: 2,
            cells: vec![
                true  , false,
                false , true ,
            ]
        };
        (&pbm).into()
    };
    let mut multiverse = TheMultiVerseOfLines::new(&tps);
    multiverse.collapse();
    assert_eq!(SolvedState::MultipleSolutions, multiverse.state());
}
Both of these pass, which is a promising sign. So we can start figuring out how to integrate this with our existing editor code. We could either have a button to run the solve and show the results, or do it each time a user adds in a new square. We could do it before save? There's a number of options and I think the only reason to not do the on-edit type one is if we think this is a slow puzzle solver. So, let's find that out!
As an initial test, we'll just toss the solving on the main thread. Terrible idea. I know! But easy! Let's see here… We'll just toss this into the ui code and since this is a temporary location, we'll just qualify everything and do it quick and dirty:
if input.mouse_released(MouseButton::Left) {
    let pbm: Pbm = (&*level_settings, &*self).into();
    let ps: crate::playstate::PlayState = (&pbm).into();
    let mut possibilities = crate::editor::solver::TheMultiVerseOfLines::new(&ps);
    possibilities.collapse();
    let state = possibilities.state();
    eprintln!("STATE: {state:?}");
}
And then trying to run it and clicking and…
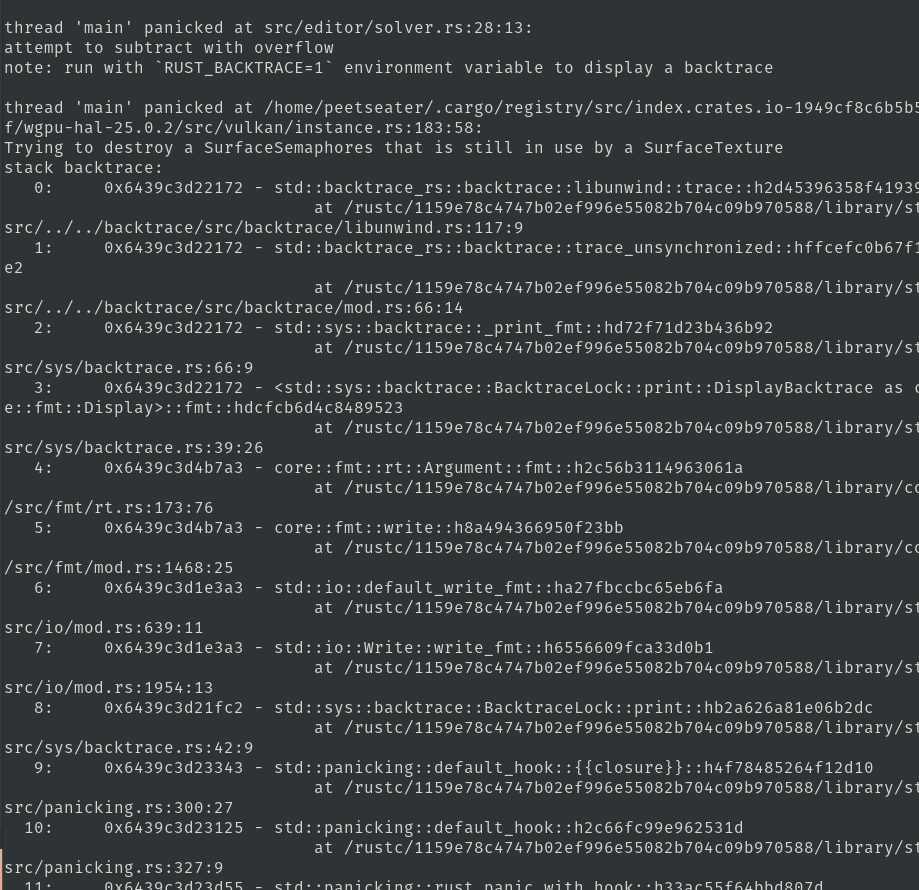
Well, the error location at least points me to this code, and we can add a bit of debugging printlns in:
pub fn bitblock_of(size: usize, at: usize) -> LinePattern {
    assert!(at < MAX_BITS);
    let one_bit_on_the_left = u32::MAX ^ (u32::MAX >> 1);
    let mut base_pattern = 0;
    for _ in 0..size {
        base_pattern = (base_pattern >> 1) | one_bit_on_the_left;
    }
    eprintln!("expected {size} + {at} - 1 to be less than {MAX_BITS}");
    assert!(size + at - 1 < MAX_BITS, "expected {size} + {at} - 1 to be less than {MAX_BITS}");
    base_pattern = base_pattern >> at;
    base_pattern
}
And this prints out
expected 0 + 0 - 1 to be less than 32
thread 'main' panicked at src/editor/solver.rs:29:13:
Well, I suppose that makes sense. But also. Why the heck is that happening? Oh. Duh.
When you're making a level, a whole bunch of groups are empty! So when we call
generate_line_pattern and try to do stuff like bitblock_of(size_of_first_group, 0)
then it gets a 0. And this means…
Yup. If I click and drag all the way across so that every row and column gets a group, it doesn't crash and instead all the blocks are made and, hey look at that, a unique solution. Besides the obvious bug we need to fix, that was fast. I was originally thinking I might need to put this onto a worker like we did the IO, but maybe not!
Anyway, we can special case this
pub fn generate_line_pattern(remaining_space: usize, groups: &[usize]) -> Vec<LinePattern> {
    ...
    let size_of_first_group = *group;
    if size_of_first_group == 0 {
        return vec![0];
    }
    ...
}
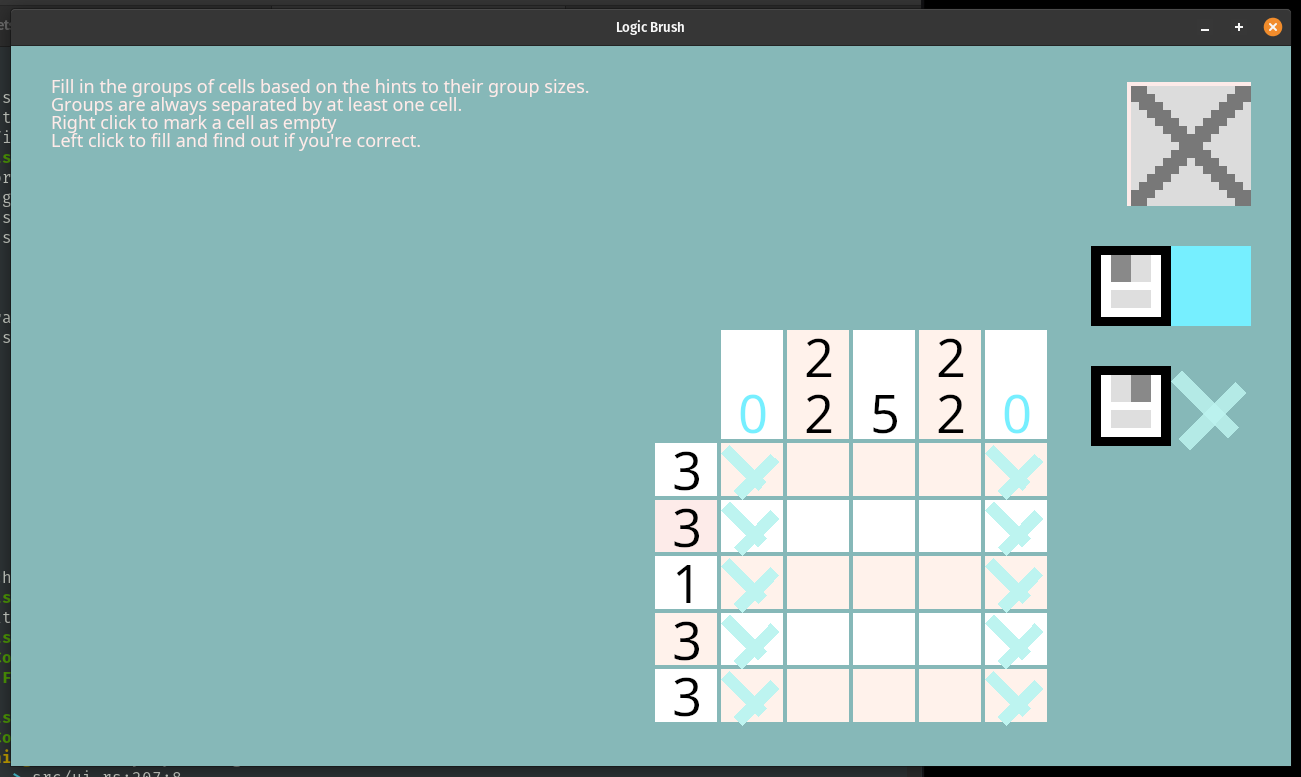
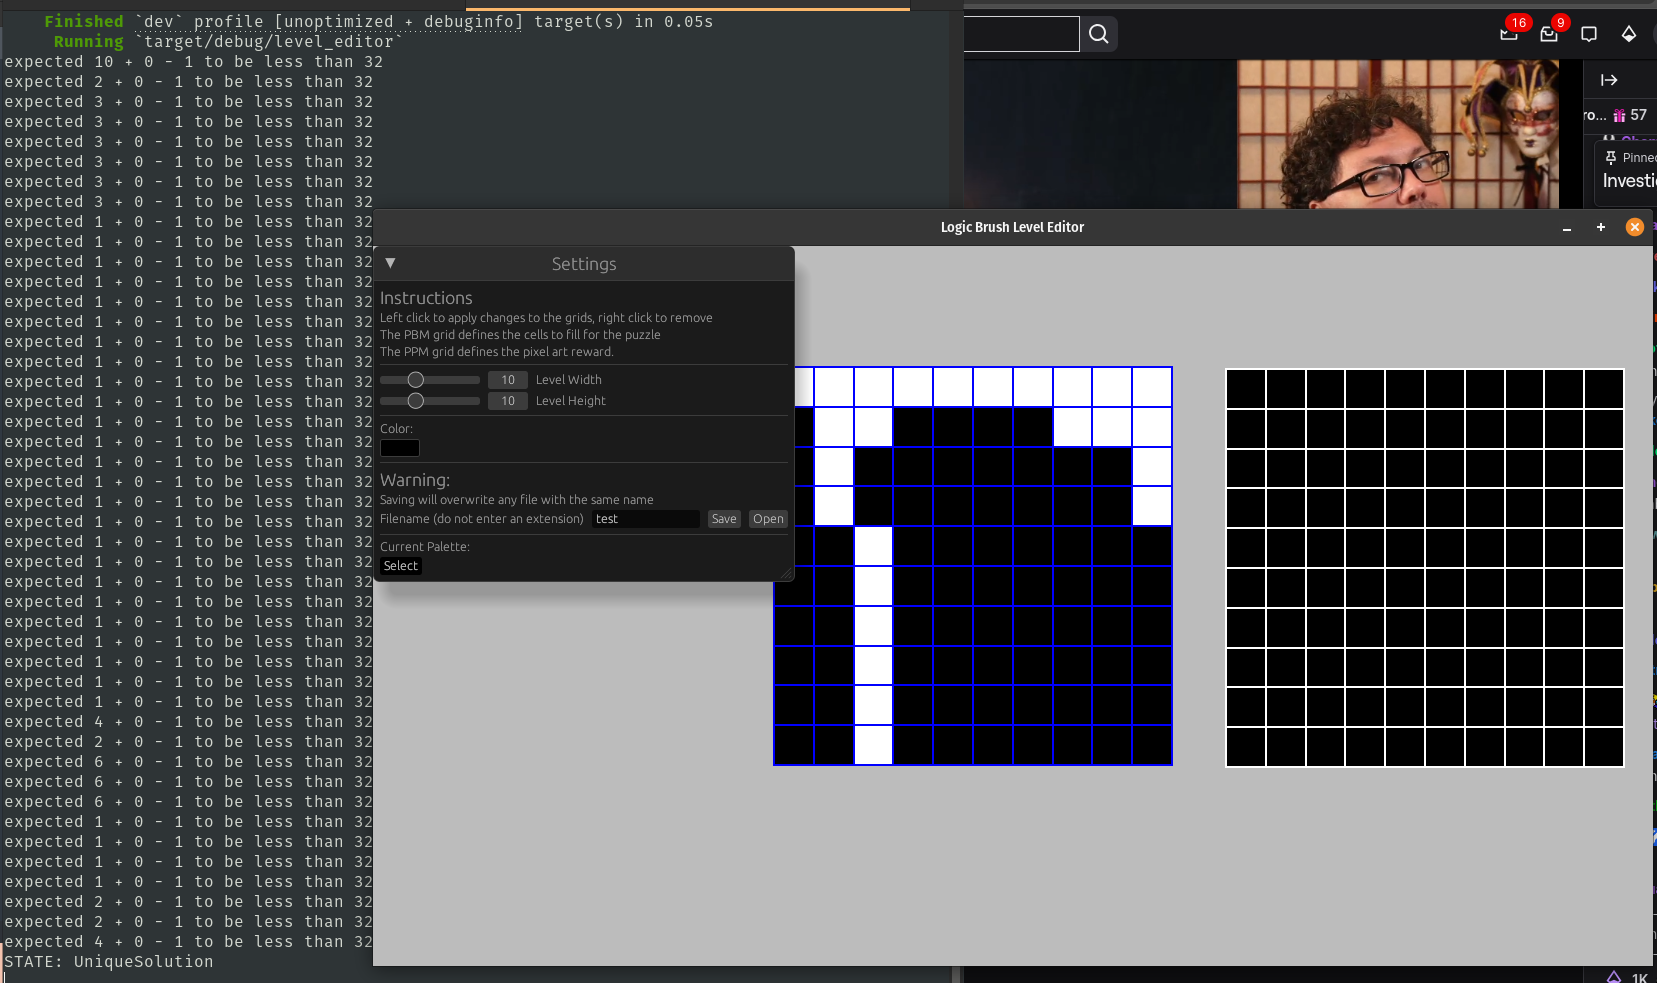
I think it makes sense to return empty space to the caller, as its basically the same case as not having any groups at all. All our tests still, pass, and loading up a puzzle that I know can be solved without guessing, I see the solver stating it's unique:
So that's good! I should check each of the other levels I've made, but before I do that I'd like to not have to get the terminal into any screenshots from here going forward, so let's update the UI to display the state of the solver and maybe some additional information. I'm kind of curious if the number of times we must loop through each collapse provides any useful information to a level designer, so I'll tweak the collapse method:
pub fn collapse(&mut self) -> usize {
    let mut iterations = 0;
    ...
}
While the "input released" hack worked fine for testing, it's no good for our proper editor. It doesn't
take into account if a user clicked inside or outside of the grids, therefore, we can be smarter and
create a new UiAction for the editor grids to raise up to the higher level to signal that
we should recompute the solve state.
pub enum UiActions {
    ...
    LevelGridUpdated,
}
Then update our editor grids to set the action signal whenever we modify the PBM data:
impl EditorGrids {
    pub fn ui(&mut self, frame_context: &mut FrameContext, level_settings: &mut LevelSettings) -> UiActions {
        let mut action = UiActions::Nothing;
        ...
        for r in 0..num_boxes_y {
            for c in 0..num_boxes_x {
                ...
                if Rect::new(position, cell_size).contains(world_xy) && left_mouse_pressed {
                    action = UiActions::LevelGridUpdated;
                    self.pbm_grid[r][c] = true;
                }
                if Rect::new(position, cell_size).contains(world_xy) && right_mouse_pressed {
                    action = UiActions::LevelGridUpdated;
                    self.pbm_grid[r][c] = false;
                }
                ...
            }
        }
        ...
        action
    }
}
I don't actually care if we modify the PPM data though. That's just the image that the user wins, and has nothing to do with the solving state of anything, so there's no need to ask the solver to re-compute at that point. This makes life easier, since now I can just do this
match grids.ui(frame_context, &mut level_settings) {
    UiActions::LevelGridUpdated =>  solver.recompute(&level_settings, &grids),
    _ => {}
};
That recompute code doesn't exist yet, but it's easy enough to make. Similar to my editor grid and level setting structs, we can track the data we want to display in one struct:
pub struct SolverDisplay {
    pub iterations: usize,
    pub state: SolvedState,
}

impl Default for SolverDisplay {
    fn default() -> Self {
        Self {
            iterations: 0,
            state: SolvedState::Unsolvable,
        }
    }
}
And then implement a ui method to display that, this is also where we can create that recompute
method:
impl SolverDisplay {
    pub fn ui(&mut self, ui: &mut Ui) {
        ui.separator();
        ui.heading("Level Correctness");
        let state = match self.state {
            SolvedState::UniqueSolution => "Good: No guesses needed!",
            SolvedState::Unsolvable => "Bad: Unsolvable",
            SolvedState::MultipleSolutions => "Bad: Guessing or multiple solutions found.",
        };
        ui.label(state);
        ui.label(format!("Solved in {}", self.iterations));
        ui.separator();
    }

    pub fn recompute(&mut self, level_settings: &LevelSettings, editor_grids: &EditorGrids) {
        let pbm: Pbm = (level_settings, editor_grids).into();
        let ps: PlayState = (&pbm).into();
        let mut possibilities = TheMultiVerseOfLines::new(&ps);
        // TODO remove later
        eprintln!("STATE: {possibilities}");
        self.iterations = possibilities.collapse();
        self.state = possibilities.state();
    }
}
If I call the ui method before the rest of the stuff, then it places it above, which looks kind of gross and I'll tweak that.
But I want to point out my terminal here 8 shows what potential solutions exist when there's a bad solution space. Which gives me an idea. Wouldn't it be nice to tell the user which rows and columns are currently causing the solver to have trouble? That way they can actually fix it?

Grid Layouts and UX ↩
Now, before jump into visually showing which rows and columns are unsolvable, I want to highlight a
pattern that I used in the original logic paint game post. While I went over the GridLayout
struct in detail there, it was such a useful and handy abstraction that I thought about highlighting it
in its own smaller blog post. I've decided that I'll just highlight it here since
- I haven't refactored the level editor code to use it
- This post is a lot shorter than the game post, so there's a better chance folks will read it
So let me show you this handy dandy struct:
pub struct GridLayout {
    pub area: Rect,
    pub rows: usize,
    pub columns: usize,
    pub cell_gap: f32,
}
If we define the total area of a grid, how many rows and columns it has, and then the size of the gap we want between each cell, then we can create a re-usable tool that can help clean up easy to mess up math. As some folks might know, I like avoiding messing up math, and as you might have surmised from the way we rewrote the assurance and solving code, I don't like to repeat code if it can be DRYed up and results in me having less code to maintain. It's also great when this simultaneously does both: less math to track, less code to maintain, more time to dance to Neru.
The key thing that this gives me is the ability to turn this code:
let num_boxes_x = level_settings.width;
let num_boxes_y = level_settings.height;
let gutter = 2.;
let cell_size_x =
    (self.size.x - (gutter + gutter * num_boxes_x as f32)) / num_boxes_x as f32;
let cell_size_y =
    (self.size.y - (gutter + gutter * num_boxes_y as f32)) / num_boxes_y as f32;
let cell_size = vec2(cell_size_x, cell_size_y);
let pbm_anchor = pbm_anchor + gutter;
for r in 0..num_boxes_y {
    for c in 0..num_boxes_x {
        let position = pbm_anchor + vec2(c as f32, r as f32) * (cell_size + gutter);

        if Rect::new(position, cell_size).contains(world_xy) && left_mouse_pressed {
            action = UiActions::LevelGridUpdated;
            self.pbm_grid[r][c] = true;
        }
        if Rect::new(position, cell_size).contains(world_xy) && right_mouse_pressed {
            action = UiActions::LevelGridUpdated;
            self.pbm_grid[r][c] = false;
        }
        let color = if self.pbm_grid[r][c] {
            Color::WHITE
        } else {
            Color::BLACK
        };

        gfx.rect().at(position).size(cell_size).color(color);
    }
}
Into the much more manageable, and less vertically irritating to read, this:
let layout = GridLayout {
    area: Rect {
        position: self.top_left,
        size: self.size,
    },
    rows: level_settings.height,
    columns: level_settings.width,
    cell_gap: 2.,
};
for (r, c, rect) in layout.iter_cells() {
    if rect.contains(world_xy) && left_mouse_pressed {
        action = UiActions::LevelGridUpdated;
        self.pbm_grid[r][c] = true;
    }
    if rect.contains(world_xy) && right_mouse_pressed {
        action = UiActions::LevelGridUpdated;
        self.pbm_grid[r][c] = false;
    }
    let color = if self.pbm_grid[r][c] {
        Color::WHITE
    } else {
        Color::BLACK
    };

    gfx.rect().at(rect.position).size(rect.size).color(color);
}
No multiplication inside of the loop, no calculations to compute how big things are or should be above it. The loop stays focused on iterating across the cells, and provides the context to the loop body about which row, column, and what the area of the cell is currently being processed. It makes life a lot easier to reason about when it comes time to do tricky things.
Of course, all that math is still happening, but it's nestled inside of iter_cells
where I don't ever have to think about it again once I've done it once:
pub fn iter_cells(&self) -> impl Iterator<Item = (usize, usize, Rect)> + '_ {
    let cell_size = self.cell_size();
    let origin = self.origin();
    let step = cell_size + Vec2::splat(self.cell_gap);

    (0..self.rows).flat_map(move |r| {
        (0..self.columns).map(move |c| {
            let top_left = origin + vec2(c as f32, r as f32) * step;
            let cell = Rect {
                position: top_left,
                size: cell_size,
            };
            (r, c, cell)
        })
    })
}
I won't fill in the blanks on the helpers its using since they're pretty self evident, but you can see it's basically the same code as what existed before just moved up and out. Anyway, one of the many reasons this is nice is because it makes it very easy to do stuff like define multiple areas of a layout within one big grid and then fill in the blanks without having to do a lot of extra work. For example, when you play the game, the entire play area and the clue area is actually one big grid that's just drawn based on a few conditionals:
And the best thing is that those clue areas scale based on how many clues there are, which helps keep things readable when the puzzles get bigger.
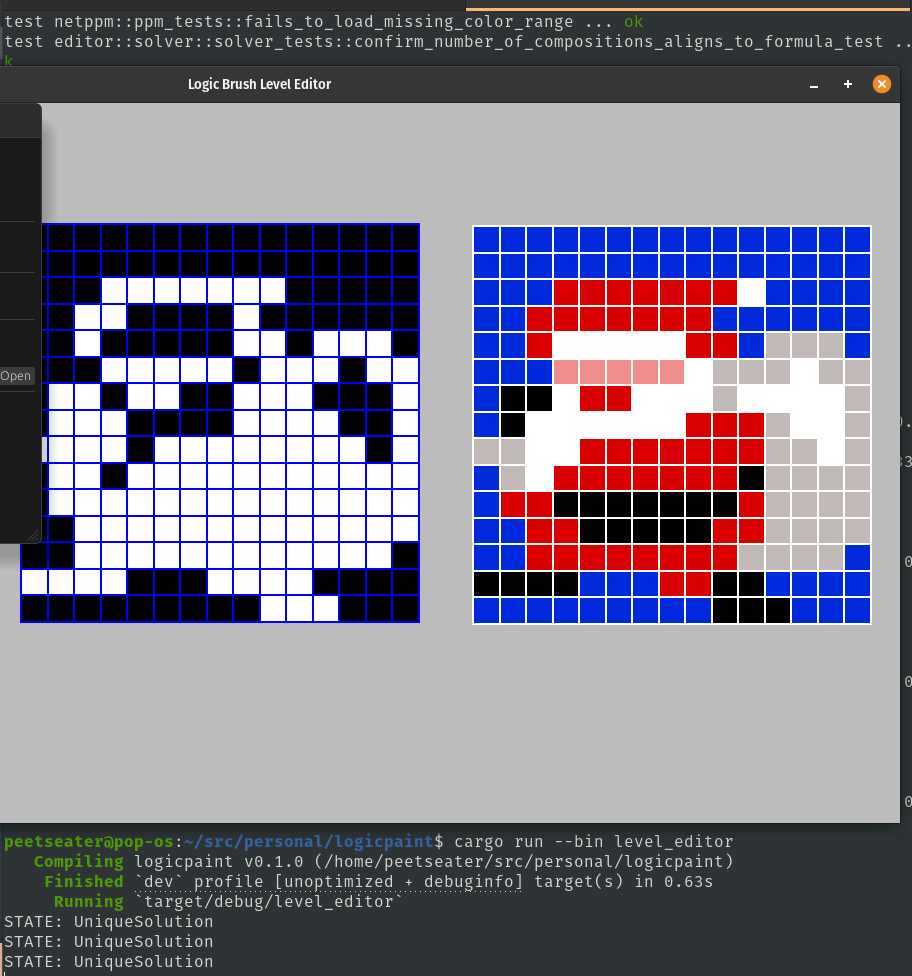
Anyway. Refactoring the level editor code to use this is important and handy for the whole "show where the bad rows and columns are" because it makes an important part of the code really easy. Consider this bad puzzle that's ambiguous:
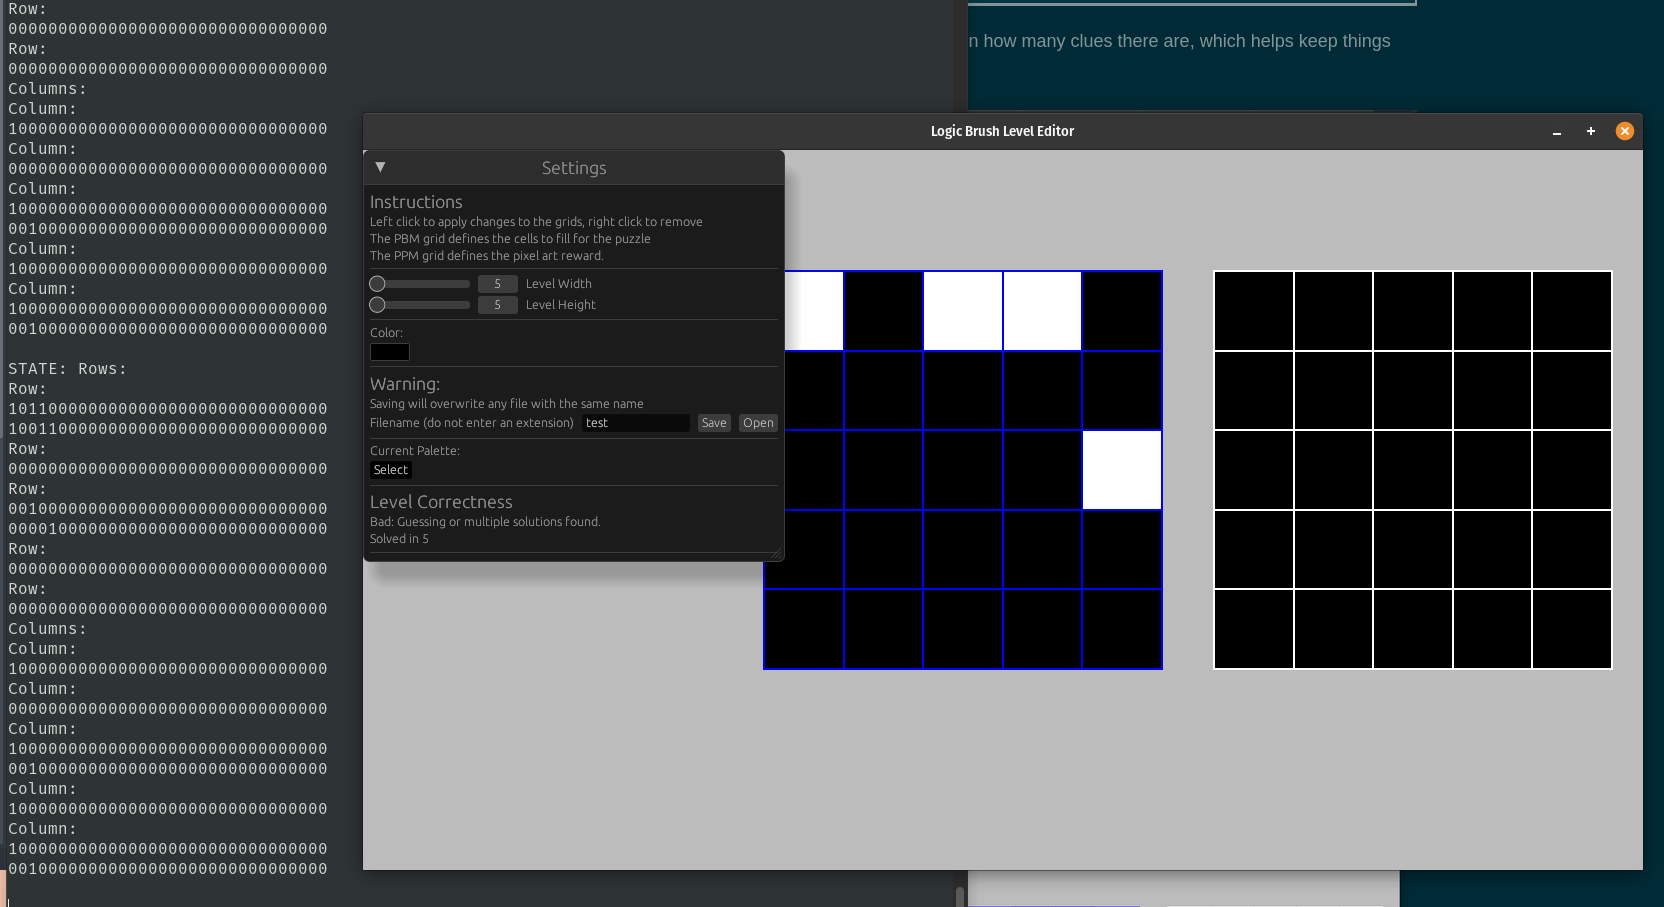
If column 5 didn't have a cell, this puzzle would be fine since having 0 groups on the right would mean you could
fully constraint the top row as desired. But, since the last row does, we end up with more than one potential
pattern that could work for row number 1, and we also have multiple patterns for column 5 too. You can see these
printed off in the terminal under the big STATE: Rows: and Columns section. Since we
know which cells are bad, we know which potential cells to highlight! By the power of the grid layout, it's
easy to define and underlying grid that powers itself off of the solved states of the board.
At the moment, the blue background you see in the editor on the left grid is just from this:
gfx.rect()
    .at(layout.area.position)
    .size(layout.area.size)
    .color(Color::BLUE);
Called before the grid layout is iterated. If we instead replace that with something like
let mut bg_layout = layout.shifted_by(Vec2::ZERO);
bg_layout.cell_gap = 0.0;
for (r, c, rect) in bg_layout.iter_cells() {
    let color = if rect.contains(world_xy) {
        Color::RED
    } else {
        Color::BLUE
    };
    gfx.rect()
        .at(rect.position)
        .size(rect.size)
        .color(color);
}
Then we gain an easy way to change the color of the line between the cells. In the above code's case, with our mouse for illustration:
The lines are a bit thin, but you get the idea. The grid layout makes it really easy to setup a new grid of data to fill with stuff. And if we we say there's only 1 column?

Easy way to highlight a whole row. Though, the bottom line doesn't get filled in because it's not part of the cell, which you can see if I make the color vary by row:
let foo = [Color::BLUE, Color::WHITE, Color::RED, Color::GREEN];
for (r, c, rect) in bg_layout.iter_cells() {
    let color = if rect.contains(world_xy) {
        Color::RED
    } else {
        // Color::BLUE
        foo[r % foo.len()]
    };
    gfx.rect()
        .at(rect.position)
        .size(rect.size)
        .color(color);
}
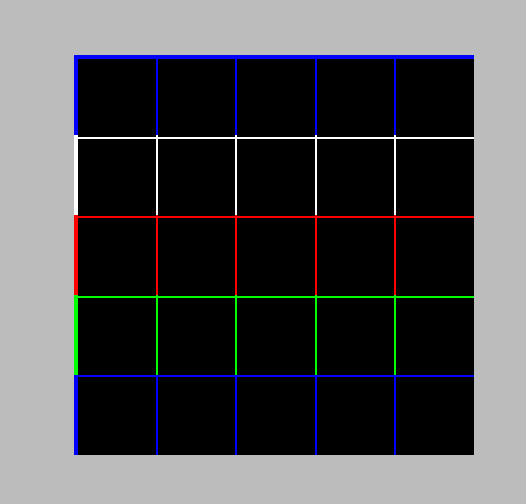
Anyway. Enough fiddling with the background layout, I just wanted to use it to illustrate how it can be used to align things on a grid easily. Which is useful, because if I wanted to tell you how many potential patterns exist within your level at any point, it becomes simple to line those up. If we take our existing layout, shift it over by one cell, then we get an easy way to draw in the number of potential row combinations next to each one:
let row_potential_listing = layout.shifted_by(Vec2::new(-layout.cell_size().x, 0.));
for (r, c, rect) in row_potential_listing.iter_cells() {
    // When we resize bad things can happen, so skip until the user is done.
    // also, we don't care about columns beyond
    if r >= last_known_solve.rows.len() || c > 0 {
        continue;
    }
    let potential_patterns = last_known_solve.rows[r].len();
    if potential_patterns == 1 {
        continue;
    }
    draw_centered_text(
        gfx,
        &format!("{}", potential_patterns),
        rect.position + rect.size * 0.5,
        rect.size.y,
        Color::RED,
    );
}
Similar code applies to the columns, and if I iterate the background cells and highlight each cell accordingly, then we have a pretty nice visual way to tell that you are making a terrible puzzle:
// Draw the background, highlighting bad cells as needed
let mut bg_layout = layout.shifted_by(Vec2::splat(-layout.cell_gap));
bg_layout.cell_gap = 0.0;
let foo = [Color::BLUE, Color::WHITE, Color::RED, Color::GREEN];
for (r, c, rect) in bg_layout.iter_cells() {
    // When we resize bad things can happen, so skip until the user is done.
    if r >= last_known_solve.rows.len() {
        continue;
    }
    if c >= last_known_solve.columns.len() {
        continue;
    }
    let potential_row_patterns = last_known_solve.rows[r].len();
    let potential_column_patterns = last_known_solve.columns[c].len();
    let color = match (potential_row_patterns, potential_column_patterns) {
        (1, 1) => Color::GREEN,
        (0, 0) => Color::RED,
        (1, _) => Color::new([1.0, 0.5, 0.0, 1.0]),
        (_, 1) => Color::new([1.0, 0.5, 0.0, 1.0]),
        _ => Color::new([1.0, 1.0, 0.0, 1.0]),
    };
    gfx.rect().at(rect.position).size(rect.size).color(color);
}
It's a little confusing though, as the editor doesn't really explain what those numbers or colors mean. So a bit more instructional text in the correctness section should do the trick:
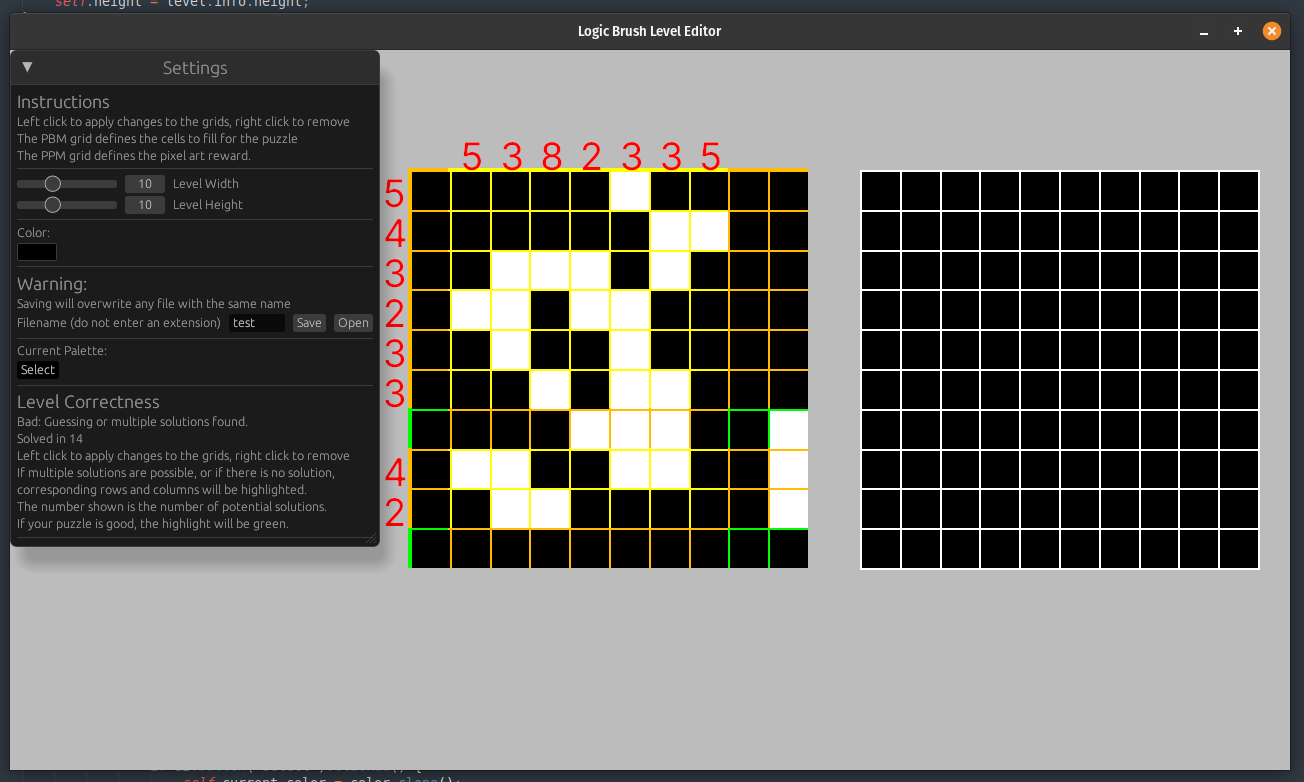
Beautiful! And now our level editor handily tells us all about if the puzzle is valid or not. Now anyone can make a valid puzzle and not have to worry about if they've just caused all their friends, juniors, or seniors any problems at all!

Wrap up ↩
And with that, we call a close to our little logic puzzle game. I've now verified that each game available in the latest release is solvable without guessing, and the level editor is ready for YOU to make whatever level you'd like!
I can't guarantee that there won't be bugs, or overflows, those seemed to like to happen whenever I wasn't anticipating them. But hey, if you spot a bug, you are more than welcome to fork and open a pull request on the repository. Maybe even fix it, or if you don't want to do that. At least let me know how to reproduce it so I can think about it.
You're also free to make as many levels as you'd like. If you have fun with it and want them included, just open a pull request with the files and I'll toss it into the game. It's all in good fun after all.
There's still no sound in the game, that can be a different project for a different time I think. But I'm content for now, and most importantly, I've read so much about nonograms that I think I've owned some quality rest time with Miku. See you all next time! And, if you found any of this stuff hard to follow, I'd encourage you to check out this post from Victor Franco Sanchez, as he has some awesome animations and goes even deeper into the world of solving these types of puzzles.
There were a few times where I shrugged my shoulders over the course of the last week and thought to myself: eh, no ones going to play this game anyway, and it's highly doubtful anyone will actually make a level, so why am I even bothering doing this? But