and if we count the match 3 game I made in 2024,
then I'm at a whopping 6/20 games done! That means we're over 25% of the way done with the challenge,
wahoo! We're making good progress on the rocky path that is game dev!1
Today, we're going to try something slightly different. We're still going to be making
a game mind you, but every project up til now has been using the libgdx
engine and Java. While Java gets a lot of random hate2, I like it.
And for exploring design patterns within gaming, it makes for a nice language to practice it. But,
as I said, we're going to do something a bit different this post and we'll see if we like it or not.
A friend of mine3
shared a library called egor with me. Said library
markets itself as a dead simple 2d graphics engine which also ships with a game loop runner supplying
delta times for frames and some basic tooling around graphics. In other words, it's pretty similar sounding to
LibGDX in that it's a toolkit to build the car around, and not a leased vehicle you got from the lot
at Epic or Unity's garage with a radio and leather seats included.
I think it would be interesting to experiment, and given that
I just finished up another small rust project, it'd be nice to keep up the momentum on exploring
that language by attempting to create a game in it. To be honest, I've been a tad scared of doing this.
Mostly because the risk of not completing a project becomes higher once unfamiliar territory enters the
map, but I figure we'll take a simple idea for a game as a counterbalance, and we'll see where we end up.
So, buckle up my programming brethren! We're going to dip our toes into the world of non-garbage collected
oh-good-lord-where-did-my-OOP-go programming and see how far we can get. Depending on the results, we'll
maybe keep this up! Or. We'll retreat back to our comfortable home within the JVM, leaving bytes out for
the javanisse4.
Most people I grew up with know that I'm a decently big fan of Hastune Miku.
While hard to define, since Miku herself is just a voice program that's used
by artists to create things, I enjoy the official media as well as most fan
creations. There are official games as well, and while that might
make you think that we're about to create a rhythm game, you'd be wrong.
Look at how freaking cute this game is:
This, my friend, is Hastune Miku Logic Paint S+.
I've never actually played a regular old logic paint game before this. Though one
of my more artistic friends really loves them and recommended me them before. It's
a simple sort of game that reminds me of sudoku, except you're painting a grid to
reveal a picture. In the above case:
While I don't think I can make a game as adorable or fully featured as this miku game.
I'd like to at least try implementing the basics because it seems relatively straightforward
and should present itself as a way to ease our way into some rust game dev. Our goals
this time will be modest:
We should be able to create puzzles from a file
We must display the constraints for the puzzle
There should be a win condition
Given my fears, I'm not even going to say that we're going to have a title screen
or anything like that. I just want to make sure we get the core game logic done as
our main scope of work here. There's also a matter of ensuring that the puzzles are
solveable without guesswork, which is probably the hardest part. So, with that said,
let me explain how this game works a little bit in case you've never played a logic paint game.
The user is presented with a grid, 10x10 or greater, and a list of constraints for each
row and column. The constraints show the groups of connected boxes within that
row or column that are filled, between each group, there must always be at least
one empty space. So, a player uses logic to paint the image by avoiding filling in places
that shouldn't have color. The game is won when you've filled in all the constraints as
expected, and then one could reveal the picture that it represents.
That last part we'll use as a stretch goal, as we all know, I'm not much of an artist.
But, I do like me a grid! So, without further adieu, let's chat about how we should
represent this data and actually initialize our project!
Obviously, a grid. But importantly, what are we going to put into it? For example, if we're
doing a logic 'paint' type thing, then one could store the image itself, but then we run into
the problem of how to specify the mapping of which color in the picture is the one which a
player needs to draw. There's also the trouble of actually reading out the image related data
itself and handling that.
So, I think it would make sense to actually have two files for each of our puzzles.
And, it may be because I just did my
own implementation of some raytracing, but I think we can actually use the two
Netpbm formats to represent
our puzzles!
We can use .pbm files to represent the "logic" part of the file easily enough.
For example, for a 5x5 grid (because I'm lazy) the ascii PBM file would look like this:
For a black and white image, the 0 and 1s correspond to white and black pixels in a 5x5 pixel
file. The P1 magic number indicates that this is an Ascii PBM file. We don't need
to interpret this as an image, but rather as a grid of true and false values that indicate if
the user should receive a penalty or not for clicking on the space. Technically, whitespace
within the defined matrix is optional and we can ignore it when we parse the value, but it's a
bit easier for you and me to read the examples if we include it. Unless you know, you want
to read this 0111001110001000111001110?
For the image itself, not the logical map, we can use the .ppm format, which is the
exact same as the PBM but the magic number is P3 and we also have to define the
maximum value for a color as well as RGB triplets. So, our weird hourglass cup things defined in
the logic map above could look like this:
As I said, I'm not an artist. I don't know if this is a weird popsicle, a 1 pound
dumbbell as your local gym, or maybe a shake weight. But the important thing is
that this is a good example for logic painting because of the constraints this little
guy allows us to figure out. We'll get into that soon, but let's get our project
kicked off and start writing some code!
I'm including my versions just in case someone is looking at this in the distance future
and needs the marker point in case something has changed. I'll do the same once we add egor,
but for now we can hand-roll the file parsing. Let's start with creating netbpm.rs
and a failing test. First up, the struct for the simpler of the two formats:
For simplicity, I figure we can keep a single vector of cells, rather than an actual grid.
We can expose grid-like behavior through a few helper methods and that should help keep our
code tidy and conceptually accurate. First though, we need to stub out a function to parse
the file. Since this is an operation that can fail, let's declare some enums for what can
happen:
Yes, there's quite a few ways that we might fail to load a PBM file! Or rather, fail to parse
it. I suppose if we fail to load the file that's an fs::std type error... but that
aside, today I opted for explicit enums of doing a Missing { field } type situation.
I think they're basically the same, but when you print them via print!("{?}") it's a
bit faster to the eye to say "ah missing width!" Or at least, that's how I'm feeling today.
Ahem. Let's start with a stub though, I sometimes like to create little helpers that could look
like this
But… if we put on our crab hats, we can instead use
str::FromStr
and then that gives us the neat ability to use the ? operator to do
slightly more idiomatic, and terser, parsing later. So, our stub:
And then, we can write a simple test against the sample PBM file I noted above.
#[cfg(test)]
mod pbm_tests {
    use super::*;
    use std::fs::read_to_string;

    #[rustfmt::skip]
    #[test]
    fn can_load_sample_ascii() {
        let data =
            read_to_string("assets/P1.pbm")
            .expect("Could not load asset file for test (P1.pbm)");

        let result: PbmResult<Pbm> = data.parse();
        if let Ok(pbm) = result {
            assert_eq!(pbm.width, 5);
            assert_eq!(pbm.height, 5);
            assert_eq!(pbm.cells, vec![
                false, true , true, true , false,
                false, true , true, true , false,
                false, false, true, false, false,
                false, true , true, true , false,
                false, true , true, true , false
            ]);
        } else {
            panic!("Failed to load PBM file, got {:?}", result);
        }
    }
    ...
And now we're all set to write a couple lines of code! Thankfully, even if I'm a novice in rust,
the amount of file parsing done during advent of code has prepared me well for this exercise.
Go forth! My fingers of fury! Let the byte of my keyboard's clattering echo throughout the blogosphere!5
My first victim shall be the whitespace and potential comments that one can insert into PBM files!
let mut characters = string
    .lines()
    .filter(|line| !line.trim_start().starts_with('#'))
    .flat_map(str::split_whitespace);
Since whitespace is the only significant thing that separates our values, we split by that.
We're lucky here in that besides the initial magic header and matrix size, everything else
will always be a single character. Before we try to pull out any fields, we can confirm the
pbm file is an ascii encoded one by checking the flag:
let header = characters.next().ok_or(LoadPbmErr::MissingHeader)?;
let "P1" = header else {
    return Err(LoadPbmErr::InvalidHeader {
        found: header.to_owned(),
    });
};
This slightly funny looking line here is covered by chapter 19
in the rust book. Fun fact, that left hand side of the let statement? It's a pattern!
We can use that fact to confirm that the header is the specific value we expect, and if
it's not, toss up the error with the early return ? that rust provides us
when we're returning a Result type. Assuming that the file has declared its
magic flag properly, we can proceed to tease out the next two numbers for the bitmap's size:
let width = characters.next().ok_or(LoadPbmErr::MissingWidthError)?;
let width = width
    .parse::<usize>()
    .map_err(|e| LoadPbmErr::InvalidWidthError {
        found: width.to_owned(),
        reason: e.to_string(),
    })?;

let height = characters.next().ok_or(LoadPbmErr::MissingHeightError)?;
let height = height
    .parse::<usize>()
    .map_err(|e| LoadPbmErr::InvalidHeightError {
        found: height.to_owned(),
        reason: e.to_string(),
    })?;
Just like with the header, we're using ? to convert potential
Err(our enum) into early returns in order to keep the code readable.
One thing that's worth nothing here besides that is our use of to_owned
and to_string. Basically, if we need to return the reference to some
part of the input as an error detail, we grab a copy of it and own it. But, if
we're grabbing out some random error enum value
then we convert it into a string to provide something useful to the caller about
why we couldn't parse the data.
With that out of the way, our last part to parse is the matrix of 0 and 1's that
represent out booleans. On the off chance that there's some garbage in the file
and it was made incorrectly, we'll fast fail and make a note of what stopped us.
let cells: Vec<bool> = characters
    .map(|c| match c {
        "0" => Ok(false),
        "1" => Ok(true),
        _ => Err(LoadPbmErr::UnexpectedCellValue {
            found: c.to_owned(),
        }),
    })
    .collect::<Result<_, _>>()?;
Yet again, ? converts any Err that occurs during the
.collect step into an immediately early return. Which is nice for
halting immediately, less nice if you had a weird pbm file that had a lot of
bad characters, since then you'd get 1 error, fix it, then get the next. Sort of
like that one scene in the Simpson's where that dude with the curly hair keeps
stepping on rakes6.
Lastly, as a quick sanity check, we can confirm that the values we read out into
the matrix are actually what the pbm file stated it had, and if not, bail out:
let expected_count = width * height;
if cells.len() != expected_count {
    return Err(LoadPbmErr::InvalidMatrixSize {
        expected: expected_count,
        got: cells.len(),
    });
}
And with all that done, we can remove our stub with a construction of the actual struct:
Ok(Pbm {
    width,
    height,
    cells,
})
The test I created before works as expected, as do
the seven tests I added
that I didn't show you:
running 8 tests
test netbpm::pbm_tests::fails_to_load_bad_header ... ok
test netbpm::pbm_tests::fails_to_load_invalid_height ... ok
test netbpm::pbm_tests::can_load_sample_ascii ... ok
test netbpm::pbm_tests::fails_to_load_invalid_matrix ... ok
test netbpm::pbm_tests::fails_to_load_invalid_matrix_cell ... ok
test netbpm::pbm_tests::fails_to_load_invalid_width ... ok
test netbpm::pbm_tests::fails_to_load_missing_height ... ok
test netbpm::pbm_tests::fails_to_load_missing_width ... ok

test result: ok. 8 passed; 0 failed; 0 ignored; 0 measured; 0 filtered out; finished in 0.00s
I'll omit the code from but you can click the link above if you want to see them on github.
Now that we can parse a pbm file, we need to start creating a few useful methods to work
with them. Mind you, we'll need to circle back to parse the ppm files later on for displaying
the corresponding image, but let's stick to the core game logic first before we dive into the
egor related graphics stuff!
Before we write some more code, let explain a bit more about the logic paint game.
Specifically, the general strategy and how one makes these things fair. Take this
screenshot of me playing the Miku game for example:
Similar, since there are 15 cells, the 5 in the middle must below to the 11 group.
Same for the 13 & 12 horizontal rows beneath my cursor, they must include the center 5, plus 2
on either side since no matter which way we approach the middle, those cells will always be
covered since there are 12 cells filled in total.
Since the group of 4 to the right is the last group, I can extend the X's down
and rule out placement that can help fill in other rows later. Continuing to
make these kinds of deductions on what can and can't be possible given the
found tiles or the number of cells in a group, I eventually arrive here:
The 3 group I've found, marked with a red arrow, must have empty spaces
on either side of it. Which cuts off the top of the 7 group that I'm missing and
implies that I must extend it downward, which finally gives me what I need to fill
in the empty cells for the 14 and 13 horizontal lines with 100% confidence.
So, let's return to my pbm example from before. If I write in the groups of true
cells above and below, it looks like this:
Even if I were to remove the 1's from the board. Given the 5 in the center column, you
would know we're allowed to filled it all in. In the process of doing so, you'd
end up with highlight groups indicating which groups have been completed.
But wait, if there's two groups of two vertically in column 2 and 4, and they must
have at least 1 space between them, then we know we can fill them in, and just like that,
we've completed the puzzle with 0 guesswork since that will also fill in the 3 across for
each of the other groups.
Given how important the groups of numbers are, we should create code that allows us to do
two things: One, get the list of groups for each column and row. Two, given some input of
what boxes the player has selected so far, indicate which groups are already complete.
Both of these can be used to later on as core game logic.
I'm somewhat torn on whether or not this should live directly in the Pbm struct
itself. We could make a separate game state struct that tracks that as well as a
number of other things, and treat the Pbm as a read-only source of truth. That
feels smart, since then we could also track a player's X's they've added in (regardless of
whether they're correct or not), as well as include a timer or any other metadata we might
need… yeah, let's make a separate struct for this, we'll keep our naming conventions
simple:
While I said we could add a timer, I think I'll avoid the extra overhead until we get the
game up and working. For now, let's just track any moves the player has done via the boolean
grid of a Pbm, and then track the group metadata for each row and column. The fun thing is that
using the groups, we actually can already define our win condition:
impl PlayState {
    pub fn is_complete(&self) -> bool {
        // assumes that groups have been computed at least once or else they'll all be empty
        if self.column_groups.is_empty() || self.row_groups.is_empty() {
            panic!("Called is_complete before groups were computed");
        }
        let all_columns_filled = self.column_groups.iter().flatten().all(|g| g.filled);
        let all_rows_filled = self.row_groups.iter().flatten().all(|g| g.filled);
        all_rows_filled && all_columns_filled
    }
}
But, as noted by the comment, we need to ensure that our state actually initializes the groups
based on an input grid or else it will instantly say we're done! That's no good, instant gratification
is far too addicting, our game would be too powerful and the youth would go mad with how much
they love winning instantly! No, no, let's compute that data. To make things easy, let's start with
a couple helpers for the Pbm struct:
impl Pbm {
    pub fn rows(&self) -> Vec<Vec<bool>> {
        let mut result = vec![];
        for chunk in self.cells.chunks(self.width) {
            result.push(chunk.to_vec());
        }
        result
    }

    pub fn cols(&self) -> Vec<Vec<bool>> {
        let mut cols = vec![vec![]; self.width];
        for c in 0..self.width {
            for row in self.rows() {
                cols[c].push(row[c]);
            }
        }
        cols
    }
}
Considering that most, if not all, of our computations will have to be looking at the lines
of the game board, being able to grab out just the rows or just the columns should make that
easy. As usual, I added a couple tests to make sure I wasn't implementing the code wrong,
once again using the pattern matching to make the test easy to follow, here's the row test,
you can imagine that the column test is extremely similar:
Just like the can_load_sample_ascii test, I used rustfmt::skip
to keep the cells formatted across lines without having to use comments to
force cargo fmt to not move things around. Also, I like including the eprintln
so that if (when) I get something wrong, I can get some printf debugging without editing
the test.
With our ability to get columns and rows out, now we need to look at the grid of cells and
count the runs of trues in order to construct the group numbers. The only
oddball will be that if a row or column has notrues in it at all,
then we still want to report a Group. That will make sure that for each row
or column we always have at least 1 group struct to check against. That way we don't have
to track any sort of index or hole within the list. 7
Luckily for us, rust's iterator chaining lets us express what we need to do in a mostly
human readable way: for each set of cells, split cells into groups based on the false
values, convert any non-empty group into the Group struct, returning an empty filled group if there were no
true values in the row.
I'm sort of skipping over the fact that everything is wrapped up in a vec and that
we're effectively taking a &Vec<Vec<bool>> but, well, remember our
helpers? The call site using our groups function is using those:
I think having the helpers empty_group and groups_of make for a
very readable test configuration. At the very least, it beats a giant vertical slice of
vec![
    Group {
        num_cells: 1,
        filled: false,
    },
    Group {
        num_cells: 1,
        filled: false,
    },
    Group {
        num_cells: 1,
        filled: false,
    },
]
To represent the row or column like: true, false, true, false, true, don't you
think? So let's go back to thinking about the game again shall we? Specifically, I think the
current type for the cells might need to be changed before we can start
thinking about displaying the data visually to the user.
Yes, I'm aware we haven't even created a single window yet. That's okay. All things in good time
my friend, we want the core of our game logic to be decently sound before we start getting distracted
by the nitty gritty of egor. Not to mention that I'm plenty distracted as is: my "research"
for this game so far has included over 30 levels of logic paint and it's pretty hard to put down
once you pick it up. I mean, come on, look at it:
Just look at how enticing that logic puzzle is! How adorable Miku is while she cheers you on, and
especially the little line drawing brimming with cuteness underneath the timer! Good gravy on a
turkey sandwich, it makes me want to go fire it up right now! But I'll resist, for now. I want
to point out that I was not the one who drew in those X's along the bottom of the grid.
So, if you think about the state of the board, a single cell has multiple states. It's not just
checked or not checked. There's also immovable X's created by the game whenever a row or columns
groups have all been filled in:
Because of this, I think we need to tweak my initial assumption that we coded up in the above
section and move towards an enum that will help us track things:
I waffled back and forth on these for a little while, slept on it, played a little logic paint,
and waffled some more. I was tempted to have a Correct value rather than a "filled",
but if you think about the situation in the first image of this section, where the bottom row
had 0 cells and it was all already filled in, that's a "correct" state even though it's
not filled.
Also, while playing the game and exploring and (painfully) getting incorrect values on purpose and
making Miku make a sad face, I found that if you make an error, then fill in the rest correctly,
your big red X doesn't disappear, it stays. Probably for the mission
check in the post-game of "Beat puzzle with less than 3 errors". You can't remove it like you can
an X you insert yourself with a right click, and if the game fills in the X's for you, you also
can't remove those! So, there's 3 distinct states of an X marker!
I suppose we could collapse them into one, and then put another enum inside of a
CellState::Marker but that sort of feels annoying at the moment, and more importantly,
I'm not sure if it will actually buy us anything in the long run. Given that this is our first time
trying to make a game in rust, it's probably better to err on the side of "stupid and simple", than
over-engineering for flexibility and situations we haven't encoded yet.
In a similar boat, updating the cells from a Pbm to a list of these cells
also begs a question. Do we do this:
At first, I was leaning towards the nested vectors, since then we can write [row][col]
when trying to pull data out. Thinking back to when I worked on the match 3 grid, I know that at
some point we're going to have to translated from a mouse click on the screen into a coordinate pair
in the grid world (if it's within the proper boundaries). The question this begs is if we check the
value via row and column grab, or if we'd want to be doing anything afterward like "user has changed
cell X", do X for row of cell, and Y for column of cell.
In my mind it feels like I'll be less likely to screw it up if I return an iterator for either
the row or column. Then we don't have to write up a for loop for any indices or do any adding. The optimistic
side of me is saying:
But the other part of me looks at my implementation of cols that we literally just wrote
and how I ran into trouble with it. On the other hand, the vector of vectors sort of imposes a row-first
mindset onto any work we might be doing which might trip me up later too 8.
Very much a damned if I do, damned if I don't sort of feeling that contributes to why it takes me so long
to write these blog posts up…
Ahem. As a middle ground, we'll do the same thing we did for the Pbm, a single list of cells for easy
iterating when I want to check all the cells, and then two helper methods when I want to see
a view of the data in a specific way. But of course, to support those, we also need to now track the
width and height, otherwise we can't write this due to the error:
impl PlayState {
    pub fn rows(&self) -> Vec<Vec<CellState>> {
        let mut result = vec![];
        for chunk in self.cells.chunks(self.width) {
            result.push(chunk.to_vec());
        }
        result
    }

    pub fn cols(&self) -> Vec<Vec<CellState>> {
        let mut cols = vec![vec![]; self.width];
        for c in 0..self.width {
            for row in self.rows() {
                cols[c].push(row[c]);
            }
        }
        cols
    }
}
We also need to update the CellState to be cloneable due to the call
to to_vec() we do. This is all very much making me think I should make a generically
typed Matrix, as that is what I would do if I were in Java. But my internal heuristic on
when to whip out the DRY principal is generally thresholded at a minimum of three. So I won't. Yet.
So our working version of the struct and helper methods becomes:
pub struct PlayState {
    cells: Vec<CellState>,
    column_groups: Vec<Vec<Group>>,
    row_groups: Vec<Vec<Group>>,
    goal_state: Vec<CellState>,
    num_rows: usize,
    num_columns: usize,
}

impl PlayState {
    pub fn rows(&self) -> Vec<Vec<CellState>> {
        let mut result = vec![];
        for chunk in self.cells.chunks(self.num_columns) {
            result.push(chunk.to_vec());
        }
        result
    }

    pub fn cols(&self) -> Vec<Vec<CellState>> {
        let mut cols = vec![vec![]; self.num_columns];
        for c in 0..self.num_columns {
            for row in self.rows() {
                cols[c].push(row[c]);
            }
        }
        cols
    }
}
Not shown is me adding Clone, Copy to the list of derived traits for the CellState enum.
But more importantly, I'm also adding in a goal_state list to track what the grid is supposed to be.
I think that this will probably be better than taking in a truth: &pbm parameter to do checks,
much better if we can internalize as much as possible I think and not let the source format bleed into the mutable
state of the game world. So, updating our From implementation:
And then should we want to query PlayState to ask for a hint, or if a move is valid
or not, we can easily do so. Similar, when it comes time for us to apply a player's move to the
board, we should be able to tell if they were correct or not with a very quick scan of the lists
to see if they match up in the right way.
Let's actually move onto something that's very adjacent to just that. Given the current state of the
board's cells, which groups should be marked as filled or not? This lends us to another
troubling question. We have the groups defined, but there's no reference back to the cells
that they are related to. Part of me wants to just re-compute the groups on the fly, and to be honest
that should be almost identical to how we pulled out the groups before:
// TODO we'll make a better name later.
fn groups2(cells: &[Vec<CellState>]) -> Vec<Vec<Group>> {
    cells
        .iter()
        .map(|row| {
            let groups: Vec<Group> = row
                .split(|state| *state == CellState::Filled)
                .filter(|v| !v.is_empty())
                .map(|run| Group {
                    num_cells: run.len(),
                    filled: run.iter().all(|state| *state == CellState::Filled),
                })
                .collect();

            if groups.is_empty() {
                vec![Group {
                    num_cells: 0,
                    filled: true,
                }]
            } else {
                groups
            }
        })
        .collect()
}
But there's a bit of a problem here. Or well, there's not a problem
directly with this method, but rather, a problem with how we'd want to use it. If I write
something like:
#[test]
#[rustfmt::skip]
fn validates_row_groups_correctly() {
    use CellState::*;

    let pbm = Pbm {
        width: 5,
        height: 5,
        cells: vec![
            false, false, false, false, false,
            true , true , false, false ,true,
            true , true , true , true , true,
            true , false, true , false, true,
            true , false, false, true , true,
        ]
    };

    let mut state: PlayState = (&pbm).into();

    state.cells = vec![
        Empty , Empty, Empty, Empty, Empty ,
        Filled, Empty, Empty, Empty, Filled, // <-- we fill in 1/2 of group 1,
        Empty , Empty, Empty, Empty, Filled, //     and all of group 2
        Empty , Empty, Empty, Empty, Filled,
        Empty , Empty, Empty, Empty, Filled,
        //^--- not full column group   ^------ we fill in all of this column group
    ];

    state.update_groups();

    assert_eq!(false, state.row_groups[1][0].filled);
    assert_eq!(true, state.row_groups[1][1].filled);

    assert_eq!(false, state.column_groups[0][0].filled);
    assert_eq!(true, state.column_groups[4][0].filled);
}
We'll be greeted by an index out of bounds: the len is 1 but the index is 1
error.
If you're quick, you'll notice that if we're basing our updated groups on the player
modified cells, but when we initialized them, we based them off the goal
state. In other words, we didn't compute the groups right and now everything doesn't
line up, and thus
E R R O R E X P L O S I O N
How embarrassing. Even if our "groups 2" function isn't right yet though, the test is!
And with that as our guide, we can get to work figuring out how we want to deal with it.
The shape of the problem is the shape of the problem after all! We need both of the list
of groups to be the same shape, and to just mark themselves filled based on the state of
the board.
My first instinct is to do some sort of zip between the goal and the current
state. If we pair up the desired state and the current state, then we can keep everything
in line while still restructuring the pairs according to their row or column shapes.
use std::iter::zip;
...

type PlayerSetState = CellState;
type GoalState = CellState;

pub fn row_goal_pairs(&self) -> Vec<Vec<(PlayerSetState, GoalState)>> {
    let mut result = vec![];
    let pairs: Vec<(CellState, CellState)> = zip(
        self.cells.clone().into_iter(),
        self.goal_state.clone().into_iter(),
    )
    .collect();
    for chunk in pairs.chunks(self.num_columns) {
        result.push(chunk.to_vec());
    }
    result
}
I don't think that this is a particularly good name for a function, but I'm using type aliasing
in order to make it obvious to the me who, in short term memory loss fashion, will promptly forget
the order in which I constructed the pairs as soon as I scroll down to the next function:
// TODO Should we just use a From?
// https://youtu.be/gkIpRTq1S6A
fn groups_from_goal_pairs(
    pairs: &[Vec<(PlayerSetState, GoalState)>]
) -> Vec<Vec<Group>> {
    pairs
        .iter()
        .map(|row| {
            if row.iter().all(|(_, goal)| *goal == CellState::Empty) {
                return vec![Group {
                    num_cells: 0,
                    filled: true,
                }];
            }

            let groups: Vec<Group> = row
                .split(|(_, goal)| *goal == CellState::Empty)
                .filter(|v| !v.is_empty())
                .map(|run| Group {
                    num_cells: run.len(),
                    filled: run.iter().all(|(state, _)| *state == CellState::Filled),
                })
                .collect();

            groups
        })
        .collect()
}
This used to be called groups2, but now that we're a little more clear about how this
input and the other groups method differ, it's a little easier to give it a name. I've
also fixed the bug from trying to check the empty state after calling .split
that I had before. I was splitting on CellState::Filled by accident, which would remove
all the filled cells rather than the empty ones (wups). I moved the early return up for the empty
group state to nix the if else branching as well, though that's more style than bug fixing.
With these two methods we can get half of the grouping update done. To get the column groups fixed,
we need to make a helper for the pairs for the columns as well:
pub fn column_goal_pairs(&self) -> Vec<Vec<(PlayerSetState, GoalState)>> {
    let mut cols = vec![vec![]; self.num_columns];
    for c in 0..self.num_columns {
        for row in self.row_goal_pairs() {
            cols[c].push(row[c]);
        }
    }
    cols
}
This is literally the same code as the cols() method, just using row_goal_pairs
instead of rows() and the appropriate return type. Again. That urge to make some kind of a
generic matrix struct that I can re-use, but…, two places isn't worth it. If we do generics with
chunks and pushes, then we've got potential for some awkward type signatures I think. So, I'd like to
avoid it for now.
Anyway, good news! A couple updates for the function renaming leaves us with:
running 12 tests
test gamestate::pbm_tests::constructs_row_groups_correctly ... ok
test gamestate::pbm_tests::validates_row_groups_correctly ... ok
...
test netbpm::pbm_tests::returns_rows_as_expected ... ok

test result: ok. 12 passed;
Great! With that bug out of the way, we can return to the fact that we made a bunch of cell states.
And, specifically, that we made RuledOut in order to handle that situation where we
have all empty values for the goal state. Or, actually, for that situation as well as the one where
all the groups in a row or column are filled. So, let's continue to make methods to deal with that,
shall we?
Given that we can now easily compute if a group is completely full or not, it becomes trivial to
map across the goal states based on that in order to update the player state. For example, here's
a good test, using the same test grid we made before:
As you can see, there are certain transitions between the cell states that
we keep, and some we modify. Specifically, I'm talking about how we'll
preserve Incorrect as we talked about before, but also, we'll
convert UserRuledOut into RuledOut when we validate
and update the group state. We do this because a user should be able to remove
their marked up states whenever they realize their mistake, but if the game
has copied over a truthful state from its solution, then the user shouldn't
be able to undo that and screw themselves over. Logically.
This isn't actually that hard, at least, not for the simple case of rows:
fn fill_in_completed_row_groups(&mut self) {
    let row_pairs = self.row_goal_pairs();
    let mut updatedable_rows: Vec<_> = self.cells.chunks_mut(self.num_columns).collect();

    for (row, groups) in self.row_groups.iter().enumerate() {
        let complete = groups.iter().all(|g| g.filled);
        if !complete {
            continue;
        }

        let mut to_update = &mut updatedable_rows[row];
        for (column, (state, goal)) in row_pairs[row].iter().enumerate() {
            to_update[column] = match (*state, *goal) {
                (CellState::Empty, _) => CellState::RuledOut,
                (CellState::Filled, CellState::Filled) => CellState::Filled,
                (CellState::Filled, oops) => panic!(
                    "despite filled groups, player set cell state did not match desired goal of {:?}",
                    oops
                ),
                (CellState::Incorrect, _) => CellState::Incorrect,
                (CellState::UserRuledOut, _) => CellState::RuledOut,
                (CellState::RuledOut, _) => CellState::RuledOut,
            };
        }
    }
}
Since we've arranged the stars in the sky to align and always ensure that the row_groups
have the set of groups for each row (as its name implies), the index can be used to pull out the
appropriate cells to modify if all the groups are completed. As noted, this isn't that hard to do
for the rows because self.cells.chunks_mut moves along in a nature row sort of way.
Going back to a simple visual for the matrix, it's easy to see this works:
0, 0, 0, 0, 0, <-- one num_columns chunk
1, 1, 0, 0, 1, <-- the next one
1, 1, 1, 1, 1, <-- etc...
1, 0, 1, 0, 1,
1, 0, 0, 1, 1,
Then the match is easy enough to follow. In fact, if I didn't feel like I needed to defend myself
from my own worst enemy, we could just write:
But, much like many a meme, me, myself, and I are constantly in cahoots behind my back, thwarting
my every move by writing bugs. Or, put another way, I'm a little concerned that later on, we may
run into some sort of timing related bugs or similar that result in the state of a cell mutating
when we don't mean it to, and I'd like to panic if that happens to make it easier to detect.
With this code in place though, nothing panics and the unit test passes once update_groups
starts calling down to our helper method. So, now we do the hard part. The columns. Just like with rows,
a unit test will help keep us on the straight and narrow:
and boy do we need it. Columns are way harder to deal with. I've already
avoided the math once by making helpers, but those helpers returned clones of the
values. Not really what we need when we need to be able to mutate the data like we
did with those chunked rows. So, I started small, fearing the math I decided to just
write part of the function first. Easy…
pub fn fill_incompleted_column_groups(&mut self) {
	let column_pairs = self.column_goal_pairs();

	for (column, groups) in self.column_groups.iter().enumerate() {
    	let complete = groups.iter().all(|g| g.filled);
    	if !complete {
        	continue;
    	}
So far so good…
        for (row, (state, goal)) in column_pairs[column].iter().enumerate() {
            let new_value = match (*state, *goal) {
                (CellState::Empty, _) => CellState::RuledOut,
                (CellState::Filled, CellState::Filled) => CellState::Filled,
                (CellState::Filled, oops) => panic!(
                    "despite filled groups, player set cell state did not match desired goal of {:?}",
                    oops
                ),
                (CellState::Incorrect, _) => CellState::Incorrect,
                (CellState::UserRuledOut, _) => CellState::RuledOut,
                (CellState::RuledOut, _) => CellState::RuledOut,
            };
We've got the momentum now, so much of this is basically the same as the other one,
which is nice, and now for the hard part…
Ah. Maybe that wasn't that hard. I guess it's because I slept on it. Went to work. Then
ate some food and booted up some encouraging music,
but yeah, duh. Columns are the only thing that ever increase by 1 at a time within our list
of cells, so only the row needs to use the width as an offset to jump ahead.
Why was I confused again? Well. Anyway. Writing out two large identical match statements makes
me want to refactor it. So I will:
impl CellState {
    pub fn to_goal(&self, goal: CellState) -> CellState {
        match (self, goal) {
            (CellState::Empty, _) => CellState::RuledOut,
            (CellState::Filled, CellState::Filled) => CellState::Filled,
            (CellState::Filled, oops) => panic!(
                "despite filled groups, player set cell state did not match desired goal of {:?}",
                oops
            ),
            (CellState::Incorrect, _) => CellState::Incorrect,
            (CellState::UserRuledOut, _) => CellState::RuledOut,
            (CellState::RuledOut, _) => CellState::RuledOut,
        }
    }
}
Then the call site becomes much tidier:
let new_value = state.to_goal(*goal);
While we're not using it yet, I think it also would make sense to encode what happens when a
user clicks on a cell. After all, that's something that's also a match statement waiting to
happen, and involves a whole lot less potential panic. Plus, defining that little state machine
will also make life easier for us for the next bit of work.
When a user clicks on a state, if it's already filled out ruled out by the game, then nothing will
happen. Same for if it's incorrect, you make your bed, you lay in it are the rules there. But how
about the others?
I'm going to call this method fill rather than click before "click" doesn't
actually tell you which button they clicked. And, if I'm going to take my nod from picross or logicpaint,
then a left click will choose to attempt to fill, while a right click will mark a cell as ruled out by the
user. Actually, I suppose perhaps attempt_fill might be a better name.
While we're at it and it's top of mind, we can make the mark cell method as well. I wonder if instead of
&self I should do a &mut self instead. Then I suppose I wouldn't have to
always do an = at the call site… I might be prematurely optimizing I think. So, let's
ignore that for now and just fill in our method:
This one's pretty simple. Basically, if a user has made a move then they can't change it, but if they're just
toggling the state of something being marked, they're free to do so! I suppose I could write this in a more
obvious form via:
And that code would optimize for reading only what changes, but at the same time, we lose the full comprehension
check against all the values. And I like exhaustiveness checks. They mean that if we change things later and
add in a new type like "mark cell green, mark cell blue" or whatever, then we'll spot places we need to update
or at least be aware of. So, for now I'll keep it as is.
With the ability to change a cell's state, we should expose this to the outside calling world so that
we can eventually hook it up to actual clicks and buttons presses from the user. That's easy enough, let's
write a terrible, awful, unsafe function and then make it better via some tests and obvious fixes!
You can probably guess from my todo comment what we'll be getting up to next:
pub fn attempt_fill(&mut self, row: usize, column: usize) {
    // todo validate
    let offset = row * self.num_rows + column;
    let goal = self.goal_state[offset];
    self.cells[offset] = self.cells[offset].attempt_fill(goal);
}

pub fn mark_cell(&mut self, row: usize, column: usize) {
    // todo validate
    let offset = row * self.num_rows + column;
    let goal = self.goal_state[offset];
    self.cells[offset] = self.cells[offset].mark_cell();
}
But it's fun to break things first, so let's do that. Before we do though, let's make it easier
to write the tests. We've been copying and pasting the grid over and over again, and I think we've
done it enough that it'd be good to consolidate things to make the next set of tests easier to write.
I'm a big fan of test helpers that make tests readable and writeable. I'll explain in a sec:
We've used the same initial cell state in all of the test so far for the Pbm,
so cleaning that up into a helper is easy. And then all of our tests become significantly
easier to read. For example, the old test for columns shrinks to focus only on what our
before and after conditions are, less boilerplate for you to read in a few months:
In the same way that the test makes it easy to read, it also makes it easy to write:
#[test]
fn can_fill_in_cell_that_is_empty() {
    let mut state = test_play_state();
    state.cells[0] = CellState::Empty;
    state.goal_state[0] = CellState::Empty;
    state.attempt_fill(0, 0);
    assert_eq!(CellState::Filled, state.cells[0]);
}
Since I don't have to copy and paste, it's simple to write the test up with exactly the
things that need to be tweaked and checked. Though, weirdly enough:
Hm. Let's take another look and see where I've gone wrong here.
Oh. I'm dumb. The goal state should be Filled!
test gamestate::pbm_tests::can_fill_in_cell_that_is_empty ... ok
That said, As part of figuring that out, before I re-read my test and realized the mistake,
I threw together a quick Display trait for the play state so I could see things
a bit more easily. Contrast:
One of these is easier to read. Even though it doesn't quite have all the info and is a lossy
transformation. But, what's clear is that we can very easily see the cells and goals in the
usual matrix form, which definitely helps. If I spent more time on it, I could probably figure
out the right combination for formatting strings to display the matrix AND the column and row
groups nicely, but given that the string output for the play state is for just debugging, I
think this is fine.
Shifting back to our tests, let's write up some more!
If a user has already ruled out some spots on the grid, we should ignore any clicks they might
have done by accident. The only way to unmark something that's ruled out is for the user to
unmark it! Let's ensure that the marked method works as expected as well:
So, we'll have to ensure we avoid doing something like -1 as usize later on. Probably
with some sort of saturating subtraction or simple guard to avoid calling the function the wrong way.
I suppose we could also take in an isize but that sort of muddies up the waters of what
information the function signature conveys, so. Let's not. For now, going positively out of bounds
of the grid will be fine.
Or, uh, well, it's not fine. Obviously. But now we have failing unit tests, so let's make it all
wonderful again by addressing our TODO From earlier:
Easy. So, we can mark cells, attempt to fill them, we have a method to call
that can check to see if the grid has any completed rows or columns that can
fill everything in, and we even have a method to tell us if the game is complete
or not. The only thing I suppose we're missing is an easy way to tally up how
many incorrect values have been entered so far. That should be pretty trivial.
So trivial, here's both the implementation and test in one go:
pub fn number_incorrect(&self) -> usize {
    self.cells
        .iter()
        .filter(|cell| **cell == CellState::Incorrect)
        .count()
}
...
#[test]
fn number_incorrect_returns_number_of_incorrect_cells() {
    let mut state = test_play_state();
    let mut count = 0;
    for (i, g) in state.goal_state.iter().enumerate() {
        match g {
            CellState::Empty => {
                count += 1;
                state.cells[i] = CellState::Incorrect
            }
            _ => {}
        }
    }
    assert_eq!(count, state.number_incorrect());
}
Easy as pie 9. And with that, I think
that we have basically all the building blocks we need to move onto the next stage of our project!
That's great, or maybe, that's bad, I can't procrastinate the part I'm not sure of yet any more!
As I noted at the start of the post, I haven't ever used this library before. So, let's start
off with the example in the readme:
use egor::{
    app::{App, FrameContext },
    input::{KeyCode },
    math::{Rect, Vec2, vec2},
    render::Color,
};
let mut position = Vec2::ZERO;

App::new()
    .title("Egor Stateful Rectangle")
    .run(move |FrameContext { gfx, input, timer, .. } | {
        let dx = input.key_held(KeyCode::ArrowRight) as i8
            - input.key_held(KeyCode::ArrowLeft) as i8;
        let dy =
            input.key_held(KeyCode::ArrowDown) as i8 - input.key_held(KeyCode::ArrowUp) as i8;

        position += vec2(dx as f32, dy as f32) * 100.0 * timer.delta;

        gfx.rect().at(position).color(Color::RED);
    })
Without running it, two things stand out to me. First, I assume run is a run forever
sort of function that moves all of the stuff around it into itself lifetime wise. And two, the
built-ins for the library that provide graphics offer a very tantalizing rect method
that I bet will be rather helpful for the idea of a logic paint game.
So let's add in the library and see what this actually does!
$ cargo add egor
    Updating crates.io index
      Adding egor v0.7.0 to dependencies
             Features:
             - angle
             - gles
             - hot_reload
             - log
             - ui
             - vulkan
             - webgl
    Updating crates.io index
     Locking 289 packages to latest Rust 1.90.0 compatible versions
...
Jeez. There goes my small build times. Running the above code inside of my main method shows
us some important things:
One, is that something is automatically clearing the buffer, since pressing the arrow
keys to move the square around doesn't leave streaks anywhere. Also, it's clearing to black. I
imagine that's probably configurable in much the same way the OpenGL stuff in LibGDX is. The
input is simple, and I know from some code I deleted while hunting down the imports that we can
get the mouse too.
The default App looks to me like it's probably running in immediate mode, aka, re-drawing
everything every frame. Or at least, that's what I'm guessing based on the fact that just letting
it sit open takes up a constant 4.2% of my CPU and spikes one of my cores up 100% fairly often. It
will be interesting to see what doing more than drawing a single square will do!
While drawing a rectangle is certainly something we'll be doing, I learned a lot by taking a peak
at the zombie shooter
demo game's code. Of note that I think will be useful is:
use crate::{ animation::SpriteAnim }
We'll probably want to animate some sprites at some point, and that there's an example on how to set that up
is pretty nice. The code
to loop the frames is sensible enough on first read. And the only thing that stands out as an immediate,
I dunno what this is, are the uv_coords. I mean, I just did a bunch of raytracing so "uv"
is probably something to do with the normals of the sprite, seeing it's usage in the new method,
it seems like we're basically precomputing the size of the rectangle for the sprite's texture to take up.
use crate::{ tilemap::EgorMap };
It's interesting to see a tile atlas
loaded into memory via image::load_from_memory, as well as a strategy to enumerate the various tiles in the map
and provide a method to load them via id.
This is using what I assumed to be a tiled tilemap formatted json file to store information about the assets. It's also neat to see what I assume is handling
the viewport into the world tile,
the visible_tiles method which provides an iterator that gives back x,y coordinate pairs and a GID to look up to
get the text to render for. Pretty neat and simple to understand system.
I'm not sure if I'll need a full tilemap, given that our game is mostly a one screen thing, but maybe we could use that for some
cool scrolling effect from Menu to play window or something fun like that if we get ambitious.
if e.rect.contains(b.rect.position) {
Perhaps unsurprisingly, the rect from egor::Math contains a contains method. I wonder if this means
I won't have to worry about obstacle collision as much as I usually do. Either way, it seems like a very good thing
to note, considering we'll be checking if the mouse is within our grid game play area plenty.
Rect::new(Vec2::ZERO, Vec2::splat(PLAYER_SIZE))
Looking at the construction of this rectangle, as expected it has a new method. What threw me off
a bit was the "splat" of Vec2. But,
looking in the docs shows that it just makes a vector with two equal values. And there's ZERO being used again
as well. I wonder if this constant is actually a constant, or if it's mutable like the one in LibGDX
10.
for event in events {
This reminds me of egui, at least, I think it was egui. Where you process
events on a separate channel in order to listen to whatever's going on. In the sample code it's watching for
a close event to log some cheeky stuff to the console. Wait. e-gui, e-gor… Hey! Egui is a dependency! I suppose that explains the name. Sort of. Dunno what a gor is. But at least
this answers the question of if this whole thing is running in immediate mode. Yes. Yes it is.
gfx.load_texture(include_bytes!
Ok, so the graphics handler passed from the App on each frame has a load texture method, handy. Although,
the return type is a tad confusing. player_tex: usize. It's a usize. If I had to guess, I'd
bet that similar to how tilemap was using ids for the graphics and what to draw, that this is also an ID
to the loaded texture for the player. There's probably caching going on inside of the gfx
handle that's passed along which enables the immediate mode not to have to re-load the actual binary data
on each frame.
The docs say
Returns a texture ID that can be used with .texture(id) on primitives.
Typically called once during initialization (when timer.frame == 0).
So looks like I'm right. It is interesting that it suggests using the 0th frame for loading. I wonder
why one wouldn't load it up before starting into the app loop? Maybe graphics aren't available at the
time? We'll have to see.
gfx.text("GAME OVER").color(Color::RED).at(vec2
We can display text with a text call. It seems easy enough to set color, and also to
specify the placement via a vector. That certainly seems easier than loading fonts in LibGDX, although
I imagine that if we want to use a non-default font we'll to dig into the docs more.
Or not.
Into::<Vec2>::into(input.mouse_position())
Aha. There's the mouse position code!
this code is subtracting it from the position and screen related values directly. So, what does that mean.
Are we working with a viewport, absolute pixel coordinates? I think we'll have to do some tests to find out.
Unsurprisingly, there is a camera. Since Egor markets itself as a 2d library, it's
probably orthographic? The
docs don't say but they do point out that there are world coordinates! And helpers to
translate between them! That will be useful for our experiment with the mouse later.
if input.mouse_held(MouseButton::Left)
Aha, another interaction with the mouse via the input handle. I bet if there's a "held", there's
probably a click or, ah, a pressed
method.
Window::new("Debug").show
Intriguing, this looks like an easy way to spawn an extra window. There's also a
ui.label(format!("FPS: {}", timer.fps)); inside of this area that shows
how they're displaying some basic info. That seems like a useful trick!
Alright. So that seems like a good amount of preparatory knowledge. Let's try to learn a bit
more about the camera and mouse by modifying the example. I'm mostly curious about the mouse
coordinates and how they relate to telling something to be drawn. So, we'll tweak the box
drawing not to go by arrow keys and positions, but by our mouse pointer location:
I think this should give me almost what I want. While we saw that the camera has helpers for
translating world coordinates, I want to see this up and working first before I start filling
my head with thoughts about viewports and such. Specifically:
I pulled over the close request event since that seemed like a good idea
The return here should just ditch the closure, but it also seems like the game will just hang? We'll find out.
I'm betting this is going to be wacky, but we'll see.
I'm not sure if this is going to be in a new window or something else, I guess we'll find out. Closures in closures though huh? Fun.
So, let's go ahead and cargo run an…d… hm?
error[E0432]: unresolved import `egor::app::egui`
  --> src/main.rs:8:44
   |
 8 |     app::{App, FrameContext,  WindowEvent, egui::Window },
   |                                            ^^^^ could not find `egui` in `app`
   |
note: found an item that was configured out
  --> /home/peetseater/.cargo/registry/src/index.crates.io-1949cf8c6b5b557f/egor-0.7.0/src/lib.rs:59:28
   |
58 |     #[cfg(feature = "ui")]
   |           -------------- the item is gated behind the `ui` feature
59 |     pub use egor_glue::ui::egui;
Oh, right, I guess we need to enable the ui feature in order to use the window like this?
I'll just update the toml file.
[dependencies]
egor = { version = "0.7.0", features = ["ui"] }
$ cargo build
error: failed to select a version for the requirement `egui = "^0.32.3"`
candidate versions found which didn't match: 0.32.0, 0.31.1, 0.31.0, ...
location searched: crates.io index
required by package `egor_glue v0.7.0`
    ... which satisfies dependency `egor_glue = "^0.7.0"` (locked to 0.7.0) of package `egor v0.7.0`
    ... which satisfies dependency `egor = "^0.7.0"` (locked to 0.7.0) of package `logicpaint v0.1.0 (/home/peetseater/src/personal/logicpaint)`
if you are looking for the prerelease package it needs to be specified explicitly
    egui = { version = "0.26.0-alpha.2" }
Uh. What? Did I do something wrong in the toml file? No… Am I not using the latest version?
No… What does the sample app
use? Hm, a relative path but following it shows me the version I'm using. The heck? Fine. You know what?
Nuking it from orbit:
That worked, there we go. I guess the lock file got narrowed in on the version of the library that didn't need the ui
feature? Weird. Anyway, the program runs! Let's learn!
Not pictured is the console printing out my message when I hit the escape button. The screen did, as
I expected, just hang there until I actually pressed the X on the window to close it down. So that
was expected. Also as expected: that mouse position coordinates are screen coordinates! Great! I
bet it's not that hard to fix that with the camera:
And with the screen_to_world in place, we get this
(unmute for a smile) 11:
As you can see, the conversion works without much of a problem at all. That's pretty great!
Ok, next up for our learning crusade: left vs right mouse buttons?
let left_mouse_pressed = input.mouse_pressed(MouseButton::Left);
let left_mouse_held = input.mouse_held(MouseButton::Left);
let left_mouse_released = input.mouse_released(MouseButton::Left);
let right_mouse_pressed = input.mouse_pressed(MouseButton::Right);
let right_mouse_held = input.mouse_held(MouseButton::Right);
let right_mouse_released = input.mouse_released(MouseButton::Right);
...
Window::new("Debug").show(egui_ctx, |ui| {
    ...
    ui.label(format!("Mouse state: left_mouse_pressed: {}", left_mouse_pressed));
    ui.label(format!("Mouse state: left_mouse_held: {}", left_mouse_held));
    ui.label(format!("Mouse state: left_mouse_released: {}", left_mouse_released));
    ui.label(format!("Mouse state: right_mouse_pressed: {}", right_mouse_pressed));
    ui.label(format!("Mouse state: right_mouse_held: {}", right_mouse_held));
    ui.label(format!("Mouse state: right_mouse_released: {}", right_mouse_released));
});
This should give us a decent idea about what we're dealing with.
Perhaps unsurprisingly, the moment which the press and release labels change are only a single
frame long. Immediate mode lives up to its name! I think this does mean we'll need to ensure
we handle state properly for any button we make then. A stray thought occurs to me that egor is
using egui, and so technically we could do something like ui.button(),
but I think Egui's clean and minimal display is probably not what I want for a game. I'm not sure
if there's an easy way to customize the buttons though. We could potentially save some
time and effort with menus if we use egui for it.
Tempting.
But as tempting as it is, probably for the best if we make stuff ourselves. A debug window with
buttons and slides and stuff will definitely be super handy for playing around though. I think
between this session and the example code for the shooter demo, we should be able to make the
game we want! Let's move onto doing just that!
So, let's take another look at our reference game:
The obvious thing is that there's a grid. Maybe not as obvious, but very powerful, is the
fact that the grid is two tone for the columns in one way, and the rows for the group numbers
are too. This makes it easier 12 to
not get lost when comparing your mouse and looking back and forth at the group numbers for clues.
Speaking of clues, the completed groups are dimmed, and their location within the row matches
the order of the numbers displayed. The interface is friendly too, not just because Rin is
adorable, but also because the controls are displayed at all times and the user can easily
understand what each one does even without a tutorial. Maybe the middle mouse click being a
sort of placeholder marking check isn't as obvious, but after a single click of it it's obvious
enough to pick up and use. Though, our cell states don't actually allow for this feature, so
we'll have to circle back if we want to include that in our polishing once we've got things
working well.
It might be obvious, but the keyboard notes in the directions also clue you into the fact
that this game can be played with a keyboard if desired. I don't think I'm going to support
that, it would be a useful way to practice a design patter in rust, but I want to try to
stay focused on the goal of having a playable game, and not get lost along the way. This means
we keep things as neat and tidy as Rins bow until we've got a prototype operational!
So, first things first, let's draw a grid onto the board. I sort of wonder if drawing the grid
as a texture and then using that would be better, but for now, let's just abuse the rect
helper that we know and love:
use egor::app::egui::Slider;
...

App::new().title("Egor Stateful Rectangle").run(
    ...
    let mut bg_size = 10.0;
    let mut bg_position = vec2(0., 0.);
    if (left_mouse_pressed) {
        bg_position = world_xy;
    }

    gfx.rect().at(bg_position).size(Vec2::splat(bg_size)).color(Color::BLUE);

    Window::new("Debug").show(egui_ctx, |ui| {
        ...
        ui.add(Slider::new(&mut bg_size, 1.0..=500.0).text("My value"));
    });
I don't really know what would look best, so I figure we can take a page from Sebastian Lague's
book and make something unity-esque, and leverage the egui sliders and things to experiment with
what looks good. Not that a deep blue against a black background looks particularly good, but my
focus is on the size. And position. And… now that I think about it, I haven't specified a
size for this window at all have I? It just defaults to 800x600 I guess?
Looking at the App
struct I can see that we've got a handy window_size method to set the size as expected.
So we can use that to change it. Thinking about the grid sizes and code to generate the appropriate boxes
across it, maybe I should also make sliders to control that sort of thing. I was a bit distracted by reading
a cool new manga I found and uh:
gfx.rect().at(bg_position).size(Vec2::splat(bg_size as f32)).color(Color::BLUE);
for r_step in (0..bg_size).step_by(grid_size) {
    for c_step in (0..bg_size).step_by(grid_size) {
        let position = bg_position + Vec2::splat(box_offset) + vec2(r_step as f32, c_step as f32);
        gfx.rect().at(position).size(Vec2::splat(grid_size as f32) - box_offset).color(Color::WHITE);
    }
}
That ain't right. Erm. Maybe, cut the offset in half and do some division…
for r_step in (0..bg_size).step_by(bg_size / num_boxes) {
    for c_step in (0..bg_size).step_by(bg_size / num_boxes) {
        let position = bg_position + Vec2::splat(box_offset/2.) + vec2(r_step as f32, c_step as f32);
        gfx.rect().at(position).size(Vec2::splat((bg_size / num_boxes) as f32) - box_offset/2.).color(Color::WHITE);
    }
}
We're getting closer, but we sometimes have more than the number of boxes desired (I'm trying to get 10, 15, and 20)
so I'm thinking maybe I should rework things a bit and just do an integral loop to make the boxes, rather than trying
to do… whatever I was thinking when I wrote up the above two loops that are trying to math more related to the
position and the box's size itself. So, let's make things slightly more independent:
let anchor = bg_position + Vec2::splat(box_offset as f32);
let offset = Vec2::splat(box_offset / 2.);
for r in (0..num_boxes).map(|i| i as f32) {
    for c in (0..num_boxes).map(|i| i as f32) {
        let box_size = box_size as f32;
        let position = anchor + vec2(r, c) * (Vec2::splat(box_size) + offset);
        let size = Vec2::splat(box_size) - offset;
        gfx.rect().at(position).size(size).color(Color::WHITE);
    }
}
Using the box offset, I do like a spacing value of 8 or 10 to let the color of the background shine through nicely.
Also, an overall box size of around 550 - 570 is feeling sort of good.
Though, since I'm now no longer scaling the boxes, if I increase that number of boxes slider,
they fly right off and out of the box. I think the ratios I have are pretty good though, so perhaps
we keep these and then tweak things a bit to scale stuff so all the boxes will always fit? I am
tempting to swap to just using a texture instead and not messing with rect at all, but
the joy of moving sliders back and forth and watching things change is really satisfying.
So. I ate dinner, talked to some folks about a really cool slime game
and then used my brain to think about how you'll have number of boxes + 1 offsets in a grid that is properly scaled:
let halfset = box_offset / 2.;
let anchor = bg_position + Vec2::splat(halfset as f32);
let offset = Vec2::splat(halfset);
let box_size =
    (bg_size as f32 - (halfset + halfset * num_boxes as f32)) / num_boxes as f32;
for r in (0..num_boxes).map(|i| i as f32) {
    for c in (0..num_boxes).map(|i| i as f32) {
        let box_size = box_size as f32;
        let position = anchor + vec2(r, c) * (Vec2::splat(box_size) + offset);
        let size = Vec2::splat(box_size);
        gfx.rect().at(position).size(size).color(Color::WHITE);
    }
}
The result of which, was also satisfying:
This seems pretty good. Besides the fact that it has 0 relationship to our actual game state.
That said, that should actually be trivial, provided I have an actual puzzle that
big to work with. I guess we need to make a PBM file with a test puzzle in it, that or change
the number of boxes limit I'm displaying…
let num_boxes = game_state.rows().len();
let box_size =
    (bg_size as f32 - (halfset + halfset * num_boxes as f32)) / num_boxes as f32;
let mut game_state: gamestate::PlayState = (&test_pbm).into();
...
for (r, row) in game_state.rows().into_iter().enumerate() {
    for (c, state) in row.iter().enumerate() {
        let box_size = box_size as f32;
        let position =
            anchor + vec2(r as f32, c as f32) * (Vec2::splat(box_size) + offset);
        let size = Vec2::splat(box_size);
        let color = match state {
            gamestate::CellState::Empty => Color::WHITE,
            gamestate::CellState::Filled => Color::GREEN,
            gamestate::CellState::Incorrect => Color::RED,
            _ => Color::BLACK,
        };
        gfx.rect().at(position).size(size).color(color);
        if Rect::new(position, size).contains(world_xy) && left_mouse_pressed {
            game_state.attempt_fill(r, c);
        }
    }
}
Immediate mode makes this simpler than usual I think. I don't have to create objects and associate
them with an index or anything like that, or have individual structures for each cell that's going
to track something separately (for now). We can just choose the color when we go to render based on
the mouse position. I don't think this is how we should actually do this in the long run,
but as a quick proof of concept?
It does work, though our grid is sideways. Why? Oh! vec2(r as f32, c as f32) is
backwards! The vector expects x and y, but rows are y and columns are x! That's easy to fix!
Let's tweak the colors a bit, the constants are just the primary colors, transparent, and
white and black. For ruling things out, let's use a gray instead:
let color = match state {
    gamestate::CellState::Empty => Color::WHITE,
    gamestate::CellState::Filled => Color::GREEN,
    gamestate::CellState::Incorrect => Color::RED,
    gamestate::CellState::RuledOut => Color::new([0.5, 0.5, 0.5, 1.0]),
    gamestate::CellState::UserRuledOut => Color::new([0.5, 0.5, 0.5, 1.0]),
    _ => Color::BLACK,
};
That's pretty good. Except for the fact that the incorrect color never shows up
no matter how often I click on it. I added in a bit of logging
If our goal state was for a tile to be empty, and it was already empty, we'd
always hit that early return. I think "goal" got stuck in my head as a sort of
synonym for Filled, but looking again: of course we need to allow
the attempt through! I suppose we could also put in an early return for the
incorrect state too, but eh, the match doesn't that just fine.
With that fixed though, we now have an impossible to guess correctly logic painting
game on our hands!
But now we're faced with a tricky question. What do we do about displaying the group
numbers? I suppose this was used in the shooter demo game:
Lacking. The TextBuilder
does allow me to set the size in points, but I'm not sure I know what the conversion of pixel to points is. Let
alone whatever arbitrary world units are currently being used.
So that could be troublesome for trying to line up the font to the rows and columns.
But hey, we've got the internet, so maybe we can figure something out!
Interestingly we've got cosmic text as a
dependency being brought in. I find this greatly amusing because it's the text library for the operating
system I switched to last year! Neat! Their example also shows them defining the text size in pixels,
so it feels like if I dig deep down into this whole thing, I can figure out a way to make the font the
right size for us.
Actually… looking at the source code
for the text builder:
The metrics class... reading its description
is interesting because it says "Font size in pixels" for the first argument. The second is the line height (also in pixels) but
the TextBuilder is hardcoding that to 1.0, which is then being rendered by a viewport conversion I think. So, one
unit is one line height tall perhaps? So, "points" in this instance feels more like its' points relative to the viewport, and
so, what if we just… try setting it to the same unit size as the boxes?
Well, tossing something like
gfx.text("?").size(box_size as f32)
does make a letter as big as the box. But,
the problem is that I have no idea how to position the dang thing. You might notice in the above screenshot I'm logging
a bunch of vectors. That's because I have no idea which coordinate system the font is in for the at call.
It feels a lot like it's screen coordinates, because to get that red question mark near the top left of the
grid, I had to click down hear the bottom right of it while running the code
let (mx, my) = input.mouse_position();
let world_xy = gfx.camera().screen_to_world(Vec2::new(mx, my), screen_size);
if right_mouse_pressed {
    draw_text_at = world_xy;
}
...
gfx.text("?")
    .size(box_size as f32)
    .color(Color::RED)
    .at(draw_text_at);

let foo = gfx.camera().world_to_screen(draw_text_at, screen_size);
gfx.text("?")
    .size(box_size as f32)
    .color(Color::WHITE)
    .at(foo);
So that's interesting I suppose. I can't say I'm surprised that the fonts are positioned differently.
Fonts, especially bitmap fonts, tend to want to be 'pixel perfect', and so positioning them via a
camera or viewport can cause blur or stretching in odd ways if things don't match up. But man, it does
make it odd to work with. Though, so does the fact that the camera has placed 0,0 in the center
of the screen, which is different from every other library I've used before. Maybe egui + egor are used
to math quadrant coordinates or something?
I clicked over to the documentation page I had open to check, and then happened to notice that on the
textbuilder doc page it said:
at Set the position of text in screen space
I really need to read more closely when I'm working on these things. Ok. So that confirms it. Fonts are
rendered in screen space. Got it.
At this point, the experimentation I've been doing has cluttered up the main method quite a bit, and
the fact that everything is rendered in immediate mode makes me wonder if I might run into problems with
refactoring things around. So, we'll see. But if we do something simple, like treat the placement
of each number as another grid cell, just off of the existing one, then we can compute the math
pretty easily if we keep in mind that the at method is targeting the center
of where to place the text13.
So, for the numbers along the rows, something like this should work:
let padding = offset.y / 2. - box_size / 2.;
let scaler = vec2(0.5, 1.);
let anchor = anchor - padding;
for (r, groups) in game_state.row_groups.iter().enumerate() {
    let number_of_groups = groups.iter().len();
    for i in 0..number_of_groups {
        let grid_offset = vec2(-(i as f32) - 2., r as f32);
        let grid_cell_size = (Vec2::splat(box_size) + offset);
        let position = anchor + grid_offset * grid_cell_size * scaler;
        let screen_position = gfx.camera().world_to_screen(position, screen_size);
        // write out the numbers from the right outward for alignment
        let g = number_of_groups - i - 1;
        gfx.text(&format!("{}", groups[g].num_cells))
            .size(0.5 * box_size as f32)
            .color(match groups[g].filled {
                true => Color::GREEN,
                false => Color::WHITE,
            })
            .at(screen_position);
    }
}
The anchor is the same top left point of the overall grid we've already displayed,
since it's easier to think about placing these as that as a sort of relative origin I think.
In order for us to align the numbers along the edge and not have weird spacing, it makes sense
to keep the numbers flush to the edge of the grid. So, we'll right align the data by counting
backwards and rendering backwards outward.
I'm not particularly happy about my variable names in the above snippets, but I tried to make it
at least somewhat more clear than if I hadn't named them. The scaler's intent is to
squish and overall box size down by a certain amount, that way we don't end up with this:
but rather, with something that's a bit more pleasing like this:
The reason we scale down the box_size for the size call
on the TextBuilder
is the same reason. Things look sort of funny if we make the text the same size (and nix the scaler):
And they're far too close together if we kept the scaler on the placement of the characters
If we tweak the row groups code a bit and instead make the numbers go up, then we
can come up with the column group code with a few minor tweaks:
let scaler = vec2(1., 0.5);
let anchor = anchor - offset;
for (c, groups) in game_state.column_groups.iter().enumerate() {
    let number_of_groups = groups.iter().len();
    for i in 0..number_of_groups {
        let grid_offset = vec2(c as f32, -(i as f32) - 2.);
        let grid_cell_size = (Vec2::splat(box_size) + offset);
        let position = anchor + grid_offset * grid_cell_size * scaler;
        let screen_position = gfx.camera().world_to_screen(position, screen_size);
        // render the bottom number closest to the top of the grid, then go up for alignment
        let g = number_of_groups - i - 1;
        gfx.text(&format!("{}", groups[g].num_cells))
            .size(0.5 * box_size as f32)
            .color(match groups[g].filled {
                true => Color::GREEN,
                false => Color::WHITE,
            })
            .at(screen_position);
    }
}
There are some shared values that we could pull out for both of these loops, but putting that
aside for the moment for locality, you can see we've got the usual offsets and sizes again, and
then the scaler is now stretching the vertical number, and the grid offset is
shifting up along the y axis rather than the x like before. That's probably not terribly surprising
when you consider this is our output:
But hey! It works! And, since everything is defined in terms of play area size and then scaled
to match the incoming PBM, we can swap back and forth between different size grids with 0 problem
with another addition to our debug menu:
... above the main app closure:
let levels = ["./assets/P1.pbm", "./assets/P1-10x10.pbm"];
let mut selected_level = 0;

... then in the debug window:
ui.add(Slider::new(&mut box_offset, 2.0..=20.0).text("Box Offset"));
let before_level = selected_level;
ComboBox::from_label("Load level").show_index(
    ui,
    &mut selected_level,
    levels.len(),
    |i| levels[i]
);
if before_level != selected_level {
    let pbm = read_to_string(levels[selected_level]).expect("Could not load level");
    let pbm: netbpm::Pbm = pbm.parse().expect("level not in expected format");
    game_state = (&pbm).into();
}
the only thing worth pointing out, in case you're following along, is that since the UI works in
an immediate mode, the value of the selected level will change once we run from_label
on every frame. So, the loading code to swap out the game state comes right then and there.
I suppose if we figure out how to do multiple screens later and loading assets, perhaps we'd do a
signal of some kind, maybe tell a channel to load it in the background and then signal later…
We'll figure it out. For now, the dirty load in the middle of a frame is fine:
Awesome, our play area is working and displaying all the important gameplay information!
So where do we go from here? There's plenty of polishing ideas that come to mind that we can do:
Add right click to rule out tiles by the user
Go deeper on fonts so that double digits align properly
Load some textures in to make the interface more friendly
Highlight the selected cell on hover, as well as highlight the group numbers for easy visibility
Add audio and sound effects
Create multiple screens
Rip off the idea of logic paint and make the levels be pixel art
These are all good ideas, but what's bothering me at the moment is that everything I did for egui right
now is just sitting in main.rs and I'm not really sure how best to move it out. A couple months
ago I was perusing the Game Engine Black Book for Doom,
as well as watching Tim Cain's video about engine
separation, both of these make convincing arguments to keep your UI separate from your game state.
At the moment, the game state is separate, and that's probably what made things pretty easy to hook
into and display stuff. But that doesn't mean I want to just have one giant function like this. I don't
enjoy having to think about shadowing and if one or two or my calculations are relying on something I didn't
intend. So, I kind of want to move the three bits of code into their own submethods to avoid that, but I
also enjoy how easy it is to add debug variables to easily pass mutateable bits around to shrink or swap
things out while the game is running. Trade offs…
But going back a second, the real thing bothering me is that, I'm enjoying egui, but I don't
like the idea of having everything about the UI tied to it, so I'd like to better understand how to
best put in just enough abstraction that if, on the next game, we decide to try out a new library for
graphics, that the way we're laying things out like "draw the grid at X,Y with these assets" could stay
the same.
Granted, this sort of thinking abstractly is the enemy of getting concrete progress done. Am I ever
going to swap out the library for this game? Probably not. But the lessons learned from designing in
that way are still useful. But would it be overkill to do something like
And abstract away the calls to rect() to something like Renderer#draw_rect?
It might make the call sites easier to reason about to some extent. At first, I walked down this path
a little bit and then ran into trouble when my OOP brain tried to do this:
Which, upon trying to figure out a way to wrap up the PlayState and the positioning information
resulted in some unpleasant lifetimes entering the picture:
This felt… bad. And so I went and consulted with some folks in an IRC for a while about my
sinful OOP-brained ways. 14 Making things
harder for myself was not what I intended to do with refactoring the code, and so I took a quick walk
and grabbed some pizza, then came back to the problem with a more clear objective for the refactoring:
Let's just focus on one baby step at a time and move the three chunks of code into their own methods,
then we'll focus on refactoring those later. We can still compile some of the information into
a struct to make things a little easier to pass things around:
However, to move the grid drawing, we need to take into account that we use player input during the
render to handle clicks. We could separate things between render and update, but at the
moment we're going to keep the 'immediate' mode mindset and just make a little struct to pass along
what we care about:
#[derive(Debug)]
pub enum Action {
    FillCell,
    MarkCell,
}

#[derive(Debug)]
pub struct PlayerInput {
    // position in world units
    pub position: Vec2,
    pub action: Option<Action>,
}

impl PlayerInput {
    fn is_fill_at(&self, cell: Rect) -> bool {
        match self.action {
            Some(Action::FillCell) => cell.contains(self.position),
            _ => false,
        }
    }
}
I'm in a DDD sort of mood still,
so rather than passing along a bunch of booleans about the click state, I'm going to transform that
information into our Action enum instead. We'll see if I regret this later or not!
The can_fill_at method is one which could maybe have a better name, but it works in
context at least for moving the grid drawing method over
pub fn draw_grid(&self, play_state: &mut PlayState, input: &PlayerInput, gfx: &mut Graphics) {
    let halfset = self.grid_gutter / 2.;
    let anchor = self.top_left + Vec2::splat(halfset as f32);
    let offset = Vec2::splat(halfset);
    let num_boxes = play_state.rows().len();
    let box_size =
        (self.size.x as f32 - (halfset + halfset * num_boxes as f32)) / num_boxes as f32;

    for (r, row) in play_state.rows().into_iter().enumerate() {
        for (c, state) in row.iter().enumerate() {
            let box_size = box_size as f32;
            let position = anchor + vec2(c as f32, r as f32) * (Vec2::splat(box_size) + offset);
            let size = Vec2::splat(box_size);
            let color = match state {
                CellState::Empty => Color::WHITE,
                CellState::Filled => Color::GREEN,
                CellState::Incorrect => Color::RED,
                CellState::RuledOut => Color::new([0.5, 0.5, 0.5, 1.0]),
                CellState::UserRuledOut => Color::new([0.5, 0.5, 0.5, 1.0]),
            };
            gfx.rect().at(position).size(size).color(color);
            if input.can_fill_at(Rect::new(position, size)) {
                play_state.attempt_fill(r, c);
            }
        }
    }
}
The halfsets, number of boxes, and all that stuff are things that probably could be computed ahead of time
and then stored as well, but until our FPS starts dropping beneath 60, I don't think we need to be too
concerned about a few repeated calculations. Math is decently fast to do most of the time after all. So,
with that in mind, let's repeat those calculations and move the code to draw the groups for the rows
into a play area method:
pub fn draw_row_groups(
    &self,
    play_state: &PlayState,
    _input: &PlayerInput,
    gfx: &mut Graphics,
) {
    // _input for background later
    let halfset = self.grid_gutter / 2.;
    let num_boxes = play_state.rows().len();
    let box_size =
        (self.size.x as f32 - (halfset + halfset * num_boxes as f32)) / num_boxes as f32;
    let padding = self.grid_gutter / 2. - box_size / 2.;
    let offset = Vec2::splat(halfset);
    let scaler = vec2(0.5, 1.);
    let anchor = self.top_left + Vec2::splat(halfset);
    let anchor = anchor - padding;
    for (r, groups) in play_state.row_groups.iter().enumerate() {
        let number_of_groups = groups.iter().len();
        for i in 0..number_of_groups {
            let grid_offset = vec2(-(i as f32) - 2., r as f32);
            let grid_cell_size = Vec2::splat(box_size) + offset;
            let position = anchor + grid_offset * grid_cell_size * scaler;
            let screen_size = gfx.screen_size();
            let screen_position = gfx.camera().world_to_screen(position, screen_size);
            // write out the numbers from the right outward for alignment
            let g = number_of_groups - i - 1;
            gfx.text(&format!("{}", groups[g].num_cells))
                .size(0.5 * box_size as f32)
                .color(match groups[g].filled {
                    true => Color::GREEN,
                    false => Color::WHITE,
                })
                .at(screen_position);
        }
    }
}
The only thing I'm doing here that's different from before is I'm including _input
in our method signature because I'd like to highlight the row groups if the mouse is in the same
row as it, to make things easier for people to track the groups associated to a cell they're
hovering on within larger grids. We haven't done it yet, but it's on my todo list for after we're
done refactoring. We'll do the same thing for the column groups:
pub fn draw_column_groups(
    &self,
    play_state: &PlayState,
    _input: &PlayerInput,
    gfx: &mut Graphics,
) {
    let halfset = self.grid_gutter / 2.;
    let anchor = self.top_left + Vec2::splat(halfset as f32);
    let offset = Vec2::splat(halfset);
    let num_boxes = play_state.cols().len();
    let box_size =
        (self.size.x as f32 - (halfset + halfset * num_boxes as f32)) / num_boxes as f32;

    let padding = offset.y / 2. - box_size / 2.;
    let anchor = anchor - padding;

    let scaler = vec2(1., 0.5);
    let anchor = anchor - offset;
    for (c, groups) in play_state.column_groups.iter().enumerate() {
        let number_of_groups = groups.iter().len();
        for i in 0..number_of_groups {
            let grid_offset = vec2(c as f32, -(i as f32) - 2.);
            let grid_cell_size = Vec2::splat(box_size) + offset;
            let position = anchor + grid_offset * grid_cell_size * scaler;
            let screen_size = gfx.screen_size();
            let screen_position = gfx.camera().world_to_screen(position, screen_size);
            // render the bottom number closest to the top of the grid, then go up for alignment
            let g = number_of_groups - i - 1;
            gfx.text(&format!("{}", groups[g].num_cells))
                .size(0.5 * box_size as f32)
                .color(match groups[g].filled {
                    true => Color::GREEN,
                    false => Color::WHITE,
                })
                .at(screen_position);
        }
    }
}
The only difference here is that I'm not computing the number of boxes based on the cols method,
rather than how we had it before, where we re-used the computed value based on the rows. Since the play areas
are always square, these two are interchangeable, but if we did need to do a rectangle and not a square, then
I suppose we'd be in better shape with this tweak.
Anyway, that moves each of the parts of the UI into the one group of implementations for the PlayArea,
and now our call site in the main method is a little bit easier to read at a glance. We've got some simple setup
to transform the input into our two structs for the PlayArea and PlayerInput:
mod ui;
...
let screen_size = gfx.screen_size();
let (mx, my) = input.mouse_position();
let world_xy = gfx.camera().screen_to_world(Vec2::new(mx, my), screen_size);
let left_mouse_pressed = input.mouse_pressed(MouseButton::Left);
let right_mouse_pressed = input.mouse_pressed(MouseButton::Right);

let play_area = ui::PlayArea {
    top_left: bg_position,
    size: Vec2::splat(bg_size as f32),
    grid_gutter: box_offset,
};

let player_input = ui::PlayerInput {
    position: world_xy,
    action: {
        match (left_mouse_pressed, right_mouse_pressed) {
            (false, false) => None,
            (true, false) => Some(ui::Action::FillCell),
            (_, true) => Some(ui::Action::MarkCell),
        }
    },
};
And then using them to draw the entire UI is now easier to scan:
And this feels better to me. The main file doesn't feel like a mess anymore, and we've started flushing out
the ui.rs module instead. So with that in place, let's turn our attention back to features!
As noted by our list in the last section, our top item to do is making it possible for a user
to mark a cell as ruled out. This is shockingly easy given how much work we put into our unit
tests and game state. We only need to add one more method related to the cells and the play
area and input to get this going:
And then we can use this when we draw the cells, to tell if the mouse is over a cell and being
clicked with the right mouse button:
pub fn draw_grid(&self, play_state: &mut PlayState, input: &PlayerInput, gfx: &mut Graphics) {
    ...

    for (r, row) in play_state.rows().into_iter().enumerate() {
        for (c, state) in row.iter().enumerate() {
            ...
            gfx.rect().at(position).size(size).color(color);
            if input.can_fill_at(Rect::new(position, size)) {
                play_state.attempt_fill(r, c);
            }
            if input.can_mark_at(Rect::new(position, size)) {
                play_state.mark_cell(r, c);
            }
        }
    }
}
And that's it!
Except… that's no good. The gray used for a system ruled out cell, and a user ruled out cell
are indistinguishable. It would be better if there was at least a small difference between the two
so that we could easily tell if a user should be able to undo the marking of the cell or not. So let's
tweak our cell drawing code:
pub fn draw_grid(&self, play_state: &mut PlayState, input: &PlayerInput, gfx: &mut Graphics) {
    ...
    for (r, row) in play_state.rows().into_iter().enumerate() {
        for (c, state) in row.iter().enumerate() {
            ...
            let color = match state {
                CellState::Empty => Color::WHITE,
                CellState::Filled => Color::GREEN,
                CellState::Incorrect => Color::RED,
                CellState::RuledOut => Color::new([0.3, 0.3, 0.3, 1.0]),
                CellState::UserRuledOut => Color::new([0.5, 0.5, 0.5, 1.0]),
            };
            ...
        }
    }
}
And that looks better:
It's still a grey but it's just different enough to let a user know they can undo it.
I think the darker grey makes for a more permanent feel, so the system ruled out cells get that.
At least, people who play picross will probably understand this, but we'll probably need to make
some kind of tutorial or something maybe or some instructions. We'll see. Later.
For now though, it would be nice if the cell you're hovering over was easier to spot in some way.
We should be able to accomplish in much the same way we just did for the cell filling and marking.
We can create a helper method to tell us if the mouse is currently over a given cell and then we
can use that result to color in the area around it. So first, the helper:
...
for (r, row) in play_state.rows().into_iter().enumerate() {
    for (c, state) in row.iter().enumerate() {
        ...
        let cell_rect = Rect::new(position, size);
        if input.can_highlight_at(cell_rect) {
            gfx.rect().at(position - offset).size(size + offset * 2.).color(Color::new([1.0, 0.75, 0.0, 1.0]));
        }

        gfx.rect().at(position).size(size).color(color);
        if input.can_fill_at(cell_rect) {
            play_state.attempt_fill(r, c);
        }
        if input.can_mark_at(cell_rect) {
            play_state.mark_cell(r, c);
        }
    }
}
And I figure I should stop writing Rect::new(position, size) over and over,
so I moved it into a variable cell_rect and then…
error[E0382]: use of moved value: `cell_rect`
Oops! Right, so I guess we'll just clone it then…
error[E0599]: no method named `clone` found for struct `egor::math::Rect` in the current scope
Fine. Fine! I'll borrow the dang value and update the signatures of the helpers to be
fn can_highlight_at(&self, cell: &Rect)
And then we can see the new highlighting in action. Which works in a pretty simple and silly way.
The rectangle we're drawing (at position - offset), is a bit bigger than the cell that
we're about to draw. So basically, we're just layering the highlight underneath the cell
that is highlighted! Which is pretty effective:
But why stop at highlighting just the cell!? Why not highlight the group area for the row and column
as well? That way, on the larger grids, it's easy for a player to shift their attention from the cell
they're considering, to the group constraints that they must take into account. So, let's go ahead
and do that too. But, the way we're drawing things right now is really throwing me off. Specifically,
my first instinct was to use the draw_row_groups to draw the backgrounds, since hey,
we're looping, why not try to draw some rectangles out as we go there?
Because I'm apparently terrible at math since my attempts to do drew background cells all over the place
and no where in the right place. So… better idea! Behold:
I purposefully didn't align things so that it would be more obvious that there are 4 rectangles
here. The big red block is what we're already currently drawing, the background rectangle that we put the
grids over. The purple and yellow are above and to the side where the row and column group numbers should
be drawn in. Lastly, the blue background is because I don't like having white backgrounds in pictures on
the blog since it hurts my eyes.
But anyway, my thought here is that I should just draw in the appropriate background image first and figure
out the vague idea of our layout. Also, we should figure out a color palette and stick with that so that I
can stop using the hardcoded GREENRED and BLUE because it's hard to
feel satisfied with the garish way everything looks. So, I defined a simple struct:
This is almost enough to get me into the right state of mind to shift back to the
4 rectangle doodle, but before that, I really want to change the ruled out cell to
be a shape and not a filled in cell, luckily for me though, we have
the polygon builder function that should let us make the universal sign of "done",
an X:
gfx.polygon().at(position).points(&[
    position + size,
    position + size * 0.5,
    position + size * vec2(size.x, 0.),
    position + size * vec2(0., size.y),
    position + size * 0.5,
]).color(color);
Ahem. Right! Polygons connect points! And, uh, giving it the corners and center of a shape
in straight lines is not going to do the job. That makes sense. Wups. Let's take
a step back and try to construct this bit by bit. An X is basically two long rectangles
that are rotated 45 degrees that share a center, right? So, let's start by just getting
one of those in the right place! We'll draw an X for ruled out cells and incorrect placements
since that's universally understood I think:
pub fn draw_grid(&self, play_state: &mut PlayState, input: &PlayerInput, gfx: &mut Graphics) {
    ...
    match state {
        CellState::Empty | CellState::Filled => {
            gfx.rect().at(position).size(size).color(color);
        },
        _ => {
            let thickness = size * 0.2;
            gfx.polygon().at(position + size * 0.5).points(&[
                position + vec2(thickness.x, 0.),
                position + vec2(thickness.x, size.y),
                position + vec2(0., size.y),
                position,
            ])
            // .rotate(-3.145 / 4.) lets not mess with this _yet_
            .color(color);
        }
    };
Well that's confusing. Notice how the offset is increasing? The position I'm using here is literally the
top left corner of the cell. How is it THAT far off? Let's look at the source code to actually understand how this
function is supposed to work... Aha, right here
is the problem:
let verts: Vec<Vertex> = points
    .iter()
    .map(|p| {
        let world = rot * p + self.position;
        Vertex::new(world.into(), self.color.components(), [0.0, 0.0])
    })
    .collect();
The points p are relative to the position we set. Therefore we don't give absolute coordinates
like I was sort of kind of doing, but rather need to define things more like:
I'm not doing proper Pythagoras here to fix how much vertical space we need to move down
as we rotate and the edge of the polygon bleeds out of its cell, just taking a crackshot
with subtracting out one thickness to inset the cell. I kind of like the way it looks, it's
got a bit more charm than a completely mathematically correct position to place it directly
into the center of the cell.
More importantly than that15,
the background color isn't really right. But if I draw a rectangle with the even-odd color
before we ever draw the X, then it looks more like someone's actually carving out their
mark on the board than not:
And this provides a good separation between an actually filled cell and one that's just marked
too! Win win. I think we still need to do adjustments to the color palette, but that's something
to play around with when I'm not motivated to get the harder parts done and need a distraction
while my subconscious does the hard work. So, now that we've got the marking cells feature working,
let's return back to that idea about the highlights for the rows and columns being drawn
in behind the group numbers.
The one thing to mull over a bit though is our PlayArea#top_left field. Should this top
left be for just the grid that the user clicks on to play? Or does the concept of "play area" include
the rows and group numbers around it? After thinking about this for a little while over lunch, I decided
that since it would be nice to be able to say "scale the entire thing to the height of the window", that
yeah, the top left should actually refer to the top left of the blue rectangle and not the red in this
picture:
But at the same time, I'm so used to thinking about that top left being the grid, that subtracting from
that point to get to the appropriate places for the side bars is also pretty intuitive feeling. How troublesome.
Since I want to alternate between the even and odd numbered rows, even though it's a bit messy feeling,
let's update the draw_grid method to draw the background of the row group during its loop:
fn play_area_gutter(&self) -> Vec2 {
    self.size * 0.4
}
...
pub fn draw_grid(&self, play_state: &mut PlayState, input: &PlayerInput, gfx: &mut Graphics) {
    ...
    let side_areas_size = self.play_area_gutter();
    for (r, row) in play_state.rows().into_iter().enumerate() {
        let (even_odd_bg_color, odd_even_bg_color) = if r % 2 == 0 {
            (self.palette.grid_even, self.palette.grid_odd)
        } else {
            (self.palette.grid_odd, self.palette.grid_even)
        };

        let y_offset = r as f32 * (halfset + box_size);
        gfx.rect()
            .at(anchor - vec2(side_areas_size.x, -y_offset))
            .color(Color::new(odd_even_bg_color))
            .size(vec2(side_areas_size.x, box_size));
        ...
}
I've lifted the way we were creating even_odd_bg_color for the cell background up
before the loop over the columns, and also created the new odd_even_bg_color. Why?
Because I think that making the row group background not match the cell background is a bit more
user-readable, what do you think:
I still think I need to do a small amount of tweaking for the palettes, but let's stay focused and
get the columns base colors showing as well. Inside of the grid cell loop we have access to which
column we're in, and so it felt like the right place to put it at first. But, we don't need to loop
over every column cell, we only need one loop across to get the appropriate placements for each
column. So, I say we throw premature optimization to the wind and just yank out the loop and do it
within the draw_gridarea_background ourselves. Since we're now drawing the backgrounds
for the grid area, column group area, and row group area, let's just change the name too:
We'll start taking in the player input as well so that we can do the highlights for the active row
and column too. The highlighting is the only thing new to the row related code:
let halfset = self.grid_gutter / 2.;
let anchor = self.top_left + Vec2::splat(halfset);
let num_boxes = play_state.rows().len();
let box_size = self.box_size(num_boxes);
let side_areas_size = self.play_area_gutter();
for (r, row) in play_state.rows().into_iter().enumerate() {
let (even_odd_bg_color, odd_even_bg_color) = if r % 2 == 0 {
(self.palette.grid_even, self.palette.grid_odd)
} else {
(self.palette.grid_odd, self.palette.grid_even)
};
let cell_size = Vec2::splat(box_size);
let y_offset = r as f32 * (halfset + box_size);
let row_group_bg_position = anchor - vec2(side_areas_size.x, -y_offset);
let row_group_bg = if row_group_bg_position.y <= input.position.y
&& input.position.y <= row_group_bg_position.y + box_size
{
self.palette.group_highlight
} else {
odd_even_bg_color
};
gfx.rect()
.at(row_group_bg_position)
.color(Color::new(row_group_bg))
.size(vec2(side_areas_size.x, box_size));
and then we hit the new code, which we'll only do while the row being processed is
the first one:
if r != 0 {
continue;
}
let color = [even_odd_bg_color, odd_even_bg_color];
for (c, _) in row.iter().enumerate() {
let position = anchor
+ vec2(c as f32, r as f32) * (Vec2::splat(box_size) + Vec2::splat(halfset));
let column_group_position = position + vec2(0., -side_areas_size.y);
let column_group_size = vec2(box_size, side_areas_size.y);
let column_group_bg_color = if column_group_position.x <= input.position.x
&& input.position.x <= column_group_position.x + column_group_size.x
{
self.palette.group_highlight
} else {
color[c % 2]
};
gfx.rect()
.at(column_group_position)
.color(Color::new(column_group_bg_color))
.size(column_group_size);
}
}
gfx.rect()
.at(self.top_left)
.size(self.size)
.color(Color::new(self.palette.background));
}
There's not a lot to say about it besides that it's probably important to remember that the Y axis
increases in a downward direction, which is why we add negative numbers in order to move the background
color above the grid:
Not to sound like a broken record, but we should really tweak that color palette. But let's consult
our list of things we started section 7 with to see if there's more important things for us to
do:
Add right click to rule out tiles by the user
Go deeper on fonts so that double digits align properly
Load some textures in to make the interface more friendly
Highlight the selected cell on hover, as well as highlight the group numbers for easy visibility
Add audio and sound effects
Create multiple screens
Rip off the idea of logic paint and make the levels be pixel art
Of these, the most important has got to be whatever adds new functionality to the game. Not something
that will result in hours of tweaking and polishing. We want concrete proof that we're making progress
and learning new things as part of the 20 games challenge spirit. So, after I refactor a bit of the code
we just wrote, I'll get to doing just that.
Side note, I've made a decent sized mess with all the math tweaking, magic numbers, and what have you.
Rather than go over each one, here's an example of the type of stuff I was tweaking:
I'll do my best to make a note about what I've changed if we revisit a block of code, but if it's
just something like I moved a calculation to a method, then I probably won't mention it since the
code will speak for itself.
So we've got the play area, and you can fill in the space. But once you do there's nothing to tell you
that you won, or that you screwed up X times, or that you were perfect and made 0 mistakes, or anything
that gives us an incentive to fill out the puzzle. Right now, it's sort of like having one of those
physical books of Sudoku puzzles, and when you finish it you sigh a little because you finished it, but
also now you have no more puzzles to fill out and are bored.
We need dopamine! But not too much, so let's just tell the user that they won and they were perfect if
they made 0 mistakes, or that they did their best and they made X number of mistakes. It'd be cool to play
a little jingle or something, but let's take things one step at a time. The refactoring I mentioned has
tweaked our main file into a smaller unit of abstraction, our main app loop now looks like this:
let mut game_state: gamestate::PlayState = (&test_pbm).into();
let mut debuggable_stuff = DebugStuff::new();
let mut palette = ColorPalette::meeks();
App::new()
.window_size(1280, 720)
.title("Logic Brush")
.run(move |frame_context| {
for event in &frame_context.events {
match event {
WindowEvent::CloseRequested => {
std::process::exit(0);
}
_ => {}
}
}
if frame_context.input.key_pressed(KeyCode::Escape) {
std::process::exit(0);
}
screens::play_game_screen(&mut game_state, frame_context, &mut palette);
debug_window(
frame_context,
&mut debuggable_stuff,
&mut palette,
&mut game_state,
);
});
And, as you can imagine, the screen method contains all the code we had which rendered everything
up to this point. Since that's just handling rendering things in the immediate context, it can't
track the stuff we've been mutating over the course of things. And so, if there's any data I care about
tweaking on the fly, it gets tossed into the aptly named DebugStuff struct and passed
around. Is it a little funny? A bit. But it does work!
And with that in mind, we can start creating a new screen method to render the win screen. Let's get
the vague idea of what we want onto the page first and then we'll jump into some more in-depth stuff.
Just like before, we're starting with a mess! No separate ui draw calls or any abstraction.
We want all the stuff we're fiddling with to be out in the open to make it easy to poke, prod,
and wiggle things around. As such, the size and position of a rectangle to represent the picture
the user has just unlocked is in full debug mode while we figure out where to put it:
It seems sensible for the button to get out of the win screen to be centered, maybe not horizontally,
but at least vertically it seems like a good idea. This isn't the final form of the button, not by a
long shot. But it does roughly represent what we want to have. I'd like to render the properly filled
image in the space to the left, and then on the right display PERFECT or N Mistakes, and underneath
the return to menu button.
In order to display the complete image, we'll need to write a parser and renderer for a ppm file. That's
not too hard to do, but for now, let's put that aside to focus on the slightly more interesting thing.
Making the perfect text bigger isn't hard, that's just a tweak to the size arguments. But,
Positioning text and the button is kind of annoying. Is there a better way to control the text? Looking
at the source of the TextBuilder,
the buffer being created is setup like this:
let mut buffer = Buffer::new(
self.renderer.font_system_mut(),
Metrics::new(self.size, 1.0),
);
If we look at the underlying cosmic text library
then we can see that this text buffer's Metrics
is setting its size and line height in pixels. But, that doesn't make any sense does it. A line height of 1 pixel?
That's weird. The only sensible thing to assume here is that it's not a single pixel tall, but a single "unit" tall,
and then that unit is scaled by the font size we're giving it.
So if I want to center the text on the "button" then we can validate that assumption by doing some rough math
based on the fact that we have the height (font size), and can compute the width based on the aspect ratio of
the characters. Obviously, every character is a bit different, but we probably can make do with a vague approximation.
So, like, if we stare at some of the text for a while, it kind of feels like a teensy bit more than half?
Let's give a shot:
fn draw_centered_text(
gfx: &mut Graphics,
text: &str,
center: Vec2,
size: f32,
color: Color,
) {
// average font aspect ratio is 0.53 (eyeballing)
let w = text.len() as f32 * size * 0.53;
let h = size;
let pos = center - vec2(w * 0.5, h * 0.5 - size / 2.);
gfx.text(text)
.size(size)
.color(color)
.at(pos);
}
Not bad! Pretty good for eyeballing things! Now that we've got the "button" centering its text, let's
make it feel like a real button by making it change color on hover:
let button_bg_pos = screen_size / 2. + vec2(-50., 100.);
let button_size = vec2(200., 100.);
let rect = egor::math::Rect::new(button_bg_pos, button_size);
let should_highlight = rect.contains(world_xy);
let (btn_color, font_color) = if should_highlight {
(
Color::new(palette.group_highlight),
Color::new(palette.background),
)
} else {
(
Color::new(palette.background),
Color::new(palette.group_highlight),
)
};
Interactivity! It's not perfect, but it will do for now and maybe we'll polish it up later.
More importantly, the button, when clicked, should do something! And as its name
implies, it should return you elsewhere. Since we only have the one other screen right now,
let's just make it swap you over there and when we actually add a menu, then we can change
the target.
let left_mouse_pressed = input.mouse_pressed(MouseButton::Left);
if left_mouse_pressed && should_highlight {
// Okay now waht
}
You may recall we're inside of a win_screen function right now. We're not in the
main loop of the App's closure. I think the obvious solution here is a flag, if we were writing
C, we'd probably use a number to indicate the next action via enum. But this is rust! We have
super enums!
With these defined we can update the screen functions to return one of these, pattern match on
the result and then do the appropriate thing! Easy. So, the game screen becomes like this:
Warning: There's a bit of flashing near the end of this video
It works! But also. Not quite! Since I'm not resetting the game state that's provided to the screen
functions, the game is already complete and so we instantly pop over to the win screen. Resulting
in that funny flashing because it seems like the time that the left mouse button is counted for is
more than a single frame, and so it swaps rapidly back.
This is mostly a temporary problem that will be fixed once we have a better flow and another screen
for you to select the puzzle you want to play from. But, we could try to fix this before that even
exists! Specifically, if we create a transition between screens, then that would play out and give
a bit of a buffer for the click from the button press to clear out before any other action can be
taken. This seems like a good idea to me, and the question is, how do we do it?
Well, unfortunately, egor doesn't seem to expose a frame buffer for us. Or at least, not that I can
spot in the documentation. I'm not well versed enough with GPUs and whatnot to figure out if I could
somehow grab this directly… So instead, we're going to do something a little silly 16.
To start, let's get a screen in the middle of the two we're going between. Because this enum is going
to reference two of the other potential values of the same enum, and technically that could
be recursive (though never will be in practice), we have to box the values:
With these enums defined, I just need a basic screen to draw for the duration of the transition. We'll get
it showing first with a minimal proof of concept, and then we'll do the hard part after.
I want to made a checkered cell pattern wipe across to the left, and then wipe to the right.
But for now, I'll settle for a percentage in the middle of the screen. As always, it's good to
start simple I think. We can update our main method to start using this new screen:
The action is going to be one of the new wipe enums, but for now, we'll only
deal with the done one since we don't need the other two yet. We need to tweak the
change screen code to construct the from and to state and select the duration though:
match action {
ScreenAction::ChangeScreen { to } => {
wipe_progress = 0.0;
current_screen = Screens::WipeScreen {
from: Box::new(current_screen.clone()),
to: Box::new(to),
duration: 2.0,
};
},
And of course, once the transition is done, set the current screen to the new one we've transitioned to:
ScreenAction::WipeDone => {
let Screens::WipeScreen {
from: _,
ref to,
duration: _,
} = current_screen
else {
panic!("screen was not wipe!{:?}", current_screen)
};
current_screen = *to.clone();
}
...
}
Is this pretty? No, not really. panic aside, having to use the ref
keyword is sort of odd. Most of the time you don't have to, and I'm very grateful for the rust compiler because it was the one
helping me solve a very weird error. But hey, one borrow checker fight later, and we've got the POC:
This doesn't look like much. But what if we make the wipe function actually do something related to its
name? I'm thinking we flood some boxes in from one corner, and then drain them out the opposite one. This
isn't too hard to do in code, we just need the almighty LERP
function17!
let box_size = 60.0;
let num_boxes = screen_size / box_size;
let box_progress = *wipe_progress / duration;
let sin = lerp(0.0..=std::f32::consts::PI, box_progress);
let max_boxes_to_draw_x = 1 + lerp(0.0..=num_boxes.x, sin.sin()) as usize;
let max_boxes_to_draw_y = 1 + lerp(0.0..=num_boxes.y, sin.sin()) as usize;
let (even, odd) = palette.even_odd_color(0);
let in_first_half_of_animation = *wipe_progress < duration * 0.5;
for x in 0..max_boxes_to_draw_x {
for y in 0..max_boxes_to_draw_y {
let offset = if in_first_half_of_animation {
vec2(x as f32, y as f32)
} else {
vec2(num_boxes.x - x as f32, num_boxes.y - y as f32)
};
let pos = offset * box_size;
let color = if x % 2 == 0 { even } else { odd };
gfx.rect()
.color(Color::new(color))
.size(vec2(box_size, box_size))
.at(pos);
}
}
This code is better understood with this quick sketch I think:
We've split the entire screen into a grid, similar to how we've done for the actual gameplay
grid. The box size is arbitrary, and I'll probably tweak it, but the main thing is that I
don't want to draw every box all at once. Rather, I want to limit the maximum number of boxes
to draw based on how far along in our duration we are.
But, we want it to fill the entire screen, and then uh, unfill the entire screen.
With the idea that we'll draw the current screen under it, and then draw the next screen
during the second half of the animation so that it's revealed. If you're thinking about
this in terms of progress, we're going from 0% to 100% and then back down to 0%. For me,
this makes me think immediately of our friend the sin function! Because it goes from 0 to 1
as the angle goes from 0° to 180°, and thus the reason we call sin.sin().
A picture is worth a 1000 words and a video is worth a 1000 pictures:
It's a bit choppy, but it's got the spirit! But now for the hard part, the "under draw"
as I'll call it. Unfortunately, unlike
LibGDX's frame buffer
the egor library doesn't expose a way to take a "screenshot" of the previously drawn screen
and re-use it. So, in order to draw the screen we're transitioning away from underneath, we
need to actually draw it.
Now, the way I set up the enums imply a sort of… Gross idea. Specifically, it implies
this:
let action = match ¤t_screen {
Screens::GameScreen => {
screens::play_game_screen(&mut game_state, frame_context, &mut palette)
}
Screens::WinScreen => screens::win_screen(
&mut game_state,
frame_context,
&palette,
&mut debuggable_stuff,
),
Screens::WipeScreen {
from: _,
to: _,
duration,
} => screens::wipe_screen(&mut wipe_progress, *duration, frame_context, &palette),
};
match action {
ScreenAction::WipeLeft => {
// DRAW UNDER SCREEN
// DRAWN WIPE A SECOND TIME BECASUE OOPS WE'RE IN THE ACTION AREA
},
...
This raises my alarm bells as gross and stupid. I mean, yes it's inefficient to have to draw the
entire window underneath us, but we've resigned our fate to doing that since we have no frame
buffer to save into with the layer of abstraction that egor is giving us. But drawing all those
rectangles doing the wip twice? That's just going to look silly. Not to mention it's going to
draw underneath the screen we're coming from too.
Also, how do we know which screen to draw? We've got the WipeScreen struct, so we
can use from! But wait, that means we have to do a second match inside
of the action match, but we already did this, and so now we're duplicating the action
match we just did.
There must be another way!
Since we're drawing things OVER the other ones, then the drawing of the screens is no longer mutually exclusive.
So, let's skip all the extra over-complicated work and just raise a flag when we want the transition to be controlling
which screen to render instead of the current screen.
let mut current_screen = Screens::GameScreen;
let mut wipe_progress = 0.0;
let mut show_wipe = false;
let mut last_action = ScreenAction::NoAction;
Then, if the show_wipe flag is set, we'll select the appropriate screen to draw.
There must be a nicer way to do this, but at the moment I'm not good enough at rust to know it:
let screen_to_draw = if show_wipe {
let Screens::WipeScreen {
ref from,
ref to,
duration: _,
} = current_screen
else {
panic!("screen was not wipe!{:?}", current_screen)
};
match last_action {
ScreenAction::WipeLeft => from,
ScreenAction::WipeRight | ScreenAction::WipeDone => to,
_ => ¤t_screen,
}
} else {
¤t_screen
};
But with that selection made, we can draw the screen and set the action
based on the screen to draw, but then ignore it if we're currently wiping the screen
for a transition:
and lastly, we set the show_wipe flag to avoid the panic case we added in above:
match action {
ScreenAction::NoAction => {}
ScreenAction::ChangeScreen { ref to } => {
wipe_progress = 0.0;
show_wipe = true;
current_screen = Screens::WipeScreen {
from: Box::new(current_screen.clone()),
to: Box::new(to.clone()),
duration: debuggable_stuff.transition_duration,
};
}
ScreenAction::WipeDone => {
let Screens::WipeScreen {
from: _,
ref to,
duration: _,
} = current_screen
else {
panic!("screen was not wipe!{:?}", current_screen)
};
show_wipe = false;
current_screen = *to.clone();
},
_ => {}
};
last_action = action;
With this in place, the screen draws previous or next screen as it draws the wipe:
And that's… almost right. I mean, it is right, conceptually. We're calling
the draw calls in the right order, but I suspect that the way egor actually implements the
drawing is throwing us off here. Specifically, if you look in the documentation for any of
the builders
you'll spot this note:
Builder for XXX, drawn on Drop
Is the fact that the draw happens when the builder is dropped screwing with us somehow?
But… that doesn't make sense, the builder is dropped when we return from the screen
drawing function, isn't it? Wait… If we look at the source code:
impl<'a> Graphics<'a> {
...
/// Start building a rectangle primitive
pub fn rect(&mut self) -> RectangleBuilder<'_> {
RectangleBuilder::new(&mut self.batch)
}
The lifetime is tied to Graphics! And the graphics is pulled from the frame context,
which lasts just as long as the entire closure, which means that all the draw calls get submitted
for drawing at the same time? I suppose that makes sense for how the library expects to
be used. Kind of. But also, not really. Does egor/egui really expect you to never have
any overlapping parts?
Well dang. That's troublesome. There is a flush method that looks like it
might be something I could use to maybe try to force this behavior, but it's private so I can't
actually call it. I looked at the repository as well and I see that
rendering to a texture is an idea floating around for the roadmap as of a few weeks ago, but
that doesn't help us now sadly. I'm also not sure if what I'm seeing is a bug of my own making or
something real that would be worth raising to the owner of the library18.
Hm. Well, for now, I guess we do have a screen position. And while I'm enjoying the
simplicity of this library, I'm also getting the itch to go one step lower in a future project,
so maybe this is okay for now and we'll come back to this later. The win screen isn't quite
done yet, but before we can truly render what I want to render, we need to return to something
we put off earlier19.
So earlier, we created a PBM file reader that stores the goal state of our logic paint board.
I also said:
Mind you, we'll need to circle back to parse the ppm files later on for displaying the corresponding
image, but let's stick to the core game logic first before we dive into the egor related graphics stuff!
- Peetseater in section 2 of the tome you're currently reading.
As you may have surmised, it is time for us to circle back. I want to display the actual image of whatever
puzzle the user just solved on the win screen! So, let's write up a NetBPM P3 file type parser! This will
be mostly similar to the one we did before, but slightly more complected by the fact that it's not a list
of 1s and 0s, but triplet tuples for RGB values! If you need a quick reminder, the files in this format
look like this:
P3
# "P3" means this is a RGB color image in ASCII
# "3 2" is the width and height of the image in pixels
# "255" is the maximum value for each color
# Everything after that is the image data: RGB triplets.
3 2
255
255 0 0
0 255 0
0 0 255
255 255 0
255 255 255
0 0 0
The code that we wrote for the PBM file parsing is really similar to this one, so similar, that
we can basically copy paste most of it and only change the struct's types and add a field! Since the P3
format specifies the maximum value (up to 232), we have some new error codes to return if the
file is set up incorrectly:
And then, just like PBM, we'll do the parse within a FromStr implementation to support
using the ?; style of result handling that we've done before. The header and comments
are handled just the same:
impl FromStr for Ppm {
type Err = LoadPpmErr;
fn from_str(string: &str) -> PpmResult<Ppm> {
/* Ignore comment lines, but grab all the characters out otherwise. */
let mut characters = string
.lines()
.filter(|line| !line.trim_start().starts_with('#'))
.flat_map(str::split_whitespace);
let header = characters.next().ok_or(LoadPpmErr::MissingHeader)?;
let "P3" = header else {
return Err(LoadPpmErr::InvalidHeader {
found: header.to_owned(),
});
};
As are the width and height parsing:
let width = characters.next().ok_or(LoadPpmErr::MissingWidthError)?;
let width = width
.parse::<usize>()
.map_err(|e| LoadPpmErr::InvalidWidthError {
found: width.to_owned(),
reason: e.to_string(),
})?;
let height = characters.next().ok_or(LoadPpmErr::MissingHeightError)?;
let height = height
.parse::<usize>()
.map_err(|e| LoadPpmErr::InvalidHeightError {
found: height.to_owned(),
reason: e.to_string(),
})?;
The new code for handling the value range is the same idea as the width and height:
let max_value = characters
.next()
.ok_or(LoadPpmErr::MissingColorRangeError)?;
let max_value =
max_value
.parse::<u16>()
.map_err(|e| LoadPpmErr::InvalidColorRangeError {
found: max_value.to_owned(),
reason: e.to_string(),
})?;
And then the cell parsing I do in two steps. First, we want to get the actual numbers
out, one by one regardless of what triplet they belong to:
let cells: Vec<u16> = characters
.map(|c| match u16::from_str_radix(c, 10) {
Ok(parsed_number) => {
if parsed_number > max_value {
Err(LoadPpmErr::InvalidColorRangeError {
found: c.to_string(),
reason: format!(
"parsed number was out of range defined by ppm file min:0 max:{}",
max_value
)
.to_string(),
})
} else {
Ok(parsed_number)
}
}
_ => Err(LoadPpmErr::UnexpectedCellValue {
found: c.to_owned(),
}),
})
.collect::<Result<_, _>>()?;
And then, since we know the we're working with triplets, we can use
as_chunks
to split the vector into triplets. Once again using the pattern matching of the let keyword
to raise an issue if the cells don't match up properly and isn't a multiple of 3.
let expected_count = width * height;
let (cells, []) = cells.as_chunks::<3>() else {
return Err(LoadPpmErr::IncorrectCellTripletCount {
expected: expected_count * 3,
got: cells.len(),
});
};
let cells = cells.to_vec();
But this isn't quite enough! The above code just verifies we have triplets of data. We still need to
confirm that we have the exact amount of triplets:
let cells = cells.to_vec();
// If we had triplets, but not the right width x height then raise
if cells.len() != expected_count {
return Err(LoadPpmErr::InvalidMatrixSize {
expected: expected_count,
got: cells.len(),
});
}
But, if our parsing code gets all the way past all of that, then we have a valid PPM file! So we can
return it:
Ok(Ppm {
width,
height,
cells,
max_value,
})
}
As per usual, I wrote up a number of unit tests. Basically a copy paste job from the PBM file with a few
tweaks. Just like the parsing code, we just need to add in new tests for the max value and that we're not
checking out booleans anymore, but instead triplets… Wait a minute.
Since the Wikipedia page on Netpbm notes that 255 and 65535
are the typical range, I figure a u16 is an acceptable value. I suppose technically the page didn't
say it couldn't go higher… But I think this is probably fine. I'm not exactly trying to make fine art here.
Just pixel art!
Anyway. The tests, like I said, were mostly the same besides the differences between tracking booleans versus triplets,
and the max value being tracked:
#[test]
fn fails_to_load_invalid_matrix_cell_oob() {
let data = "P3\n1 1\n1\n3";
let result: PpmResult<Ppm> = data.parse();
match result {
Err(LoadPpmErr::InvalidColorRangeError { found, reason }) => {
assert_eq!(found, "3");
assert_eq!(
reason,
"parsed number was out of range defined by ppm file min:0 max:1"
);
}
weird => {
panic!("Should not have parsed: {:?}", weird);
}
}
}
Let's skip all the other tests since there's really nothing interesting about them20,
and instead try to draw our cool new file. We'll use the one from section 2 of this post, which matches our 5x5 grid we've been using,
and write up a quick render method. The good news is that this is actually super easy because drawing squares with egor is super easy!
We just need to convert the numbers into RGBA!
impl Ppm {
pub fn rows(&self) -> Vec<Vec<[u16; 3]>> {
...
}
pub fn to_rgba(&self, cell: [u16; 3]) -> [f32; 4] {
let max = self.max_value;
let r = cell[0] as f32 / max as f32;
let g = cell[1] as f32 / max as f32;
let b = cell[2] as f32 / max as f32;
[r, g, b, 1.0]
}
}
Then, we just need to figure out the way to scale the image to whatever size we feel like.
We've already basically done this with our cell grid drawing code before, so this isn't too hard
to add into our UI module.
pub fn draw_ppm_at(ppm: &Ppm, top_left: Vec2, size: Vec2, gfx: &mut Graphics) {
let num_boxes = ppm.rows().len();
let gutter = 2.;
let cell_size = (size.x - (gutter + gutter * num_boxes as f32)) / num_boxes as f32;
for (r, row) in ppm.rows().into_iter().enumerate() {
for (c, rgb) in row.iter().enumerate() {
let position = top_left + vec2(c as f32, r as f32) * (Vec2::splat(cell_size) + gutter);
gfx.rect()
.at(position - gutter)
.size(Vec2::splat(cell_size + gutter * 2.))
.color(Color::new(ppm.to_rgba(*rgb)));
}
}
}
Then it's just a matter of passing the PPM down to the win screen code after loading the file
within the main method and tweaking the signature of the method:
let test_ppm = read_to_string(filename_ppm)?;
let test_ppm: netppm::Ppm = test_ppm.parse()?;
...
let mut action = match screen_to_draw {
...
Screens::WinScreen => screens::win_screen(
&mut game_state,
&test_ppm,
frame_context,
&palette,
&mut debuggable_stuff,
),
and, arbitrarily, let's just draw it with a size of 450 and at 75 units in from the top left
like we were doing the blank placeholder rectangle before:
It works! Our weird, shake weight dumbbell… thing. Is revealed for all to see in its
glory! I'm not winning any design awards here for this layout. But I'm less interested in
making something that looks super pretty, and more interested in exploring the idea of
creating a game in rust with this blogpost. So, let's move onto our next important to-do
list item.
On our win screen, we have the text "Return to Menu". This implies that we should have a menu!
And more specifically, we should have a way for users to select the puzzle they want to play.
Now, we've only really had 2 puzzles in play so far, the one I've been using as an example, and
a 10x10 that I made by duplicating the 5x5 four times in order to validate our scaling.
We can save the idea of figuring out how to make these puzzles for later21,
for now, I just want to make it possible for a user to pick between two. This will, of course,
be a new screen for our system to show and so we'll be updating our enum:
pub enum Screens {
...
ChooseLevelScreen,
}
Then update our main.rs loop that's matching these, and we'll drop in a function that doesn't
work yet:
Let's talk about what arguments we'll need for this guy to work properly. At the moment, within the
main file we've just got these mutable buddies hanging out at the top level and getting rendered:
let test_ppm: netppm::Ppm = test_ppm.parse()?;
let mut game_state: gamestate::PlayState = (&test_pbm).into();
let mut debuggable_stuff = DebugStuff::new();
let mut palette = ColorPalette::meeks();
let mut current_screen = Screens::ChooseLevelScreen;
let mut wipe_progress = 0.0;
let mut show_wipe = false;
let mut last_action = ScreenAction::NoAction;
There's nothing wrong with these living at this level. But we do need to be able to more
easily control them and bundle them. So I think it's time we formalize what a "level" is. A level
is the combination of a PBM and PPM file, and maybe whether or not we've completed it or not.
The PBM file is transformed into the current game state, so we can use that to separate the mutable
and immutable aspects of the current level. Basically, when we want to load a level we transform the
fresh slate of the pbm file into a PlayState and set the top level game state.
One thing that's kind of nice in the Miku paint game is that once you beat a puzzle, you can tell
because it displays the image for you in the select menu. This is a nice feature that I'd like to
have too, so we'll also include a flag in the level for whether or not the puzzle has been beat or
not:
Now, as far as how I'll tell if something's completed or not goes… My first instinct is to just
write out a little marker file. So we'd have the pbm, ppm, and then one more .data or something file.
We could probably also just write out one file, and store the names of the levels that have
been beaten so far. Either works I think, so we'll just do whatever's easiest. For now, let's ignore
that and write up a function to look in a folder and load the levels it finds:
And by write up a function, I mean, sigh heavily and get reminded by
read_dir
that strings in rust, especially when dealing with the operating system's file handles,
are really really annoying to work with. Hint:
use std::ffi::OsStr;
use std::fs::{ read_dir, read_to_string};
use std::path::Path;
We're going to do things the panicking unsafe way first, then we'll stop being lazy and make it
work with better ergonomics once we can confirm we've loaded the level as expected. So, let me
introduce you to our best friend for our task:
with_extension
this fella will be our bread and butter on how we load the level. But first, the (initial) signature:
I say initial because we'll tweak it to return a result later, but for now, we'll be expecting
a bunch to deal with bad loads. Though not always, in the case of the given path being a file in case of
configuration error, we can just return an empty list to silently fail22:
if !dir.is_dir() {
return vec![];
}
let dir_iter = read_dir(dir);
if let Err(problem) = dir_iter {
panic!("could not load levels {}", problem);
}
let dir_iter = dir_iter.unwrap();
I suppose it isn't actually completely silent. If the path is a directory but something like bad permissions
or some other sort of nonsense happens we'll happily panic and explode. But, assuming we get past that, then
we get to deal with the weird world of wrapped DirEntry:
let mut level_files = Vec::new();
for entry in dir_iter {
if let Ok(entry) = entry {
let path = entry.path();
match path.extension() {
Some(os_string) => {
if os_string.to_string_lossy() == "level" {
level_files.push(path);
}
}
_ => {}
};
}
}
level_files.sort();
I call it weird because rather than getting something like Vec<DirEntry>, we're given a
ReadDir<io::Result<DirEntry>>. The ReadDir struct is just an iterator,
and that's fine, but that each individual entry is wrapped in a result is what feels weird to me. I suppose
one could have permissions to read one thing and not the other, but it feels quite cumbersome to use.
Once we have the actual entry we can grab its path out. And then from that we can get the extension. But this
is a weirdo too! It's not a regular string, because operating systems don't just work with "Strings" but rather
with OsStr in order to deal with the nonsense jank that has accumulated over the years. Rust,
unlike most languages, pushes this jank right into the programmers face. Every time it does it makes me sigh
a bit. But anyway, once we have our paths to all files in a directory ending with .level we can
load them:
let mut levels = Vec::new();
for level_file in level_files {
match read_to_string(&level_file) {
Err(problem) => {
panic!("could not load level {:?} {:?}", &level_file, problem);
}
Ok(contents) => {
// contents are completed 0 or 1, expected to be paired with pbm and ppm file of same name
let completed = contents.trim() == "1";
let ppm_file_path = level_file.with_extension("ppm");
let pbm_file_path = level_file.with_extension("pbm");
let pbm = read_to_string(&pbm_file_path)
.expect(&format!("could not read level file {:?}", &pbm_file_path));
let pbm: Pbm = pbm
.parse()
.expect(&format!("could not parse level file {:?}", &pbm_file_path));
let ppm = read_to_string(&ppm_file_path)
.expect(&format!("could not read level file {:?}", &ppm_file_path));
let ppm: Ppm = ppm
.parse()
.expect(&format!("could not parse level file {:?}", &ppm_file_path));
levels.push(Level {
info: pbm,
image: ppm,
completed: completed,
});
}
}
}
levels
}
And now you can see why I said with_extension was our friend here. It let's us easily express
that these three files in my levels directory are what makes up our game data:
levels/
1.level # <-- contains 0 or 1
1.pbm # <-- goal state data
1.ppm # <-- victory picture
If any of those files are missing, then we'll explode in a giant mess. Well, mostly messy since it panics,
but somewhat better than unwrap() since we do raise a useful error not about which
file was the problem! Though, since we've already loaded these Netpbm files before, we know they won't
explode. To prove that, I can load my directory from my main method like so:
let level_dir_path = Path::new("./levels");
let levels = levels::load_levels_from_dir(level_dir_path);
println!("{:?}", levels);
Tada! Though the results are less than stellar if I tweak one of our files to be invalid:
thread 'main' panicked at src/levels.rs:61:22:
could not parse level file "./levels/1.pbm": UnexpectedCellValue { found: "0x" }
note: run with `RUST_BACKTRACE=1` environment variable to display a backtrace
Though, admittedly, still decently readable! Still… It leaves a bad taste in my mouth to leave
an expect hanging around, not to mention the silent failure on a bad directory path. Imagine for a moment
that you're a gamer. Ready to try out the latest and greatest in logic painting puzzle prowess from a
fictional version of me that's known for these things. You're excited, wrapped up and warm in a blanket,
one hand poking out from under the fuzz to guide the mouse.
You double click. The program full-screens for a second, black screen popping up to show a loading window
and then the game loads. You eagerly look at the level select, primed to pick the puzzle of your dreams
and… there's nothing there.
Wwwhhhhhhhhyyyyyyyyy
Dramatics aside. It's a poor user experience. So is crashing to the desktop before ever loading. But eh.
Better a crash with a useful trace than false hope and confusion. So let's refactor the code. Similar to
the netpbm types, we'll create an enumeration to represent what can go wrong.
Analyzing our code and the .expect's that we have, we've got 4 main ways to explode.
Two of which are parsing problems, and one is just a bad parameter input. The last one, or first
one in our list, is just a generic wrapper around the io Errors that we can get from reading the
directory itself, and in order for us not to lose context, we wrap the source up with it, just
in case the io error itself doesn't include it (common in my experience). Next up, we can declare
the return type of our function so that we can avoid the silent failures we've got now:
pub type LevelsLoadResult<T> = Result<T, LevelLoadError>;
While not strictly required, it's nice to implement Display to make the errors easy
to print out if we ever need to:
impl std::fmt::Display for LevelLoadError {
fn fmt(&self, f: &mut std::fmt::Formatter<'_>) -> std::fmt::Result {
match self {
LevelLoadError::Io { path, source } => {
write!(f, "could not read {:?}: {}", path, source)
}
LevelLoadError::ParsePbm { path, source } => {
write!(f, "could not parse PBM {:?}: {}", path, source)
}
LevelLoadError::ParsePpm { path, source } => {
write!(f, "could not parse PPM {:?}: {}", path, source)
}
LevelLoadError::InvalidDirectory(path) => {
write!(f, "{:?} is not a directory", path)
}
}
}
}
And lastly, we can refactor the method to use all these new enums so that we can drop the panics and
instead use ? to early return errors as needed:
pub fn load_levels_from_dir(dir: &Path) -> LevelsLoadResult<Vec<Level>> {
if !dir.is_dir() {
return Err(LevelLoadError::InvalidDirectory(dir.to_path_buf()));
}
let mut level_files: Vec<_> = read_dir(dir)
.map_err(|e| LevelLoadError::Io {
path: dir.to_path_buf(),
source: e,
})?
.filter_map(|entry| {
let path = entry.ok()?.path();
path.extension()
.is_some_and(|ext| ext == "level")
.then_some(path)
})
.collect();
level_files.sort();
level_files
.into_iter()
.map(|level_file| -> LevelsLoadResult<Level> {
let contents = read_to_string(&level_file).map_err(|e| LevelLoadError::Io {
path: level_file.clone(),
source: e,
})?;
let completed = contents.trim() == "1";
let pbm_path = level_file.with_extension("pbm");
let ppm_path = level_file.with_extension("ppm");
let pbm: Pbm = read_to_string(&pbm_path)
.map_err(|e| LevelLoadError::Io {
path: pbm_path.clone(),
source: e,
})?
.parse()
.map_err(|e| LevelLoadError::ParsePbm {
path: pbm_path.clone(),
source: e,
})?;
let ppm: Ppm = read_to_string(&ppm_path)
.map_err(|e| LevelLoadError::Io {
path: ppm_path.clone(),
source: e,
})?
.parse()
.map_err(|e| LevelLoadError::ParsePpm {
path: ppm_path.clone(),
source: e,
})?;
Ok(Level {
info: pbm,
image: ppm,
completed,
})
})
.collect()
}
Admittedly, I do find it sort of bothersome having to write map_err twice with ?
between when we read and parse the file, but logically it does make sense. There are two places
for the error to propagate up, and so there are two places to map an error. If I didn't care about including
the source path in the error, we could create a From implementation and be able to write the
code like this:
... enum like ...
Pbm(LoadPbmErr)
... error usage like ...
let pbm: Pbm = std::fs::read_to_string(&pbm_path)?.parse()?;
But this results in useless errors that don't help us fix the problem like this:
Err(Pbm(UnexpectedCellValue { found: "0x" }))
Which is vastly inferior to the error we get like this:
Knowing which level is the broken one is better for the player on the other side of the error if they're
trying to load a custom level and running into trouble I think. Also, because this is no longer panicking,
we could potentially display this information in a pop-up within the game itself, rather than crashing
everything. We'd have to do more work if we wanted to make it possible to not let one bad apple spoil the
bunch, but for now this is as far as I want to tidy it.
Anywho. Now that we're able to load the levels, let's get to work on displaying the options to the user
in the screen's function. The way I see it, we've got a couple small things to keep track of for display
purposes:
Which page you're on for selecting a level
How many levels we display per page (we'll probably hard code this)
If the user wants to load a level or see the next page
Just like the other screen, I'm not overly concerned with making this look pretty. Just functional.
Let's start by getting the lay of the land in place. We'll tweak the enum for the level select screen
to include the page its showing:
we'll plan to have a screen action to change the page, but before that, let's get the layout
down. I'm thinking I'll just center everything for now:
pub fn level_select_screen(
levels: &[Level],
page: usize,
frame_context: &mut FrameContext,
current_level: &mut PlayState,
) -> ScreenAction {
let levels_per_page = 15;
let levels_per_row = 5;
let levels_to_show = levels
.iter()
.skip(levels_per_page * page)
.take(levels_per_page);
let gfx = &mut (frame_context.gfx);
let screen_size = gfx.screen_size();
let center = screen_size / 2.;
let title_text_position = center - vec2(0., screen_size.y / 4.);
let level_bg_position = title_text_position + vec2(screen_size.x / -4., 72.);
let level_bg_size = vec2(screen_size.x / 2., screen_size.y / 2.);
gfx.camera().target(center);
draw_centered_text(
gfx,
"Level Select",
title_text_position,
36.,
Color::WHITE, // TODO: bring in the palette
);
gfx.rect()
.at(level_bg_position)
.size(level_bg_size)
.color(Color::BLUE);
ScreenAction::NoAction
}
As you can probably guess from my variable names, we're going to make 3 rows of 5 tiles
to show an icon for each level. The user can click on these and this will load up the
level for them. We've created a number of grids at this point, so the code to draw one
out isn't too different, except for a bit of centering since this isn't a square grid
so things don't fit perfectly into place like our play area:
let padding = vec2(10., 10.);
let level_tile_height = (level_bg_size.y - padding.y * 2.) / rows as f32 - padding.y * 2.;
let level_tile_size = vec2(level_tile_height, level_tile_height);
let centering_x_offset =
(level_bg_size.x - (level_tile_height + padding.x) * levels_per_row as f32) / 2.;
let centering_y_offset = (level_bg_size.y - (level_tile_height + padding.y) * rows as f32) / 2.;
let anchor = level_bg_position + padding + vec2(centering_x_offset, centering_y_offset);
for (r, levels_in_row) in levels_to_show.chunks(levels_per_row).enumerate() {
for (c, level) in levels_in_row.into_iter().enumerate() {
let pos = anchor + vec2(c as f32, r as f32) * (level_tile_size + padding);
gfx.rect().at(pos).size(level_tile_size).color(Color::GREEN);
}
}
It's not quite perfectly centered vertically. But it's good enough I think. Now there's just
one more graphical thing to do before we add interactivity. If we complete a level, we should
show the winning image to the user as the icon! This is thankfully really easy since we already
abstracted out a draw_ppm_at method:
let pos = anchor + vec2(c as f32, r as f32) * (level_tile_size + padding);
if level.completed {
draw_ppm_at(&level.image, pos, level_tile_size, gfx);
} else {
gfx.rect().at(pos).size(level_tile_size).color(Color::GREEN);
}
That's pretty good! Now, we just need to make them look more like buttons, and probably also
come up with a simple "not completed" icon that isn't a green block. Maybe it's time for us
to finally use the load_texture method? That or I just make an "unknown" ppm file
and render that… actually that sounds pretty good. After all, the ppm files will share
however large I feel like and we already have an easy way to load them!
Pasting 103 lines of triplets isn't something I feel like doing here but the good news is that
loading it up once from the main method and then passing along the reference to it down to the
screen function gets us something that actually feels like a real game!
Ok, and what about making them feel more like a button? How about we draw a rectangle underneath
them to provide an outline highlight? Then, when we interact with it, we can make it behave like
a shadow or pulse or whatever floats our boat in approximately 30 seconds?
let input = &mut (frame_context.input);
let (mx, my) = input.mouse_position();
let world_xy = gfx.camera().screen_to_world(Vec2::new(mx, my), screen_size);
let left_mouse_pressed = input.mouse_pressed(MouseButton::Left);
...
for (r, levels_in_row) in levels_to_show.chunks(levels_per_row).enumerate() {
for (c, level) in levels_in_row.into_iter().enumerate() {
let pos = anchor + vec2(c as f32, r as f32) * (level_tile_size + padding);
let rect = egor::math::Rect::new(pos, level_tile_size);
let highlight_color = if rect.contains(world_xy) {
Color::BLACK
} else {
Color::WHITE
};
gfx.rect()
.color(highlight_color)
.at(pos - padding / 4.)
.size(level_tile_size + padding / 4.);
if level.completed {
draw_ppm_at(&level.image, pos, level_tile_size, gfx);
} else {
draw_ppm_at(&unknown_ppm, pos, level_tile_size, gfx);
}
}
}
This actually feels pretty good. I mean, sure, it's very blue. But it's readable.
Though we're missing something important. We need buttons to change the page! Honestly,
we could use the PPMs to make a little sprite again (and I'm sorely tempted) but we could
also use the polygon builder to make some nice wide arrows and I think that might look
nice. Let's find out!
Let's say that the button for the arrow is 30 units wide. We'll make it tall, like a big chevron
that sits next to the level select area, rather than within it.
let btn_width = 30.;
let btn_size = vec2(btn_width, level_bg_size.y);
let previous_btn_position = level_bg_position - vec2(btn_width, 0.) - vec2(padding.x, 0.);
let next_btn_position = level_bg_position + vec2(level_bg_size.x, 0.) + vec2(padding.x, 0.);
I'll definitely want to refactor this code later, but for now, we'll just inline everything in
the screen method while we're prototyping. Speaking of prototyping, let's just use simple colors
for the background and foreground:
Being able to draw a triangle is probably something I could generalize, but let's see
what it looks like first.
Hm.
It's not as nice looking as I would hope. For some reason I was thinking that a triangle would be
smooth. I mean, it's three points. Instead it's very… pixel-y I guess. Makes me think that
I should have made a ppm file instead. But… let's stay focused. We can always polish in
the future after all, and it's not like making those buttons look better is going to change how
prototype-jank-filled the rest of the vibe of the game gives off.
Let's just make sure the buttons work. It's pretty easy to do, we just create a mutable action and
then set it over the course of the screen call.
let mut action = ScreenAction::NoAction;
... then inside the previous button if statement ...
if rect.contains(world_xy) && left_mouse_pressed {
action = ScreenAction::PreviousPage;
}
... and inside the next button if statement ...
if rect.contains(world_xy) && left_mouse_pressed {
action = ScreenAction::NextPage;
}
There's nothing special about these two enums, so I'll skip their definition in the enums list,
but we do need to update the match statement within main.rs's app loop to handle when
we raise one of these signals up:
ScreenAction::NextPage => {
let Screens::ChooseLevelScreen { page } = current_screen else {
panic!("screen was not level select {:?}", current_screen);
};
current_screen = Screens::ChooseLevelScreen { page: page + 1 };
}
ScreenAction::PreviousPage => {
let Screens::ChooseLevelScreen { page } = current_screen else {
panic!("screen was not level select {:?}", current_screen);
};
current_screen = Screens::ChooseLevelScreen { page: page - 1 };
}
So long as we don't screw anything up, that page - 1 won't underflow the usize value.
And at the moment, that's not hard to do! With all of that settled, we need to actually handle
and create the action that this screen is all about, selecting a level! In order to work with the
rest of the code, we'll need to somehow set the level to the clicked one. Which means setting both
the game state, and the victory screen's eventual image:
pub fn level_select_screen(
levels: &[Level],
page: usize,
frame_context: &mut FrameContext,
current_level: &mut PlayState,
current_win_image: &mut Ppm, <-- this is new!
unknown_ppm: &Ppm,
) -> ScreenAction {
...
for (r, levels_in_row) in levels_to_show.chunks(levels_per_row).enumerate() {
for (c, level) in levels_in_row.into_iter().enumerate() {
...
if rect.contains(world_xy) && left_mouse_pressed {
action = ScreenAction::ChangeScreen { to: Screens::GameScreen };
let to_load: PlayState = (&level.info).into();
*current_level = to_load;
*current_win_image = level.image.clone();
}
...
After creating a reference in the main loop, and also adding #[derive(Debug, Clone)]
to the Ppm struct so that .clone() will work. This all compiles! And,
it works!
It does feel a little gross though. Not to mention a little misleading variable wise. We're definitely
accruing technical debt here. But we're also making good progress. Such is the balance of things, it's
not that I don't like that we're passing in something to be mutated, with an immediate mode UI it feels
very much like a natural given unless we structure our program a different way. But rather than we mutate
TWO things based on one action, and conceptually those two things are really the same thing. You know?
Before we shift our attention to cleaning up our mess, I think it's important we not only tweak the other
screen's return to menu button to send us to the right place, but also that we mark a level as completed!
Let's do both of those things now, one is a one line change:
pub fn win_screen(
...
) -> ScreenAction {
...
if left_mouse_pressed && should_highlight {
// Tmp go back to game screen for now
ScreenAction::ChangeScreen {
to: Screens::ChooseLevelScreen { page: 0 },
}
} else {
ScreenAction::NoAction
}
Okay I guess technically we deleted our todo comment too, but whatever. It doesn't really set us up
to send the user back to the potential page their level was on in the past, but that's okay. We could
probably figure that out if we really wanted to, but it's very low on the list of priorities to me.
More importantly, when we hit that win screen, we ought to mark the level as done! Or maybe, when we
trigger the change over to the win screen?
I think maybe what we should do is represent this as a screen action. If we do this, then we can
tweak the win screen code to send the signal to mark the level complete on each frame:
if left_mouse_pressed && should_highlight {
ScreenAction::ChangeScreen {
to: Screens::ChooseLevelScreen { page: 0 },
}
} else {
ScreenAction::MarkLevelComplete
}
Obviously, we don't want to open the file and write out to it every frame. That'd probably tank the FPS and
also ruin the hard drive of whoever's running the game! But we can handle that "do this once" type behavior
by using the Level struct itself. Except, there's an important detail we're glossing over by
accident:
How do we tell which file to update?
We loaded the files, but we didn't actually keep track of a name or path to write back to, did we?
Wups. We can fix this pretty easily, it's just a matter of tweaking the struct and loading method,
Besides being able to have a handle on which file we need to update to persist the change itself,
we also now have an easy way to distinguish the levels from each other besides comparing their
entire PBM file or similar. Also a boon.
let mut current_level = levels[0].path.clone(); // tmp garbage for now
...
match action {
...
ScreenAction::MarkLevelComplete => {
let found_level = levels.iter_mut().find(|level| level.path == current_level);
if let Some(played_level) = found_level {
if !played_level.completed {
played_level.completed = true;
// TODO: Persist this to the file
}
}
}
...
This gets us almost all the way there. But we need to update the level_select_screen to
pass the new path down just like we did the game_state and win_image so that
the level select code can mutate it on the fly whenever we change the level. Otherwise we'd end up
updating the wrong level all the time.
While this growing list arguments is begging for a parameter object refactor, we're not done yet.
This does set the completed flag when we finish a level
But if I restart the program it blows it away. So, to really call this done, we need to write
one more little helper method:
If you've been paying attention to the videos in the level building section you may have noticed
something.
Each of the completed levels are the same. This is because every single level is the same. For the
sake of testing I ran a little bash script that basically did this 15+ times:
cp 1.level 2.level
cp 1.pbm 2.pbm
cp 1.ppm 2.ppm
But obviously, I'd like to have different levels for users to enjoy! But, I'm not sure if you could
guess, but writing out the BPM and PPM files by hand is a bit of a pain in the butt. Not terribly
difficult, and in fact the unsolved.ppm file I made by doing the bpm of the shape I wanted first, and
then doing a find and replace on the 1 and 0's to the gray triplets I wanted. Shocking, I know, but
you may have suspected it when you saw that the ppm was only two colors.
Speaking of not terribly difficult, the way we used draw_ppm_at got me thinking:
Why don't I make an easy ppm paint program?
Nothing as complicated as MSPaint 24, but a
bit of egui color picker and sliders and friends can probably enable us to make a simple tool to construct
our levels. Up to this point, we've only had a single main method though, but luckily for us, we should
be able to make an extra bin folder and create an extra binary to run for this. Unluckily for us, the
way that I've been declaring out modules so far has made everything private to the main main.rs file.
So, first things first. We need to create a src/lib.rs file to move some of the code around so that
we can easily share things like the Netbpm format structs around. The short way to describe things is that
we have to create src/lib.rs with the contents of:
pub mod gamestate;
pub mod levels;
pub mod netbpm;
pub mod netppm;
pub mod screens;
pub mod ui;
And then, we tweak the src/main.rs file to do use XXX instead of mod XXX
that we had before. This will all almost work. But because we're now using a lib.rs file,
everything in the main.rs file is private to itself. This means that our screen methods that were relying
on our helpful mutable debugging struct now run into this:
error[E0432]: unresolved import `crate::DebugStuff`
--> src/screens.rs:1:5
|
1 | use crate::DebugStuff;
| ^^^^^^^^^^^^^^^^^ no `DebugStuff` in the root
While I'm not actively using most of this, the debugging on the color palette is something I still appreciate
and may want to use later on when we're doing any sort of polishing. So, for now, I just shifted over the
entirety of the debug struct and its helper window into the src/ui.rs file and updated the imports.
With that done, we can begin thinking about our level editors.
Let's start small, let's not think too much about loading and changing existing levels, instead, let's think
about just making new ones and saving the output. Since the BPM and PPM are interconnected, it would make
sense to me if the user edits them both at the same time. Though, we won't translate any clicks from each
grid to the other automatically. I mean, look at an example grid vs its image in the miku game:
You can see how the simple binary colors set up the shape, but then when we actually look at the image
there's plenty of colors to define the shading and details that make you say: aaah I see the penguin!
Looking at the pixel art, it occurs to me that a good idea for a feature would be to show the used colors
so far in the PPM file as a palette for the user to select from, that way it's easy to select and draw
the pixel art without having to fuss around with the RGBa color wheel too often. So, here's our list of
MVP requirements for our tool:
Display PPM and PBM files next to each other
Save button to save files
Color selector for current color
Display colors in-use in PPM, allow re-selecting as current
Able to edit PBM and PPM by clicking to fill cell with color
While looking at the egui home page for a reference about how to
make a textbox for the filename, I noticed an interesting pattern in the code example source. Creating a ui function in the struct implementation
to avoid having to write &mut everywhere all the time. This also seems like a nicer
way of doing what we were doing with the DebugStuff before too! Let's give it a try:
And we can define an implementation function for the ui to render using &mut self
in order to avoid all the boilerplate and all the passing around. Rendering some of the simple
fields is easy, since we've done this before with the DebugStuff struct. The width,
height, and color for example are simple:
But this is the first time we've used the horizontal helper, which allows us to
put two widgets next to each other side by side:
ui.horizontal(|ui| {
ui.label("Filename (no extension)");
ui.add(TextEdit::singleline(&mut self.filename));
if ui.button("Save").clicked() {
// TODO: Save out to file!
}
});
ui.separator();
ui.label("Current Palette:");
This isn't too bad, but one thing that was interesting to figure out was how to render the
color palette! The LevelSettings field lru_colors is meant to
track the used colors so far in the PPM file that we're making. So it would be nice if these
were buttons that were the color of what you are getting, kinda of like a paint palette.
Figuring out how to do this involved
hunting down this github issue and then extrapolating from that and staring at the
WidgetVisuals
documentation. But with their power combined we get this:
for mut color in &mut self.lru_colors {
ui.horizontal(|ui| {
ui.scope(|ui| {
ui.style_mut().visuals.widgets.inactive.weak_bg_fill =
Rgba::from_rgba_unmultiplied(
color[0], color[1], color[2], color[3],
)
.into();
if ui.button("Select").clicked() {
self.current_color = color.clone();
}
})
});
}
}
}
All the styles used within a ui scope, can be controlled by the visuals
field. Since buttons are widgets, we can control their properties from there, and then it was a
matter of trial and error to figure out if we needed to modify weak_bg_fill or bg_fill.
I went with bg_fill but it didn't work, so, "weak" it was! And then, like magic:
We'll empty out the lru_colors soon, but first we need to work on getting the
level data shown for editing purposes. One thing that I think is important before we start
working on this is that I don't know if we'll actually re-use our existing Pbm
and Ppm structs, for one specific reason:
When you slide the sliders to control width and height, what happens to the cell data of the
cells that are being trimmed away? If I accidentally slide something over, do I lose ALL the
data for the pretty picture I was drawing? That seems awful, and frustrating! So I think we
actually want to work slices of a full 20x20 level, and then export only the width and height
that we've chosen.
We can create a separate struct to track this information. And since the PBM and PPM sizes
must be the same in order for this to work, let's just track it all together as one struct:
I wanted to use [[[f32;4]; 20]; 20] but I couldn't remember how to do this
without typing out false 400 times, so I opted to stick with vectors for
the time being, and initialize them with some simple default properties:
impl Default for EditorGrids {
fn default() -> EditorGrids {
let mut pbm_grid = Vec::with_capacity(20);
let mut ppm_grid = Vec::with_capacity(20);
for _ in 0..20 {
let mut pbm_row = Vec::with_capacity(20);
let mut ppm_row = Vec::with_capacity(20);
for _ in 0..20 {
pbm_row.push(false);
ppm_row.push([0.0, 0.0, 0.0, 1.0]);
}
pbm_grid.push(pbm_row);
ppm_grid.push(ppm_row);
}
EditorGrids {
pbm_grid,
ppm_grid,
size: vec2(400., 400.),
top_left: vec2(400., 120.), // [ 400 + 400 + gutter + 400 ]
}
}
}
The position and size values are magic numbers, but I think it's okay to hard code these for now since
it's not like we're moving these grids around on the screen dynamically at all. Just their contents!
For drawing purposes, even though we'll be using the Graphics of the frame context, and
not the ui.* methods, I'll stick with the pattern and call the function ui:
To start, we can just render the general shape of what we want. Which is two grids, side by side,
not overlapping with our tool window:
And then we can work on drawing the actual grids themselves, starting with the simple
PBM which also has a simple interaction with the mouse click:
fn ui(&mut self, frame_context: &mut FrameContext, level_settings: &mut LevelSettings) {
...
let input = &mut (frame_context.input);
let left_mouse_pressed =
input.mouse_pressed(MouseButton::Left) || input.mouse_held(MouseButton::Left);
let right_mouse_pressed =
input.mouse_pressed(MouseButton::Right) || input.mouse_held(MouseButton::Right);
let (mx, my) = input.mouse_position();
let screen_size = gfx.screen_size();
let world_xy = gfx.camera().screen_to_world(Vec2::new(mx, my), screen_size);
let num_boxes_x = level_settings.width;
let num_boxes_y = level_settings.height; // TODO: maybe just always have a square
let gutter = 2.;
let cell_size = (self.size.x - (gutter + gutter * num_boxes_x as f32)) / num_boxes_x as f32;
let cell_size = Vec2::splat(cell_size);
let pbm_anchor = self.top_left;
gfx.rect()
.at(pbm_anchor)
.size(self.size)
.color(Color::WHITE);
let pbm_anchor = pbm_anchor + gutter;
for r in 0..num_boxes_y {
for c in 0..num_boxes_x {
let position = pbm_anchor + vec2(c as f32, r as f32) * (cell_size + gutter);
let color = if self.pbm_grid[r][c] {
Color::RED
} else {
Color::BLACK
};
if Rect::new(position, cell_size).contains(world_xy) && left_mouse_pressed {
self.pbm_grid[r][c] = true;
}
if Rect::new(position, cell_size).contains(world_xy) && right_mouse_pressed {
self.pbm_grid[r][c] = false;
}
gfx.rect().at(position).size(cell_size).color(color);
}
}
...
The red color is just to make life easy and obvious for us while we work. The rest of the code is
the same sort of grid drawing code we've done this entire time. One nice trick is that the mouse
pressed and mouse held makes life easier on the fingers, because you don't have to click every cell,
instead you can just drag to draw a line, which makes making red blobs like this, easy:
The ppm drawing code is similar for the grid itself, though we'll need to think harder about the
interaction between clicks and the cells (but not too much harder). One thing that's nice about
the full capacity of the grid, and that we're limiting the updates to the width and height that
the level settings define, is that we preserve anything out of bounds, so you don't lose work:
This is great! What's less great, is that I'm starting to think the answer to the
// TODO: maybe just always have a square is Yes, we should just have a
square and not have to think about weird awkward shapes. We can circle back to that in
a bit, let's get the PPM drawing working. And by "working" I mean, we won't do the LRU
related thing yet
let ppm_anchor = pbm_anchor + vec2(400. + 50., 0.);
gfx.rect()
.at(ppm_anchor)
.size(self.size)
.color(Color::WHITE);
let ppm_anchor = ppm_anchor + gutter;
for r in 0..num_boxes_y {
for c in 0..num_boxes_x {
let position = ppm_anchor + vec2(c as f32, r as f32) * (cell_size + gutter);
if Rect::new(position, cell_size).contains(world_xy) && left_mouse_pressed {
self.ppm_grid[r][c] = level_settings.current_color;
}
if Rect::new(position, cell_size).contains(world_xy) && right_mouse_pressed {
self.ppm_grid[r][c] = [0.0, 0.0, 0.0, 1.0];
}
let rgb = self.ppm_grid[r][c];
gfx.rect()
.at(position)
.size(cell_size)
.color(Color::new(rgb));
}
}
This is enough for the basics to work, preserve things out of bounds as needed, and draw any
20x20 pixel art picture one might want to make:
Once again, the potential for the height to be higher than the width is causing some funny
things to happen. But, before we fix that, let's finish the base functionality by making the
save button work. Since I don't want to interrupt the drawing of the ui settings with an early
return or with a call out to write files mid-frame, let's return an action and act on it from
the main loop. Our new actions are simple:
pub enum UiActions {
Nothing,
SaveLevel,
}
As is the usage:
impl LevelSettings {
pub fn ui(&mut self, ui: &mut Ui) -> UiActions {
let mut result = UiActions::Nothing;
...
if ui.button("Save").clicked() {
result = UiActions::SaveLevel;
}
...
result
}
}
But we don't have an actual save method yet. Or a way to convert the grid into a file,
so let's work on that. Like I said before, we'll only save the defined region by the
height and width, so it makes sense to me for us to make a temporary copy of what we're
saving, and if we're going to be saving the data out to the ppm and pbm files for the
level, I think it makes sense to create the serialization to a string in those struct's
helper methods.
We already implemented a FromStr implementation, and if you read the
Display
documentation, it does seem to suggest a trait for us to implement to do just that:
However, if a type has a lossless Display implementation whose output is meant to be conveniently
machine-parseable and not just meant for human consumption, then the type may wish to accept the
same format in FromStr, and document that usage. Having both Display and FromStr implementations
where the result of Display cannot be parsed with FromStr may surprise users.
Thankfully, the PBM and PPM file formats are so simple, that these are both easy to make:
impl std::fmt::Display for Pbm {
fn fmt(&self, f: &mut std::fmt::Formatter<'_>) -> Result<(), std::fmt::Error> {
write!(f, "P1\n{} {}\n", self.width, self.height)?;
for cell in &self.cells {
write!(f, "{}\n", if *cell { "1" } else { "0" })?;
}
Ok(())
}
}
So then, we just need to write up a conversion method to create Pbm and Ppm structs
from the grids the level editor is tracking. Once we have that in place, then we can construct a Level
struct, and then implement a simple save method:
So, let's fill in the missing link. The conversion of the editor data to a Level we can save.
I think a relatively nice way to organize this is with a handy caller of our above save function, that
will in turn, use into to do some of the conversions.
error[E0277]: the trait bound `Pbm: From<&EditorGrids>` is not satisfied
--> src/bin/level_editor/editor_grids.rs:117:21
|
117 | let pbm = grids.into();
| ^^^^ the trait `From<&EditorGrids>` is not implemented for `Pbm`
|
= note: required for `&EditorGrids` to implement `Into<Pbm>`
error[E0277]: the trait bound `Ppm: From<&EditorGrids>` is not satisfied
--> src/bin/level_editor/editor_grids.rs:116:21
|
116 | let ppm = grids.into();
| ^^^^ the trait `From<&EditorGrids>` is not implemented for `Ppm`
But I do love how the compiler helps drive our development process here. Oh, you want to convert one type to the
other? You'll need to satisfy this trait bound to do that! It's so handy! And so, we can follow along
with what it's asking us to do:
But wait a minute. We need more information than this, we need both the editor grid AND the level settings to do this.
I suppose I could do this:
let ppm = (level_settings, grids).into();
let pbm = (level_settings, grids).into();
But I do kind of wonder if I'm bending this backwards to use into here, rather than just having a
ppm_from(level_settings, grids) sort of function. But I mean, naming that function makes me think
level_settings_and_grid_to or ppm_from_grid_and_settings or something like that.
And well, the From semantics match that without me having to contort into the verbosity of an
average Enterpise™ Java programmer to name the function.
Alright let's just use a From + tuple maneuver. The Pbm file is simple and easy as
we're working with a grid of booleans either way, so there's no conversion:
impl From<(&LevelSettings, &EditorGrids)> for Pbm {
fn from(tuple: (&LevelSettings, &EditorGrids)) -> Pbm {
let (level_settings, grids) = tuple;
let width = level_settings.width;
let height = level_settings.height;
let mut cells = Vec::with_capacity(height * width);
for r in 0..height {
for c in 0..width {
cells.push(grids.pbm_grid[r][c]);
}
}
Pbm {
width,
height,
cells,
}
}
}
For the PPM file we do need to convert things a bit. The Rgba
code from the color selector is expressed as an f32 and we need to
convert that over into a u16. So something like [0.0, 0.0, 1.0, 1.0] becomes
0 0 255. Sounds like a great opportunity to lerp:
Only thing of note there is that we round since if we just did as, we'd
truncate something like 254.745 to 254, which feels wrong since that funny decimal number is actually
what you get from doing 0.999 * 255.. Anyway, with that ability to go from a number
from the range of 0 to 1 to the 0 to 255 range, we can write our Ppm code:
impl From<(&LevelSettings, &EditorGrids)> for Ppm {
fn from(tuple: (&LevelSettings, &EditorGrids)) -> Ppm {
let (level_settings, grids) = tuple;
let width = level_settings.width;
let height = level_settings.height;
let mut cells = Vec::with_capacity(height * width);
let max_value = 255.;
for r in 0..height {
for c in 0..width {
// [0.15354905, 0.13828914, 0.6661099, 1.0]
let rgba = grids.ppm_grid[r][c];
let r: u16 = percent_to_u16(rgba[0], max_value);
let g: u16 = percent_to_u16(rgba[1], max_value);
let b: u16 = percent_to_u16(rgba[2], max_value);
cells.push([r, g, b]);
}
}
Ppm {
width,
height,
max_value: max_value as u16,
cells,
}
}
}
I'm sort of arbitrarily choosing 255 as our maximum value, even though we could go up to the
higher range of 65535, my brain still thinks mostly in simple RGB mode that the web uses.
Anyway, easy! Now the code compiles and we just have to call the save method!
match level_settings.ui(ui) {
UiActions::Nothing => {}
UiActions::SaveLevel => {
let level = save_grid_as_level(&level_settings, &grids);
level.save();
}
}
Although, considering that I have to call save after using our new function, I
think I've named it wrong. So, I'll rename that in a moment, but first, the test!!!
The PBM file writes out each value in the column, row by row, and all in one go. I suppose
we could tweak it to print more like a "grid" like I had in my hand made one which was a little easier
to check and confirm, but it is correct. What about the PPM?
Yup! This matches things up! Ok, so final test, if open up the game, since we wrote this into
the levels folder, I should be able to select and play it in the game itself:
Besides the fact that this just revealed a bug in our save code, it works! Let's fix the save
method to not mark the level as completed instantly.
And we've proven that our level editor works and can be used to make a level! Awesome!
But there's a bit more work to be done before we call it good to ship. Mainly, our concept
of the most recently used colors showing up in a palette/what is being used in the PPM file
powering that list.
I don't want to pull out the unique colors from the ppm display each frame, that'd be wasteful
and silly, so rather than that, let's create a new enum to tell the system to pull out the
colors as needed. Specifically, when we click the "Select" button on the panel that changes the
color palette we can raise this up, as well as if we modify the current color
pub fn ui(&mut self, ui: &mut Ui) -> UiActions {
...
ui.label("Color: ");
let previous_color = self.current_color.clone();
ui.color_edit_button_rgba_unmultiplied(&mut self.current_color);
if previous_color != self.current_color {
result = UiActions::RecomputePalette;
}
...
for color in &mut self.lru_colors {
...
ui.horizontal(|ui| {
ui.scope(|ui| {
if ui.button("Select").clicked() {
self.current_color = color.clone();
result = UiActions::RecomputePalette;
}
})
});
}
...
}
And then, well, what I'd like to do is use something like a hash set, but unfortunately for us:
the trait bound `f32: Eq` is not satisfied
If we attempt to use that with an f32 value. So I guess, rather than using a hashset, we'll
use a hashmap and compute a key that should work properly for our purposes. We can take
advantage of the fact that we already have a handy dandy function to convert the floats into u16s, and
then…
impl EditorGrids {
pub fn unique_colors(&self) -> Vec<[f32; 4]> {
let mut unique = HashMap::new();
for row in &self.ppm_grid {
for &[r, g, b, a] in row {
// each value is u16, 16 * 4 = 64 and so...
let key =
(percent_to_u16(r, 255.) as u64) << 48 |
(percent_to_u16(g, 255.) as u64) << 32 |
(percent_to_u16(b, 255.) as u64) << 16 |
(percent_to_u16(a, 255.) as u64);
unique.insert(key, [r, g, b, a]);
}
}
unique.into_values().collect()
}
There's probably other ways we could make a key, but I figure since we have 4 values
of 16, and u64s are right there that we could use that. Once we've got the
unique values in the hashmap, it's just a matter of returning them which is easy.
Then, we can use them:
Also, I originally was planning on us guarding against too many colors at once with
that max_colors thing, but honestly, I don't think we need it. So we can
just remove it from the code and if someone REALLY wants to draw a PPM color with so
many colors that it makes the palette selector unwieldy, then they can go for it.
For now though, this is almost done. While I think I'll only ever make square levels,
I suppose the easy way to fix the bleed is to make the cell size respect the height
and not only base themselves on the width:
impl EditorGrids {
pub fn ui(&mut self, frame_context: &mut FrameContext, level_settings: &mut LevelSettings) {
...
let cell_size_x = (self.size.x - (gutter + gutter * num_boxes_x as f32)) / num_boxes_x as f32;
let cell_size_y = (self.size.y - (gutter + gutter * num_boxes_y as f32)) / num_boxes_y as f32;
let cell_size = vec2(cell_size_x, cell_size_y);
...
This fixes the display so that you end up with the right image, and not the left:
Again, I don't think this looks very good. But for the sake of it, I'll let is be fixed this way
instead of forcing all images to always be square. Who knows, maybe when I start making levels
I'll want to make some funny shaped guys. Time will tell.
What we can't tell right now though, is when you've actually saved the level!
warning: unused `Result` that must be used
--> src/bin/level_editor/main.rs:63:29
|
63 | ... level.save();
| ^^^^^^^^^^^^
|
= note: this `Result` may be an `Err` variant, which should be handled
= note: `#[warn(unused_must_use)]` on by default
help: use `let _ = ...` to ignore the resulting value
|
63 | let _ = level.save();
| +++++++
Right now, if I click on the save button there is no feedback to the user about what just happened.
So let's fix that. I don't know if egui has a "pop up" sort of dude, but I'm pretty sure we could
easily replicate one with a mutable boolean that gets set plus a message, or maybe if we wanted to
be a little bit more pure and re-usable… yeah, let's do this!
Just like before, we can define a ui function to construct how we want to
display something with mutable data in the ui. Thankfully, I spotted the
modal example
in egui's documentation and that made life simpler. The modal handles nixing any input besides
what's going to itself while it's displayed, and displaying it is pretty simple for us, since
we don't always have a pop up, we can use an option to good effect here:
... above our main loop alongside our other long lived settings
let mut save_pop_up: Option<PopUp> = None;
...
App::new()
.window_size(1280, 720)
.title("Logic Brush Level Editor")
.run(move |frame_context| {
...
Window::new("Settings")
.anchor(Align2::LEFT_TOP, egor::app::egui::Vec2::ZERO)
.default_size([100.0, 500.0])
.show(egui_ctx, |ui| {
...
match level.save() {
Ok(_) => {
save_pop_up = Some(PopUp {
heading: "Saved".to_owned(),
msg: "Your level has been saved".to_owned(),
visible: true,
});
},
Err(error) => {
save_pop_up = Some(PopUp {
heading: "Error".to_owned(),
msg: format!("Error: {error}").to_owned(),
visible: true,
});
}
}
if let Some(popup) = save_pop_up.as_mut() {
popup.ui(ui);
}
}
...
Technically, once a pop up has occurred, we always have one. But once its dismissed
it won't show up again. A tiny memory hit, but not enough of one for me to consider
adding in a check against the visible flag to then set the save_pop_up
back to None.
There's nothing stopping you from overwriting the file or anything like that, but I
don't think this editor needs to be that sophisticated. I'm tracking the levels in
git after all, so if I mess it up I can revert25.
And just like that. Our basic level editor is complete!
Erm. Well, it could probably use some labels of what each thing is, and maybe an instruction
or two actually. Only we know how to use it, and while "internal tools" sometimes have a
lower bar of tutorials for some reason, that doesn't mean we need to give in to that, right?
We can at least toss those in before we move on…
For one, black on black is kind of hard to read. So let's clear the screen to gray instead
so that the black boxes of the grids are easier to tell apart from the background:
gfx.clear(Color::new([0.5, 0.5, 0.5, 1.0]));
We can also tweak the Color::WHITE for the pbm board to Color::BLUE
for a bit more of a difference to see how we like it:
But more importantly, we can add some labels and instructions to the screen:
ui.heading("Instructions");
ui.label("Left click to apply changes to the grids, right click to remove");
ui.label("The PBM grid defines the cells to fill for the puzzle");
ui.label("The PPM grid defines the pixel art reward. ");
...
ui.separator();
ui.heading("Warning:");
ui.label("Saving will overwrite any file with the same name");
There's really nothing to say here besides we'll rely on people's ability to read instructions.
Which is a terrible way for a program to be, but for now, I'll accept the risks of not reading
my own notes.
As a consequence of our side quest to create a level editor, we now have a handy pop up
struct and ui we can use. So, let's return to the code we left on the table before:
ScreenAction::MarkLevelComplete => {
let found_level = levels.iter_mut().find(|level| level.path == current_level);
if let Some(played_level) = found_level {
if !played_level.completed {
played_level
.mark_completed()
.expect("could not persist level completion")
}
}
}
This code didn't sit well with me before, yes, we have other panicing parts
of this code, such as this:
ScreenAction::PreviousPage => {
let Screens::ChooseLevelScreen { page } = current_screen else {
panic!("screen was not level select {:?}", current_screen);
};
current_screen = Screens::ChooseLevelScreen { page: page - 1 };
}
But that panics because of a programmer error, and so feels more acceptable to
me since we should explode and stop if the assumptions we're making about our own code
go wrong. But, the completion of a level failing to save feels like it could happen due
to something weird about the external world to the program, like a permission
error or similar on the player's machine.
This feels like a different class of problem, and so I'd like to handle it more gracefully.
It's not hard to use our new pop up structure for this:
let mut maybe_popup: Option<PopUp> = None;
...
ScreenAction::MarkLevelComplete => {
let found_level = levels.iter_mut().find(|level| level.path == current_level);
if let Some(played_level) = found_level {
if !played_level.completed {
match played_level.mark_completed() {
Ok(_) => {},
Err(error) => {
maybe_popup = Some(PopUp {
heading: "Error".to_owned(),
msg: format!("There was a problem {}", error).to_owned(),
visible: true,
});
}
}
}
}
}
Though, it is a little funny to actually render the pop up because we need a Ui
from egui, and in our usual loop here, we don't have one of those. But we can get one if
just make a new window widget for it:
if let Some(popup) = maybe_popup.as_mut() {
let egui_ctx = frame_context.egui_ctx;
Window::new("!").show(egui_ctx, |ui| {
popup.ui(ui);
});
if !popup.visible {
maybe_popup = None;
}
}
But, unlike before, we need to actually reset the pop-up to None when
we're done with it or else the window with the ! will hang around if
it ever shows up. Which is annoying.
For now this is okay though. We're running into those little oddities because we're
combining egui windows and egor's drawing panes in one app. So a bit of jank is to
be expected I think. But I'm okay with it, and I feel like we've learned a lot.
An overhaul of the "graphics" and layout to make it look like an actual game
Sounds! Music! There's no audio component at all to this game!
Some tidying up of the code, why do I keep writing the same grid rendering code everywhere
A deployment process to give the game to YOU
Of these things, the most important to me is understanding the release process. As you may
have guessed, I'm not planning on circling back to the graphics, music, or covering the tweaking
and twiddling I might do to refactor things in this blog post. My main goal, as I stated above
the table of contents, was to dip our toes into the idea of doing game development with rust.
I feel like I've accomplished that, I've learned some stuff along the way, and I've ran into
some face-to-rake moments along the way that have me itching to explore alternatives and potentially
go deeper in some of these areas. For some reason, I have the itch to find out if this
SDL3 thing I've been hearing about recently
would be fun to use. And our run in with cosmic-text and friends sort of make me think it'd be fun
to see if those two could play along.
But as always, I'm stubborn.
And as I noted at the start, my one fear for this project was that we wouldn't finish it.
You might say that since I'm ignoring the music and graphics aspects that I'm not finishing it,
but my definition of not finishing is having no deliverable to give to you. Which is why
I was so trepidatious about using rust in the first place. With Java and LibGDX, I press a
couple buttons and run a few gradle tasks and bada bing, bada boom, we've got zip files to
handle out to anyone who wants to play the game!
So the question is, how the heck do I do that for this project? How do I deploy the egor
game to YOUR machine?
Well, according to the README
file, we can make a wasm build by creating an index HTML file and then running trunk?
It requires me to run cargo install trunk, which took a few minutes to compile
510 or so crates together. Then, I tried running trunk serve like the docs
suggested and uh
Hm. I tried to look at the documentation on "trunkrs.dev", but the site was just a blank
white screen with some errors in the web inspector console
Cross-Origin Request Blocked: The Same Origin Policy disallows reading the remote resource at https://router.parklogic.com/. (Reason: CORS request did not succeed). Status code: (null).
failed to contact router, status code: 0 ""
That's uhm. A sign. Maybe not a good one. But a sign. Of something. I'm not really sure if
maybe it's unhappy due to use having two binaries and perhaps it doesn't know which to
do things for? But I don't think that's it, because if I temporarily name the editor main
to a txt doc, it doesn't change the output of the commands at all.
So let's set that aside. How do I generate a build for a simpler target. How about just,
linux? Well, making the binaries is easy, we just run cargo build --release
and then out pops the data
Granted, becuase they're completely divorced from the folders we created like assets and levels
trying to run them results in this pain:
/target/release$ ./logicpaint
Error: Os { code: 2, kind: NotFound, message: "No such file or directory" }
But that's not really a problem. We can just copy the appropriate folders over and then it should
boot up. And, this also gives us an opportunity to see a real user error in the wild if we run the
editor and try to save:
So sure, that seems simple enough and honestly, using a make file comes to mind to me for us to
copy those files over. But I think that's actually not the right option here. One of the great
things about rust is that it compiles on windows, linux, and mac. So, rather than trying to figure
out how to build from my linux machine and target those, why don't we just build it on that machine?
Now, technically, I do have access to each of these systems on my own. But an easier solution
than me duel—erm, triple-wielding keyboards, would be to just make the robots do it all for me.
Specifically, the Octobot! Within a .github/workflows/release.yml file, I can start my plot: 26
Nothing crazy here yet, just saying that we'll build for the 3 most common targets with the code
we've got in the repository whenever we push up a tag that starts with "v".
These two steps are the same regardless of which platform we're one, cargo is nice like that.
At the risk of dumping too much at once, the platform specific runners are pretty straightforward.
Linux and mac both can use the same process since cp works the same on each,
but of course, the weirdo world of MacroSlop uses all those funny /E /I flags.
It's funny, I used windows for most of my life, but besides writing fork bombs to drop onto the
school's computers, I never really spent much time learning the CLI for the DOS style shells.
Let alone powershell. Anyway:
this doesn't cut a release or attach anything like I've done in the past for java builds.
I think we want to see that this works before we do any of that sort of thing.
That's promising! But when I downloaded the linux assets and gave it a shot:
~/Downloads/logicpaint-Linux/logicpaint-linux$ ./logicpaint
./logicpaint: /lib/x86_64-linux-gnu/libc.so.6: version `GLIBC_2.39' not found (required by ./logicpaint)
So we accidentally built on a build that used a very very recent version of glibc, more recent than
mine
not TOO much more recent, but it doesn't really matter since
The reverse (backwards compatibility) is not true. It is not possible to take program binaries linked with the latest version of a library binary in a release series (with additional symbols added), substitute in the initial release of the library binary, and remain link compatible.
https://gcc.gnu.org/onlinedocs/libstdc++/manual/abi.html stackoverflow post
GLIBC is forward compatible, but not backwards. So if we want our cool new game to
work on common systems, we need to target an older version of linux. Sadly, this makes the
yaml file a little more complicated, but not too much. We just need a container!
And then everything else goes along as expected. But speaking of platform specific things,
now would probably be a good time to audit some of our code. Specifically, the stuff that
deals with paths…
let filename_pbm = match arguments.next() {
Some(arg) => arg,
_ => "./assets/P1.pbm",
};
arguments.next(); // skip the name of the program being ran
let filename_ppm = match arguments.next() {
Some(arg) => arg,
_ => "./assets/P3.ppm",
};
// todo use options and whatnot to load things up properly and such
let unknown_ppm = read_to_string("./assets/unsolved.ppm")?;
Hey, would you look at that. Past me even had a todo in here. This isn't
too hard to fix, we just need to build up our paths from a known location. Your first
instinct, like me, might be to just reach for current_exe
from the std::env module. And that's mostly right, but when if we do that,
then when we try to run cargo again we'll run into
Error: Os { code: 2, kind: NotFound, message: "No such file or directory" }
when the binary runs from the target directory.
Reason being that up until now, the ./
has actually been meaning from our current working directory of where we were running the commands.
Not the directory of the binary. This worked in our favor with us sitting at the root of
the repo, right next to the assets and levels folder, but that won't work if we swap things around
as if we're a non-dev machine. So, we can be clever here:
pub fn base_dir() -> std::path::PathBuf {
let mut dir = std::env::current_exe()
.expect("failed to get current_exe")
.parent()
.unwrap()
.to_path_buf();
// To avoid a bit of friction with cargo run versus cargo build --release + run the binary
// we can find out if we're in "dev mode" by looking for the tell tale signs of development
// aka: there's a toml file hanging out somewhere above wherever we are.
let mut probe = dir.clone();
while probe.pop() {
if probe.join("Cargo.toml").exists() {
return probe;
}
}
dir
}
This sort of thing very much feels like it's deserving of a comment. After all, walking up from where
a binary is is sort of an odd thing to do. For a release version, I suppose it might run into
a permission error, but the docs for pop
don't seem to throw out any particular thing to watch out for, so this seems ok. Anyway, to detect if
we're in editor mode or not, we can just look to see if the toml file exists. We don't ship that, so it's
an easy thing to detect our "dev" mode.
Explanations of probing aside, the changes to the rest of the code to make it all behave are pretty
minimal, code like
let unknown_ppm = read_to_string("./assets/unsolved.ppm")?;
expands a little bit and becomes:
let exe_dir = base_dir();
let assets = exe_dir.join("assets");
let unknown_ppm = read_to_string(assets.join("unsolved.ppm"))?;
Similar, our use of the array + collect strategy in the level save code removes the
relative path part, and then relies on join to combine the base and ending path
together:
pub fn save_grid_as_level(level_settings: &LevelSettings, grids: &EditorGrids) -> Level {
let ppm = (level_settings, grids).into();
let pbm = (level_settings, grids).into();
let base = base_dir();
let path: PathBuf = ["levels", &level_settings.filename].iter().collect();
let path = base.join(path);
Level {
info: pbm,
image: ppm,
completed: false,
path: path.with_extension("level"),
}
}
Certainly not the worst thing one could be doing to achieve cross platform abilities. Speaking of,
checking back in on the github build I kicked off before fixing up the directory related stuff, we're
now able to successfully run the linux version we built on github locally from the downloaded zip:
That's pretty exciting! Putting aside the fact that the game still proudly shoves the debug
window into your face, and also only has one committed level, this is a pretty good sign that
the release process is going smoother than I'd have thought it would. The last step, now that
the build is green, is to have it attach the assets to a release version.
permissions:
contents: write
... as another step after the upload artifact step....
- name: Upload to GitHub Release
uses: softprops/action-gh-release@v2
with:
files: |
logicpaint-linux.tar.gz
logicpaint-macos.tar.gz
logicpaint-windows.zip
thankfully, the softprops folks have done all the hard work, so it's as easy as making sure the
workflow job has permissions to write data, and then one little action later and bada bing, bada
boom, behold on github,
zoom zoom zoom.
Ok, so now that we've got the release process going, we can do any final polishing, tag it, and then
we'll be officially done!
Besides taking out the debug windows, we need to do a bit more tweaking
because when it comes to 5x5 puzzles, we don't always render everything as intended, as seen with
this level:
There's three 1's in the first column, but as you can see, we're only showing the last two. So,
we'll need to fix that. In general, the overall design of the layout of well, everything, leaves
a lot of be desired. The thing is, every time I open excalidraw, draw.io, pinta, or any program
to doodle things out, it just never feels right and always feels clunky. So, I did something better.
Yup. Just like the president of Dominos Japan, I decided to
have some fun with miku
and use my grid notebook to dot out the 16x9 screen, and then get a feel for how I wanted
the UI to look from there. I'm not 100% sure it will look good on screen yet, but that's
what we'll find out next.
Since I want a quit icon and maybe a few other things, it's time to refactor the way we're
passing unknown_ppm down. Right now it's loaded up in the main function and
given over to the ui, I don't want to make a new argument for every ppm I want to use, so
let's bundle em all up:
I suppose this is where people use "asset managers" and that sort of thing, but since I don't have
one of those at the moment, I think this will suffice just fine. You might ask, why not use a hashmap
of a file or something to the loaded Ppm? Because I don't want to deal with Options everywhere and if
I can't load an icon, then the game shouldn't be played! This refactor is quick, in the main we replace
the load for the unbeaten level with:
Is my "art" for the quit button good? No, but hey, I made it with the level editor
so give me a bit of a break. One day, I'll use a proper pixel art program like aesprite
or something, but not today! Now, you might be wondering about those new variables for
position and size, well, since we're not working off the grid paper, we can tweak the
level setup code like this:
let x_unit = 1280. / 32.;
let y_unit = 720. / 18.;
let level_bg_size = vec2(16. * x_unit, 10. * y_unit);
let title_text_position = vec2(8. * x_unit, 5. * y_unit) + vec2(level_bg_size.x / 2., 0.);
let level_bg_position = vec2(8. * x_unit, 6. * y_unit);
let quit_position = vec2(28. * x_unit, 1. * y_unit);
let quit_btn_size = vec2(3. * x_unit, 3. * y_unit);
This helps keep our mental model of "8 graph paper cells to the right" in place in the
code, which is helpful for transcribing things. Since the calculations are all from hardcoded
values, I'm decently confident that the rust compiler is going to just inline the values and
not do any math each frame.
For the quit button to actually do something, we need to wire up a new screen action
and then create a rect to check if the user has clicked or not:
// in level_select_screen
let rect = Rect::new(quit_position, quit_btn_size);
let highlight_color = if rect.contains(world_xy) {
if left_mouse_pressed {
action = ScreenAction::QuitGame;
}
Color::new(palette.cell_incorrect)
} else {
Color::new(palette.group_highlight)
};
gfx.rect()
.color(highlight_color)
.at(quit_position - 4.)
.size(quit_btn_size + 4.);
draw_ppm_at(&loaded_ppms.quit_ppm, quit_position, quit_btn_size, gfx);
// in main.rs
match action {
ScreenAction::QuitGame => {
std::process::exit(0);
}
You might notice I'm also starting to use palette here, we weren't passing
that in before, but it was a trivial refactor to do, and then the vivid blue that screams:
"I am a work in progress" disappears:
Also I've decided to combine the two games I know of that do this sort of puzzle mechanic
into one word to use as the name of this silly little game27.
Interesting, and of note, is that calling gfx.clear(Color::new(palette.grid_even)); just
the one time results in every screen using that color as the clear screen. I fully
expected to have to call it every time from every screen, but I guess global mutable state
is the name of egor's game.
Moving along, we can rework the play_game_screen to also follow our grid paper
layout. Its signature needs an update since we'll be wanting our quit button, which means
we want our LoadedPpms container passed along as well:
and then it's the usual song and dance of using the graph paper units to
lay things out
...
let x_unit = 1280. / 32.;
let y_unit = 720. / 18.;
let bg_position = vec2(16. * x_unit, 7. * y_unit);
let quit_position = vec2(28. * x_unit, 1. * y_unit);
let quit_btn_size = vec2(2. * x_unit, 2. * y_unit);
let bg_size = x_unit * 10.;
let box_offset = x_unit / 8.0;
and then after all the usual play area calls, we can call our new helper to draw
the quit button (which I just made) and if it returns an action for us to take,
we can quit. Which, in the case of playing a game, means quitting back to the main
level select:
...
if game_state.is_complete() {
ScreenAction::ChangeScreen {
to: Screens::WinScreen,
}
} else if let Some(quit_action) = draw_quit_button(
quit_position,
quit_btn_size,
&loaded_ppms.quit_ppm,
&palette,
&player_input,
gfx,
) {
ScreenAction::ChangeScreen {
to: Screens::ChooseLevelScreen { page: 0 }
}
} else {
ScreenAction::NoAction
}
}
This works, and it aligns us to what the graph paper wanted us to be like. Though
it does show a bit of a usability issue for us. A 5x5 grid is easily readable:
But if I load up a 20x20:
How troublesome. I think we can fix this, but let's get the other UI elements for
the play screen into the world. As you might have noticed in the image, I want to
add some basic instructions and a visual guide for the user on how to play. Easy
1 2 punch of, add in the ppm files to the assets struct for them:
And then draw them at the appropriate place with an icon next to them. As before,
we can re-work the existing positioning variables to use the graph paper world:
let x_unit = 1280. / 32.;
let y_unit = 720. / 18.;
let bg_position = vec2(16. * x_unit, 7. * y_unit);
let bg_size = x_unit * 10.;
let box_offset = x_unit / 8.0;
let quit_position = vec2(28. * x_unit, 1. * y_unit);
let quit_btn_size = vec2(3. * x_unit, 3. * y_unit);
let mouse_left_position = vec2(27. * x_unit, 5. * y_unit);
let mouse_left_size = vec2(2. * x_unit, 2. * y_unit);
let mouse_right_position = vec2(27. * x_unit, 8. * y_unit);
let mouse_right_size = vec2(2. * x_unit, 2. * y_unit);
While not the best version of hieroglyphics I've ever come up
with, it's at least what I intended. It passes the bar of "good enough"
for me, because I, as I've said multiple times, am not an artist.
Also, we have English!
let instruction_text_position = vec2(1. * x_unit, 1. * y_unit);
let font_size = 18;
...
let instructions = [
"Fill in the groups of cells based on the hints to their group sizes.",
"Groups are always separated by at least one cell.",
"Right click to mark a cell as empty",
"Left click to fill and find out if you're correct.",
];
for (i, instruction) in instructions.iter().enumerate() {
gfx
.text(instruction)
.at(instruction_text_position + vec2(0., (font_size * i) as f32))
.size(font_size as f32)
.color(Color::new(palette.group_highlight));
}
The nice thing about the size for the TextBuilder is that
it's the line height, so we can very easily stack instructions on top of each other
with equal spacing without any guesswork.
Now, besides the too small 20x20 issue, the play area is aligned with what we wanted!
I want to wrap up transferring the physical into the virtual before we consider beating
our head against the pain of virtual real estate. Thankfully, there's really not too
much to do for the win screen, it wants a similar signature update:
And that looks a bit better, more consistent with the perfect screen at least
layout wise.
I think we've all just learned a pretty valuable lesson. We should definitely
use graph paper the next time we decide to put things on a screen. It's a lot easier
and quicker. I mean, sure, the DebugStuff struct I had and the mutable
sliders and all that fun stuff made for satisfying visual feedback within the application,
but I wasn't saving any of those values down. Or at least, if I was using them to update
the code, I was doing it one variable at a time.
With the graph paper, it made it easier to sketch the idea out and get a feel for the
whole picture all at once. Very handy, and next game I'll probably try to remember to
use graph paper from the start. Maybe then we wouldn't have had this problem about the
interface feeling too small with the larger levels. That's a big maybe though, the bad
visibility is a combo of the font color and the scaling of the grid to the given area.
A new font that's just black actually does help. A little:
But it really feels more like a font weight and size problem, more than just the color.
If I just blindly tweak our scalars that we made before from 0.5 to 1.0 then we run into
a rather unpleasant result (I only changed the rows here)
And the problem is obvious. I think that if we want to fix this problem, we need to approach
this in the same way as we did the layout. Thinking about it on paper. Or at least a little
bit more analytically than we did before, I think we can solve a number of little irksome things
in the code with one little trick, including the font problem!
What if we had an easy way to compute just the geometry of a grid?
Like, what if we could say GridLayout { area, rows, columns, cell_gaps } and then
ask it to give you back an iterator that gives you the row and column you have, as well as a
Rect that defines the smaller area within the space we specify that whatever this
grid is being used for can use? If we had that, then we could use it so define the gutter size
for a specific number of letters, then get back the equally spaced areas for them to appear and
use the height of the cell as the font height. We could also use it to refactor all the code
like
let anchor = anchor - offset;
for (c, groups) in play_state.column_groups.iter().enumerate() {
let number_of_groups = groups.iter().len();
for i in 0..number_of_groups {
let grid_offset = vec2(c as f32, -(i as f32) - 2.);
let position = anchor + grid_offset * grid_cell_size * scaler;
without having to do all those grid offset, position, anchor things all the time. The only
downside to this I can think of is that iterating a separate struct increases the potential
for us to accidentally go out of bounds if we misaligned something. But I think that the
trade off is worth it since that should be mitigated since the layouts can be created in relation
to whatever grid type thing we need, or even with From trait again maybe.
There's nothing too crazy about this, we've already defined grids quite a few times and
even tried to use some cute names like halfset before in some helpers. But,
this will be a bit better than all of those born of our repeated creation of the grids
informing us what we actually need:
impl GridLayout {
pub fn cell_size(&self) -> Vec2 {
let total = self.area.size;
// [gap [cell] gap [cell] gap ]
let gaps = vec2(
(self.columns as f32 + 1.0) * self.cell_gap,
(self.rows as f32 + 1.0) * self.cell_gap,
);
// (max(vec)) to avoid negative space
let space_for_cells = (total - gaps).max(vec2(0.0, 0.0));
space_for_cells / vec2(self.columns as f32, self.rows as f32)
}
// Return the top left of where the cells start within the grid layout (offset by the gap)
pub fn origin(&self) -> Vec2 {
self.area.min() + vec2(self.cell_gap, self.cell_gap)
}
pub fn cell_rect(&self, r: usize, c: usize) -> Rect {
let cell = self.cell_size();
let origin = self.origin();
let offset = vec2(
c as f32 * (cell.x + self.cell_gap),
r as f32 * (cell.y + self.cell_gap),
);
Rect {
position: origin + offset,
size: cell,
}
}
But what should make this easier to use than what we've been doing
is this new function, where it's time to return an iterator across all the
cells for the grid, all precomputed with rectangles ready for input checking
and graphics drawing!
// For me in 3 months: '_ is an anonymous lifetime tied to self.
// it just means the caller can't let the iterator last longer than this layout
pub fn iter_cells(&self) -> impl Iterator<Item = (usize, usize, Rect)> + '_ {
let cell_size = self.cell_size();
let origin = self.origin();
let step = cell_size + Vec2::splat(self.cell_gap);
(0..self.rows).flat_map(move |r| {
(0..self.columns).map(move |c| {
let top_left = origin + vec2(c as f32, r as f32) * step;
let cell = Rect {
position: top_left,
size: cell_size,
};
(r, c, cell)
})
})
}
}
As you can tell by my comment, I have total faith in my ability to
remember bizarre nonsense like the tick underscore
aka anonymous inferred lifetimes based on the input to the function. Which is a lot of words to say
that the iterator we're returning is valid for as long as the self reference is. Er,
and by self I mean the actual instance of the thing that just called iter_cells.
Anyway. In the PlayArea#draw_grid method, we can swap out the chunk of code drawing
the grid. As a reminder, this is what the code looks like pre-refactor:
let halfset = self.halfset();
let anchor = self.anchor();
let offset = Vec2::splat(halfset);
let num_boxes = play_state.rows().len();
let box_size = self.box_size(num_boxes);
let cell_size = Vec2::splat(box_size);
let side_areas_size = self.play_area_gutter();
for (r, row) in play_state.rows().into_iter().enumerate() {
let (even_odd_bg_color, odd_even_bg_color) = self.palette.even_odd_color(r);
let y_offset = r as f32 * (halfset + box_size);
let row_group_bg_position = anchor - vec2(side_areas_size.x, -y_offset); (1)
let row_group_bg = if row_group_bg_position.y <= input.position.y (2)
&& input.position.y <= row_group_bg_position.y + box_size
{
self.palette.group_highlight
} else {
odd_even_bg_color
};
gfx.rect()
.at(row_group_bg_position)
.color(Color::new(row_group_bg))
.size(vec2(side_areas_size.x, box_size));
for (c, state) in row.iter().enumerate() {
let position = anchor + vec2(c as f32, r as f32) * (Vec2::splat(box_size) + offset);
let color = match state {
CellState::Empty => Color::new(even_odd_bg_color),
CellState::Filled => Color::new(self.palette.cell_filled_in),
CellState::Incorrect => Color::new(self.palette.cell_incorrect),
CellState::RuledOut => Color::new(self.palette.cell_marked_game),
CellState::UserRuledOut => Color::new(self.palette.cell_marked_user),
};
let cell_rect = Rect::new(position, cell_size);
if input.overlaps(&cell_rect) {
gfx.rect()
.at(position - offset) (3)
.size(cell_size + offset * 2.)
.color(Color::new(self.palette.cell_highlight));
}
match state {
CellState::Empty | CellState::Filled => {
gfx.rect().at(position).size(cell_size).color(color);
}
_ => {
gfx.rect()
.at(position)
.size(cell_size)
.color(Color::new(even_odd_bg_color));
draw_x_at(position, cell_size, color, gfx);
}
};
if input.can_fill_at(&cell_rect) {
play_state.attempt_fill(r, c);
}
if input.can_mark_at(&cell_rect) {
play_state.mark_cell(r, c);
}
}
}
And using the GridLayout
let layout = GridLayout {
area: Rect {
position: self.top_left,
size: self.size
},
rows: play_state.rows().len(),
columns: play_state.cols().len(),
cell_gap: self.grid_gutter,
};
let state_by_rows = play_state.rows();
for (r, c, cell_rect) in layout.iter_cells() {
let (even_odd_bg_color, odd_even_bg_color) = self.palette.even_odd_color(r);
let cell = state_by_rows[r][c];
let color = match cell {
CellState::Empty => Color::new(even_odd_bg_color),
CellState::Filled => Color::new(self.palette.cell_filled_in),
CellState::Incorrect => Color::new(self.palette.cell_incorrect),
CellState::RuledOut => Color::new(self.palette.cell_marked_game),
CellState::UserRuledOut => Color::new(self.palette.cell_marked_user),
};
if input.overlaps(&cell_rect) {
gfx.rect()
.at(cell_rect.min() - self.grid_gutter / 2.) (3)
.size(cell_rect.size + self.grid_gutter)
.color(Color::new(self.palette.cell_highlight));
}
match cell {
CellState::Empty | CellState::Filled => {
gfx.rect().at(cell_rect.min()).size(cell_rect.size).color(color);
}
_ => {
gfx.rect()
.at(cell_rect.min())
.size(cell_rect.size)
.color(Color::new(even_odd_bg_color));
draw_x_at(cell_rect.min(), cell_rect.size, color, gfx);
}
};
if input.can_fill_at(&cell_rect) {
play_state.attempt_fill(r, c);
}
if input.can_mark_at(&cell_rect) {
play_state.mark_cell(r, c);
}
}
// The side bar area (1)
let side_areas_size = self.play_area_gutter();
let layout = GridLayout { (2)
area: Rect {
position: self.top_left - vec2(side_areas_size.x, 0.),
size: vec2(side_areas_size.x, self.size.y)
},
rows: play_state.rows().len(),
columns: 1,
cell_gap: self.grid_gutter,
};
for (r, c, cell_rect) in layout.iter_cells() {
let (even_odd_bg_color, odd_even_bg_color) = self.palette.even_odd_color(r);
let extended_across_grid = Rect {
position: cell_rect.min(),
size: cell_rect.size + vec2(self.size.x, 0.)
};
let bg = if input.overlaps(&extended_across_grid) {
self.palette.group_highlight
} else {
odd_even_bg_color
};
gfx.rect()
.at(cell_rect.min())
.color(Color::new(bg))
.size(cell_rect.size);
}
This a lot of code to take in at once, so here's two things I want to call your attention to
that I think shows off why this new grid layout guy is cool:
The negative offset adds were confusing. When I first wrote it it was confusing, when I'm
looking at it now, days later, it's still confusing. If you look at the corresponding (1)
in the refactor, you'll see that entire thing is isolated away and the math is WAY more
clear. We can easily move this to its own function now!
The positioning of the side bar area is a lot more clear it feels. The row group bg position
and its input check plus that y offset formed a wall of text that my eyes wanted to have
nothing to do with. But the refactored code is the declaration of the struct, which says
loudly "here is my position and size" and it makes it obvious to me what's going on.
For the background highlight, which exists within the gutter, we still have to do a little
bit of math to push the color outside of the current cell's boundaries, but it's minimal
and feels a little lighter on my head than before. Maybe because the gutter variables are
so close by and not hidden away by the large amount of offset and positional computation
code.
Because this is so easy to refactor into two parts now, it also lends itself to that additional
tidying. And so, draw_left_group_backgrounds is born! Then the grid is back to
being just about the grid, not about anything else. Also of note, in case you didn't spot it,
is that the side bar is a grid layout of row by 1 column, which much more mentally aligns to
what you see on the screen.
Now, let's apply the grid layout to the draw_row_groups method. The old code,
as a refresher, walked backwards from the edge of the play area grid, scaled the font down
by half, and then drew out the font from there:
pub fn draw_row_groups(&self, play_state: &PlayState, gfx: &mut Graphics) {
let offset = self.halfset();
let num_boxes = play_state.rows().len();
let box_size = self.box_size(num_boxes);
let padding = self.grid_gutter / 2. - box_size / 2.;
let offset = Vec2::splat(offset);
let grid_cell_size = Vec2::splat(box_size) + offset;
let scaler = vec2(0.5, 1.);
let anchor = self.anchor();
let anchor = anchor - padding;
let screen_size = gfx.screen_size();
for (r, groups) in play_state.row_groups.iter().enumerate() {
let number_of_groups = groups.iter().len();
for i in 0..number_of_groups {
let grid_offset = vec2(-(i as f32) - 2., r as f32);
let position = anchor + grid_offset * grid_cell_size * scaler;
let screen_position = gfx.camera().world_to_screen(position, screen_size);
// write out the numbers from the right outward for alignment
let g = number_of_groups - i - 1;
gfx.text(&format!("{}", groups[g].num_cells))
.size(0.5 * box_size)
.color(match groups[g].filled {
true => Color::new(self.palette.cell_filled_in),
false => Color::new(self.palette.group_font),
})
.at(screen_position);
}
}
}
The new code uses the layout, which is explicitly defined in screen space to match
the font's needs, and then walks forward until it's time to show the appropriate cell.
Which is a little less confusing, because visually you can think of it like this little
ascii diagram:
[][x][x]
For a grid of 5 cells, you can at most have 3 groups, but when there's only 2 to fill,
we right align them by skipping the first one. Simpler than walking backwards and
trying to keep track of a negative offset and reverse ordered groups like we did before:
pub fn draw_row_groups(&self, play_state: &PlayState, gfx: &mut Graphics) {
let num_boxes = play_state.rows().len();
let screen_size = gfx.screen_size();
let side_areas_size = self.play_area_gutter();
// Because fonts are rendered in screen position, compute their grid layout
// with respect to that rather than raw world units
let screen_position = gfx
.camera()
.world_to_screen(self.top_left - vec2(side_areas_size.x, 0.), screen_size);
let layout = GridLayout {
area: Rect {
position: screen_position,
size: vec2(side_areas_size.x, self.size.y),
},
rows: num_boxes,
columns: num_boxes - num_boxes / 2, // If 5 cells, room for 3 numbers [x_x_x] and similar
cell_gap: self.grid_gutter,
};
for (r, groups) in play_state.row_groups.iter().enumerate() {
let groups_in_row = groups.len();
let start_col = layout.columns - groups_in_row;
for (i, group) in groups.iter().enumerate() {
let column = start_col + i;
let rect = layout.cell_rect(r, column);
// for some reason fonts position their _center_ at the position we tell
// them to be. So just add half in to get the real placement location
let half_font = rect.size.y / 2.;
let position = rect.min() + vec2(0., half_font);
gfx.text(&format!("{}", group.num_cells))
.at(position)
.size(rect.size.y)
.color(match group.filled {
true => Color::new(self.palette.cell_filled_in),
false => Color::new(self.palette.group_font),
});
}
}
}
The fonts pretty big since we're matching it to the size of the grid, but, importantly,
when you look at a 20x20 grid, you can actually read the dang font!
There's still that _slight_ annoyance of the 20 being a bit too big, but we can fix that
by properly scaling the cell by the aspect ratio, kind of like how we did the centered
text helper before. Hey wait a minute… I'm dumb, why don't I just use the helper
I made already to deal with this?
for (i, group) in groups.iter().enumerate() {
let column = start_col + i;
let rect = layout.cell_rect(r, column);
// for some reason fonts position their _center_ at the position we tell
// them to be. So just add half in to get the real placement location
let position = rect.min() + rect.size / 2.;
let text = &format!("{}", group.num_cells);
let font_color = match group.filled {
true => Color::new(self.palette.cell_filled_in),
false => Color::new(self.palette.group_font),
};
draw_centered_text(
gfx,
text,
position,
rect.size.y,
font_color,
);
}
Problem solved! Now I just have to update the column group helper to do the same thing
and we'll have solved the font problem woes that I wasn't happy about. I hope.
pub fn draw_column_groups(&self, play_state: &PlayState, gfx: &mut Graphics) {
let num_boxes = play_state.cols().len();
let screen_size = gfx.screen_size();
let gutter = self.play_area_gutter();
let grid_corner = self.top_left - vec2(0., gutter.y);
let screen_position = gfx.camera().world_to_screen(grid_corner, screen_size);
let rows = num_boxes - num_boxes / 2;
let layout = GridLayout {
area: Rect {
position: screen_position,
size: vec2(self.size.x, gutter.y),
},
rows: rows,
columns: num_boxes,
cell_gap: self.grid_gutter,
};
for (c, groups) in play_state.column_groups.iter().enumerate() {
let number_of_groups = groups.iter().len();
let start_row = rows - number_of_groups;
for (i, group) in groups.iter().enumerate() {
let r = start_row + i;
let rect = layout.cell_rect(r, c);
// for some reason fonts position their _center_ at the position we tell
// them to be. So just add half in to get the real placement location
let position = rect.min() + rect.size / 2.;
let text = &format!("{}", group.num_cells);
let font_color = match group.filled {
true => Color::new(self.palette.cell_filled_in),
false => Color::new(self.palette.group_font),
};
draw_centered_text(gfx, text, position, rect.size.y, font_color);
}
}
}
This is more of the same refactoring. Draw a grid above the play area, then
fill the blocks near the bottom with the appropriate column group numbers.
The slightly odd bit about this change is that the text seems a bit smaller
than before for the column groups:
I suppose the reason the font was the same before was that it was based on the cell
size of the play area's grid, not the cell size of trying to fit into the area we've defined as
the place where the cell groups live. Looking at the actual values, the font size values
are pretty different from this change, with the 20x20 grid having fonts for the rows and columns
of 14.75 and 10.5, and the 5x5 having 74 and 46.6
respectively.
I think there's a relatively easy way to fix this problem now that we have the GridLayout
struct. And it's one that was on my mind before when we were first considering the gutter areas themselves.
Remember that picture blocking things out?
We've been drawing each grid area separately, so why don't we just make our various draw_*
functions relating to these take in a GridLayout struct, which spans the entire space, and
then some direction on the relative position within that large space to fill with their respective bits
and pieces? If we do that, then we'll be back to the single cell size for the whole space, and so the
fonts for rows and columns will be consistent, and who knows, maybe it will make life slightly easier
to think about.
Rather than refactoring ALL the signatures and whatnot, let's take advantage of the fact that we're in
a shared PlayArea struct and just define a method to give back the entire layout. Since
we've got the information, we can also ditch the boxes - boxes / 2 bit and instead base
the gutters off of the maximum size of groups they need to fit, this will also allow the font to be
a bit bigger for the 20x20 grids, even though we won't have perfectly balanced rectangles anymore.
fn full_layout(&self, play_state: &PlayState) -> (usize, usize, GridLayout) {
let max_row_groups = play_state
.column_groups
.iter()
.map(|g| g.len())
.max()
.unwrap_or(1); // always include at least a bit of gutter
let max_column_groups = play_state
.row_groups
.iter()
.map(|g| g.len())
.max()
.unwrap_or(1); // always include at least a bit of gutter
let rows = play_state.rows().len() + max_row_groups;
let columns = play_state.cols().len() + max_column_groups;
let layout = GridLayout {
area: Rect {
position: self.top_left - self.play_area_gutter(), 28
size: self.size + self.play_area_gutter(),
},
rows,
columns,
cell_gap: self.grid_gutter,
};
(max_row_groups, max_column_groups, layout)
}
Since the origin point of the grid for the play area is now dynamic, I'm also returning the
max row and column group numbers since that specifies where the red box starts in our picture.
If we temporarily stop drawing everything else and tweak the background drawing method
to use our layout, we can confirm that things are working as expected
As you can see, the gutter is now a bit more dynamic and changes with the levels. So that will
help out with the font issue for sure. If I nix the block colors of debugging, and instead replace
each arm of the match with the rest of the code from the draw backgrounds method, we get this code:
pub fn draw_backgrounds(
    &self,
    play_state: &PlayState,
    input: &PlayerInput,
    gfx: &mut Graphics,
) {
let (origin_x, origin_y, layout) = self.full_layout(&play_state);
for (r, c, rect) in layout.iter_cells() {
let (even_odd_bg_color, odd_even_bg_color) = self.palette.even_odd_color(r);
match (r < origin_x, c < origin_y) {
(true, true) => {
// Draw nothing here in the space in the corner. Though we could
// put a cute character smiling or something if we wanted to.
}
(false, false) => {
// The Grid. https://www.youtube.com/watch?v=lWu40FA3eZk
gfx.rect()
.at(rect.min())
.size(rect.size)
.color(Color::new(self.palette.background));
}
(true, false) => {
// Top gutter (column groups)
let colors = [even_odd_bg_color, odd_even_bg_color];
let mouse_within_column_range = true
&& rect.position.x <= input.position.x
&& input.position.x <= rect.position.x + rect.size.x;
let color = if mouse_within_column_range {
self.palette.group_highlight
} else {
colors[c % 2]
};
gfx.rect()
.at(rect.min())
.color(Color::new(color))
.size(rect.size);
}
(false, true) => {
// Left gutter (row groups)
let mouse_within_row_range = true
&& rect.position.y <= input.position.y
&& input.position.y <= rect.position.y + rect.size.y;
let color = if mouse_within_row_range {
self.palette.group_highlight
} else {
odd_even_bg_color
};
gfx.rect()
.at(rect.min())
.color(Color::new(color))
.size(rect.size);
}
}
}
}
And then, still not drawing the rest of the UI elements since we haven't updated them to use the full layout
yet, we can see that everything is working as expected before, though it might look a bit funny since the
background of the clickable area is just a void:
Now, where the real magic happens is when we update all the other methods to operate within the full grid
layout. The update itself isn't too bad, and we can delete a ton of the old boilerplate code. Using the
same technique I mentioned above, about computing an offset to start from and then drawing in the groups
from that point on, we get this for the rows
pub fn draw_row_groups(&self, play_state: &PlayState, gfx: &mut Graphics) {
let (origin_r, origin_c, layout) = self.full_layout(&play_state);
for (r, groups) in play_state.row_groups.iter().enumerate() {
let groups_in_row = groups.len();
let start_col = origin_c - groups_in_row;
for (i, group) in groups.iter().enumerate() {
let column = start_col + i;
let rect = layout.cell_rect(origin_r + r, column);
// for some reason fonts position their _center_ at the position we tell
// them to be. So just add half in to get the real placement location
let position = rect.min() + rect.size / 2.;
let text = &format!("{}", group.num_cells);
let font_color = match group.filled {
true => Color::new(self.palette.cell_filled_in),
false => Color::new(self.palette.group_font),
};
draw_centered_text(gfx, text, position, rect.size.y, font_color);
}
}
}
and some extremely similar looking code for the column groups
pub fn draw_column_groups(&self, play_state: &PlayState, gfx: &mut Graphics) {
let (origin_r, origin_c, layout) = self.full_layout(&play_state);
for (c, groups) in play_state.column_groups.iter().enumerate() {
let groups_in_column = groups.len();
let start_row = origin_r - groups_in_column;
for (i, group) in groups.iter().enumerate() {
let row = start_row + i;
let rect = layout.cell_rect(row, origin_c + c);
// for some reason fonts position their _center_ at the position we tell
// them to be. So just add half in to get the real placement location
let position = rect.min() + rect.size / 2.;
let text = &format!("{}", group.num_cells);
let font_color = match group.filled {
true => Color::new(self.palette.cell_filled_in),
false => Color::new(self.palette.group_font),
};
draw_centered_text(gfx, text, position, rect.size.y, font_color);
}
}
}
There might be a way to refactor and write this code in such a way that it shares more but that's
just yak shaving and really not necessary, it'd probably be better to toss the drawing of a cell into
a helper if I really want less text in front of me. Lastly, if we tweak the background drawing code
for the clue areas by their respective uh, pokey bits? Erm. You know, the row clues expand horizontally,
but the columns are vertical? Anyway. If we expand a bit while drawing the grid we can combine those
together and we're now basically back at our old layout:
Granted there's a few little tweaks to make, like keeping the gap between the groups and the play area
instead of it getting joined right now, and also maybe tweaking things so that we have groups of 5 with
a slightly thicker border or outline of some kind to make the game more readable. But overall, we're
pretty close, and most importantly, the font issues are all gone now and things are centered and looking
decent.
The gap issue is easily solved by checking if we're on the border:
// Left gutter (row groups)
let mouse_within_row_range = true
&& rect.position.y <= input.position.y
&& input.position.y <= rect.position.y + rect.size.y;
let color = if mouse_within_row_range {
self.palette.group_highlight
} else {
odd_even_bg_color
};
// we + gap to join the squares together
let gapfill = if c == origin_y - 1 {
vec2(0., 0.)
} else {
vec2(layout.cell_gap, 0.)
};
gfx.rect()
.at(rect.min())
.color(Color::new(color))
.size(rect.size + gapfill);
You might also notice that the column groups are checkered, we can fix that to make sure
that the column group backgrounds aren't based on the row, but just alternated between.
The checkered pattern came out because our background columns were changing every row,
which works great to checker things for row based iteration, not so much for the column
related ones:
pub fn draw_backgrounds(
&self,
play_state: &PlayState,
input: &PlayerInput,
gfx: &mut Graphics,
) {
let (origin_x, origin_y, layout) = self.full_layout(&play_state);
// Hold the column colors fixed for the group clues
let (column_group_color_a, column_group_color_b) = self.palette.even_odd_color(0);
for (r, c, rect) in layout.iter_cells() {
...
match (r < origin_x, c < origin_y) {
...
(true, false) => {
// Top gutter (column groups)
let colors = [column_group_color_a, column_group_color_b];
...
let color = if mouse_within_column_range {
self.palette.group_highlight
} else {
colors[c % 2]
};
...
}
...
}
}
}
Alright, looking good! 29
We can also now easily change the anchor point of the PlayArea. Right now,
the top left is the top left of the grid you can click on. Since we refactored everything
to the point of the top_left field only being referenced within the full_layout
helper, we can now shift that around and this is easy:
Removing the math in red causes the entire play area to shrink as expected:
But then updating the position and size variables makes us able to stretch the
whole region a bit more, resulting in a slightly larger grid to work with:
let bg_position = unit_size * vec2(10., 1.);
let bg_size = unit_size.x * 16.;
It's a little subtle, but the easiest way to tell what we changed and how this changed
things to give us more room is how the top of the column hints now aligns with the big
X button. It didn't do that before!
Now, for our last bit of polish before we dust our hands of this project for a little
while. It's not going to be what my friend who plays picross a bunch would like me to do.
Nope, we're not going to do something similar to what you see here with the 5x5 grids
within the bigger grid.
I admit, it does help a lot in reading the board and not getting lost in cells after cells
after cells in a row. But, I'd like to instead polish our screen transition a little.
While I liked the idea of the "wipe" before, I think we can do something better now. How about
a spiral?
Not a perfectly smooth spiral like you'd draw on your own, nah, we want to keep up the pixely
blocky theme and have it do this instead:
This took a bit to figure out, but it's best understood piece by piece. First off, if you're
thinking about this, you might think: hey, why don't I just use polar coordinates or something
to compute the row and column, then round things off to get indices?
What, you think we're going to use a math solution when we can do a simulation solution instead?
Clearly, you didn't enjoy my 2024 Advent of code post
enough. Or at the very least, don't know that I much rather simulate a little guy walking around than
compute their precise coordinates.
But we do need coordinates. Because if you remember, the wipe animation is based on the current
time, so we need a way to jump to the appropriate stage of the animation without any issues. We already
did this, just for both x and y before, so now it's simpler, because we don't care about interpolating
a row and column, just how many cells need to get filled in:
*wipe_progress += frame_context.timer.delta;
let num_boxes = layout.rows * layout.columns;
let box_progress = *wipe_progress / duration;
let sin = lerp(0.0..=std::f32::consts::PI, box_progress);
let max_boxes_to_draw_this_frame = 1 + lerp(0.0..=num_boxes as f32, sin.sin()) as usize;
And just in case this doesn't click, I offer you this table to explain how things fill in:
0 →
1
2
3↓
11→
12
13↓
4
10
15⤬
←14
5
9↑
8
7
←6
Hopefully the little arrows help guide your eyes as if they were a sliding block puzzle on an icy floor
of a zelda game. You can see that the order of the indices doesn't really have a great formulaic way
to be computed (at least as far as I can tell), but we can encode the whole animation as a list of
which row and cell would be filled at that point. For example, let's just take going from 0 to 3, that's
running along the top. So, if we were hard coding this we'd write something like
let mut r = 0;
for c in 0..=3 {
list.push(r, c);
}
Holding the row constant as we push along. But obvious this won't work once we try to do the same
thing from index 11, as now we need to do:
let mut r = 0;
for c in 0..=2 {
list.push(r, c);
}
But you can see the pattern here at least, the sides are shifting in. If we take the left paths
it's even more apparent, as we have going from column 4 to 0 starting with index 6; then from column 2 to 1
when going left from index 14.
So it's not just one side, but all sides. Similar, if you consider the top and bottom sides, those also
have to squeeze down. Everything must be squished! So let's very seriously smoosh up some cells
fn spiral_indices(rows: usize, cols: usize) -> Vec<(usize, usize)> {
let mut indices = Vec::with_capacity(rows * cols);
let mut top = 0;
let mut left = 0;
let mut bottom = rows - 1;
let mut right = cols - 1;
while left <= right && top <= bottom {
// along the top going right
for c in left..=right {
indices.push((top, c));
}
top += 1;
if top > bottom { break; }
// along the right side going down
for r in top..=bottom {
indices.push((r, right));
}
right = right.saturating_sub(1);
if left > right { break; }
// along the bottom going left
for c in (left..=right).rev() {
indices.push((bottom, c));
}
bottom = bottom.saturating_sub(1);
if top > bottom { break; }
// along the left going up
for r in (top..=bottom).rev() {
indices.push((r, left));
}
left += 1;
}
indices
}
The only thing else of note in the above code is the break. Since we're
collapsing our drawing space each time we take a turn, we can't rely on the while loop's
condition to tell us to jump out if we run into a "wall" mid-iteration. Also, we don't
ever want to go past 0 by accident, so the saturating_sub will help ensure
we don't do anything silly like that.
Once we've got this helper to compute the spiral indices, we can easily adapt our current
wipe code to use it to draw in the boxes according to a GridLayout
pub fn wipe_screen(
wipe_progress: &mut f32,
duration: f32,
frame_context: &mut FrameContext,
palette: &ColorPalette,
) -> ScreenAction {
let gfx = &mut (frame_context.gfx);
let screen_size = gfx.screen_size();
gfx.camera().target(screen_size / 2.);
let layout = GridLayout {
area: Rect {
position: vec2(0., 0.),
size: screen_size,
},
rows: 10,
columns: 10,
cell_gap: 2.0,
};
let num_boxes = layout.rows * layout.columns;
*wipe_progress += frame_context.timer.delta;
let box_progress = *wipe_progress / duration;
let sin = lerp(0.0..=std::f32::consts::PI, box_progress);
let (even, odd) = palette.even_odd_color(0);
let spiral = spiral_indices(layout.rows, layout.columns);
let boxes = 1 + lerp(0.0..=num_boxes as f32, sin.sin()) as usize;
for &(r, c) in spiral.iter().take(boxes) {
let cell = layout.cell_rect(r, c);
let color = if (r + c) % 2 == 0 { even } else { odd };
gfx.rect()
.color(Color::new(color))
.size(cell.size)
.at(cell.min());
}
let in_first_half_of_animation = *wipe_progress < duration * 0.5;
if in_first_half_of_animation {
ScreenAction::WipeLeft
} else if *wipe_progress > duration {
ScreenAction::WipeDone
} else {
ScreenAction::WipeRight
}
}
Pretty nice right? The lerping sin wave is doing the same thing as it was before,
allowing the maximum number of boxes to shift all the way up midway through the
animation, and then back to 0 when we reach 100%. The GridLayout is
continuing to pull its weight worth its refactor here too because we're not tied
to trying to do for loop over rows and columns to do any math on figuring out which
cell to fill in, but rather can just say "hey the spiral index says to draw in row 3 column 4,
where is that?", and it just slides a rect down to us across the counter, winks,
and says: "I gotchu homey".
Alright, so according to the reading time calculation, you've been potentially reading
for nearly 4 hours. Maybe more if you're using this as a sort of follow-along make a
similar project yourself. So first off.
Congratulations
Platitudes aside, I appreciate if you read this far. If you're coming from the table of contents
because you just wanted to know the results and spoil the ending of this tome, I guess congratulations
to you too. You cheated not only the game, but yourself.30
If you just wanted to get my thoughts on how it was making a game in rust versus in Java, then you're
in the right place.
First off, I don't think the fact that I'm actively choosing to not include music and sound effects
is rust's fault. It's more that I set myself a deadline of end of February, and it's now the end of
February. I saw the writing on the wall a week or so ago and made the choice to get the grid layout
and font related things polished up rather than risk the issue of cross platform audio support causing
a problem with the builds.
And that's okay!
I think it's important that when it comes to these 20 game challenge projects that there are reasonable
limits and expectations. The whole point of the challenge is to learn new things, build on the experiences,
and strive towards tackling enough weird problems that the next time you face something you don't shy away
and give up, but instead feel that push from all the small victories prior that gets your inertia going and
says: you can do it.
Maybe that sounds like an excuse to not add sound to the game. But hey, it's my game I'll call the shots on if
it's done or not. Fork y You can fork the project on github
if you'd like and add your own sounds! It might be fun! The code runs on Mac, Linux, and Windows, so you have no
excuse unless you're on like, windows 95 or an IBM 5100 trying to save the love of your live from a time loop death
spiral or something.31
Ahem. Sorry. Now, about Rust vs Java. It was definitely a very different experience. You'll notice I loaded
0 textures from images at all in the rust project. It's not that egor doesn't have support for that, it does,
but I'm not that familiar with the whole, texture ID, thing. Even though that's not actually that different
sounding from LibGDX's AssetManager being keyed by name and such, not having the wiki and guide that says:
this is how you do thing made me want to stick to what felt intuitive and easy to deal with, and
thus, you get lots of rectangles being drawn.
Though I am amused that upon deciding to use PPM files to show the victory image for each level, and setting
up a way to draw those, I pretty much instantly capitalized it on it to make my own icons and such. And that
was also sort of the motivation for creating the level editor too. Not the whole motivation, obviously I wanted
some tool to have to not have to write out PBM and PPM files by hand, but definitely became a gleeful feedback
loop of "eating your own dog food" that brought joy to my heart.
The level editor is actually where I want to spend more time on in a future post. And this is also a place where
the development I usually do for Java vs Rust shows another big difference. When working on the Java projects,
I hang out in Intellij, write the code, press the buttons, you know, the usual. I dread having to do something
that involves touching the gradle files because those things are finicky and my aversion is strong.
So while LibGDX has all those tasks to do nice things for you like say, build for multiple platforms, if anything
goes wrong while that happens I'm out of luck and throwing my hands to the sky: hoping I'll find something on
stackoverflow to fix the problem. All of that is to say, that if I had wanted to create a level editor, I probably
would have started a new Java project and had to figure out how to do local builds, references, and then make
a fat jar with both things in it and it's all just… Exhausting. Exhausting to think about how to get
a custom task to fire up an editor and yeah.
But in contrast, cargo is easy as heck to use. Sure, I ran into some problems when I misunderstood the way src/bin
worked and I tried to make a separate library set of files inside of there and share things that were technically
in different crates, but hey, that aside, it was easy to just say "Yeah I've got these ppm and pbm structs and I want to
use them too and make a new binary". So it felt like it was easier for me to make my own tool to do some specific
task I needed to get done. And that's pretty powerful.
On the other hand, because my preferred choice of editor in Java is IntelliJ (one of the few places I don't use sublimetext),
LibGDX work definitely has the upper hand when it comes to ease of refactoring. IntelliJ has a ton of built in mechanical
refactoring tools that make extracting interfaces, lifting classes up and out, or even generating test boilerplate all super
easy. Meanwhile, in rust world, I do it all by hand and have to take breaks because my wrists bother me after a while.
There are "fixes" to this of course, probably plugins for sublime I could use, or something similar, but it just doesn't
feel quite right. And that's not just the tension in my wrists that feels off. There's just something very normal to me
about leveraging and using all those "power tools" in an IDE that makes it feel natural in Java. But with Rust, it's
closer to the metal, and it feels better to be flipping between editor and terminal.
Another major difference is that egor is an immediate mode UI. So if you want to check if a button is clicked, you're
checking on that frame right then and there. But with LibGDX, it's callbacks and listeners, so very much a retained
UI pattern at work. LibGDX encourages abstracting out that interface between those glue points and your core code if
you're disciplined about it, and it works well for testing if you do.
Egor makes it both easier and harder to do this glue work. Easier, because what you see is what you get, you write that
you checked the button there, you checked the button there. But the back of my mind while doing all that is the question
of "is the FPS going to tank because I'm doing this"? It doesn't mind you, but it's what I'm thinking about when I write
spiral_indices and then stick it into a call that happens every frame rather than suffer the pain of threading
it down from the main method to the call point so I only compute them once. It's an easy to reason about model, but it
encourages the combination of state and display into one place that's easy to fall into and be trapped by. A far cry from
my object oriented interfaces that all for easier testing.
That said, that egor has egui underneath it, and that I could make a debug widget to get the same sort of functionality as
you might find with unity or similar is awesome. There's a good post that someone shared with me a while ago about
making games with no engine in 2025 that captures the home
grown tooling aspects like this can really empower development. And I fully agree with the sentiment. Saying: I need thing,
and I can make thing easily. Is really nice. There are definitely better ways to do it than &DebugStuff
being passed around, but that's probably for a different post to explore more.
To circle back to Java vs Rust again though; I'm quite comfortable in Java, and in thinking about patterns within that
realm. Builders, adapters, trees, strategies, anonymous functions, all that good stuff are things I'm comfortable deploying
into the process of making a game and feeling like I know what I'm doing. In case it wasn't obvious to you, I am far more
a novice in Rust than I am not. While I understand, abstractly, how to do a lot of things, when it comes to getting the syntax
right or fighting the borrow checker to a stalemate, I'm sorry to say that the borrow checker "has hands".
But in a way this is a good thing. Not knowing the idioms means I get to make my own or discover things myself.
There's certainly better ways to do things, better ways to organize code, avoid traps and bugs, and certainly
more ways to be efficient than the code I wrote. But it's fun. And that's what's important! I've always enjoying
the process of programming, not necessarily the results. Which is why it's now a good time to take stock of things,
did we actually accomplish our goals? Listing these off from the first section, that I wrote, over a month ago:
32
We should be able to create puzzles from a file
We must display the constraints for the puzzle
There should be a win condition
That low bar was definitely cleared. One other aspect mentioned in that same section, about ensuring puzzles
are solvable, is going to be it's own post. There's no way that I'm tackling an NP complete problem in the
middle of a game programming tutorial dev log thing. That wouldn't be fair to the interesting parts of doing
nonogram solving! And going back to the start of this reflection section, it definitely wouldn't fit into
publishing this before February's up!
This has been very rambley, maybe moreso than usual, but that's probably because it's 1:38 am on February 28th
and I'm a little tired. But can you blame me? I don't think I've written a post this long since
the match 3 game! The game is available, for free as per
usual, on Github and you can
download the appropriate zip file for your system and play it if you'd like. There are 15 levels, none of which
I guarantee are solvable. But you can make your own levels! The level editor comes with the zip and will save
things for you to the same folder the game expects it to load from.
Now, is the game any good?
No. Absolutely not. If you think I'm going to be playing my version of picross/logic paint/nonogram over
the adorable, fun and happy, cute and adorable, musically wonderful game of
Miku Logic Paint S+,
then you've got more bugs than we've solved in this post running around inside of your head.
If I wanted this game to hold a candle's chance in a snowstorm levels of being "Ok" in comparison, we'd
need to:
Add sounds and music
Create proper levels that are solvable without guesswork
Make proper pixel art
Improve the UI and UX to group 5x5 grids together to make the grid more readable
Get proper icons for the mouse and not just have the instructions sitting on a side
Include a tutorial to orient a user to the game in the first few levels
Create settings pages that allow palette swaps for colors
Make the color scheme properly accessible and not low contrast like it is now
Make the level editor more usable, like being able to load a saved file to modify.
Right now it's less level editor and more level create and pray you don't have to
change it by hand later.
Profile, optimize, and ensure that we don't make unnecessary structs and data where we don't…
Stop
There's probably more stuff that we could think of if our heads tapped together a few times. But that's just
what comes to mind that doesn't have anything to do with putting adorable characters into the game! But, to
put a pause to the deluge of what could be, remember that this is just another 20 games challenge
game. Which means that the key point was to learn, not to make the perfect game.
So. What did I learn? I learned that it is very possible to make games in rust with egor. I also
learned that, while egui was great for tooling, I felt the itch to be unconstrained by some of the
guardrails and limitations that egor had in place. And that itch makes me want to explore SDL3
a bit, as I've heard good things and am intrigued. Whether or not SDL3 is used in the next project is an
open question, we'll see!
Thanks for reading, and again, if you made it this far. Wow! I hope that it was interesting and that you
learned something too! If you're hungry for more, there's always another slice if you look around the
blag at some other posts. Or if you're looking for side monitor background noise, my twitch channel and
youtube vods are linked on this site if you're very bored. But anyway, until next time, have
fun with your new game!

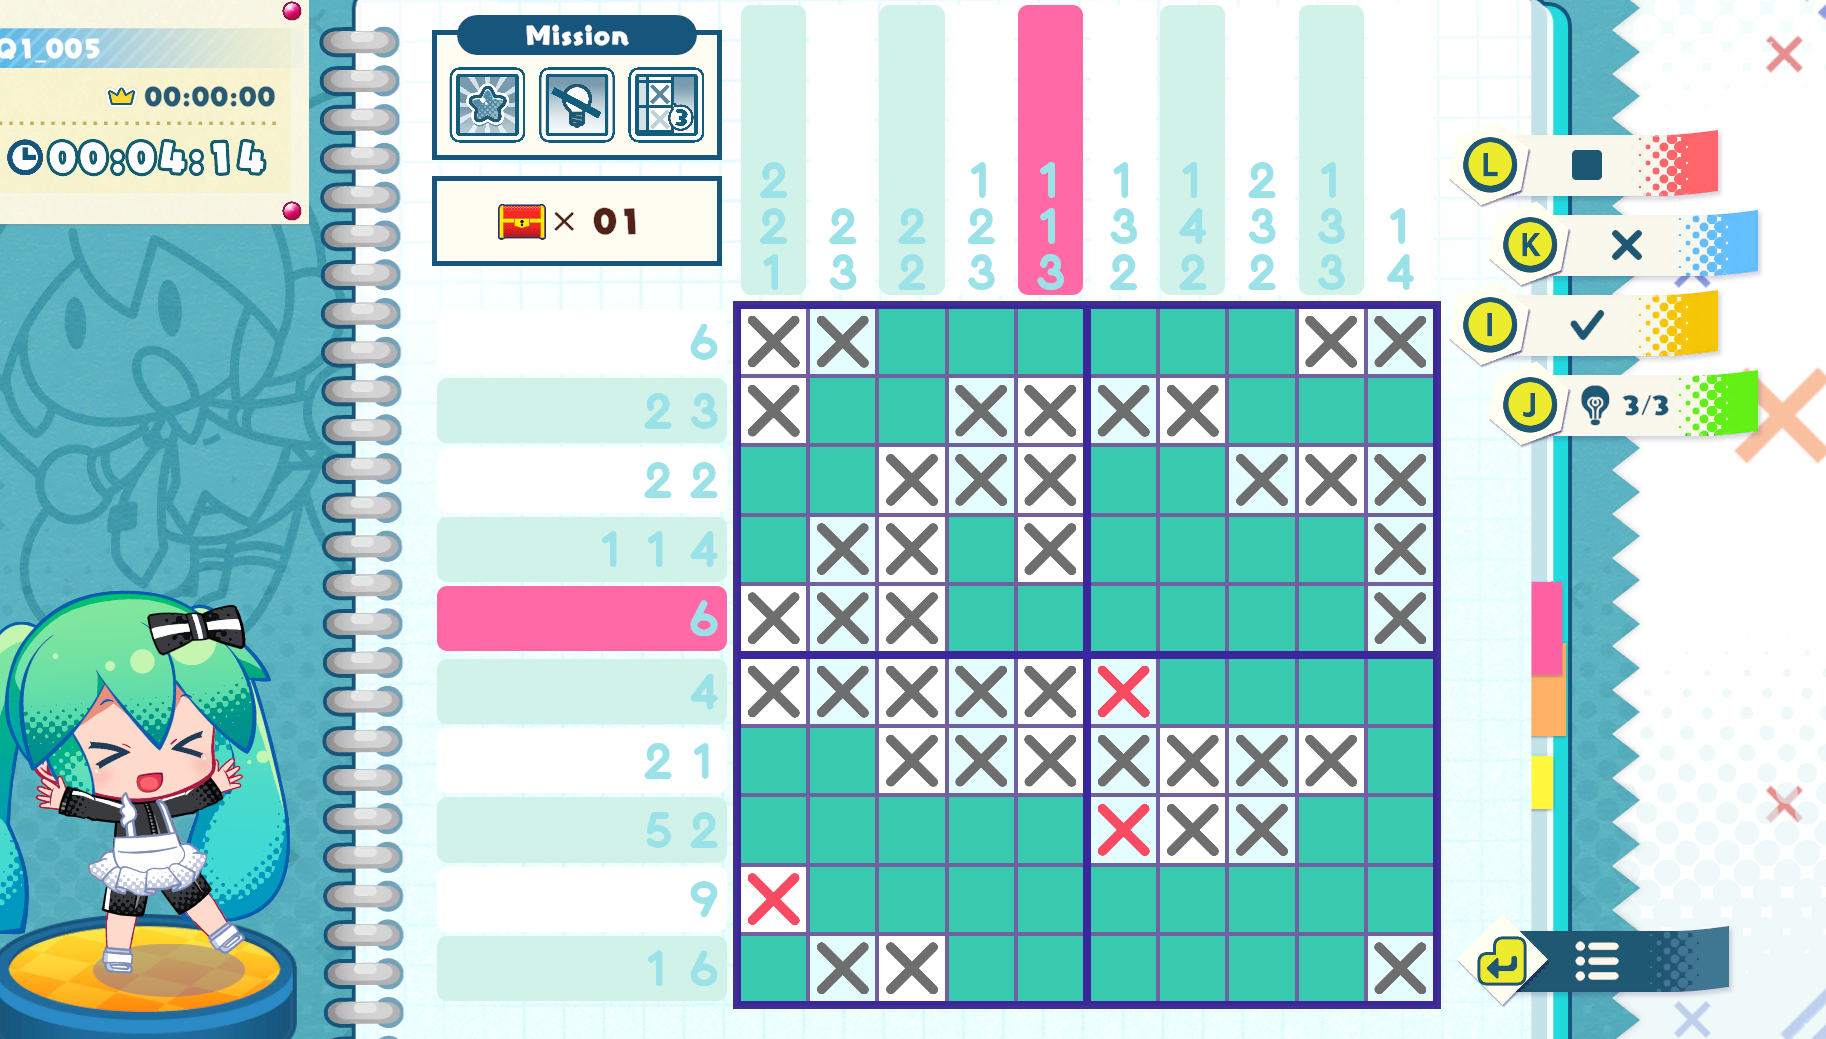
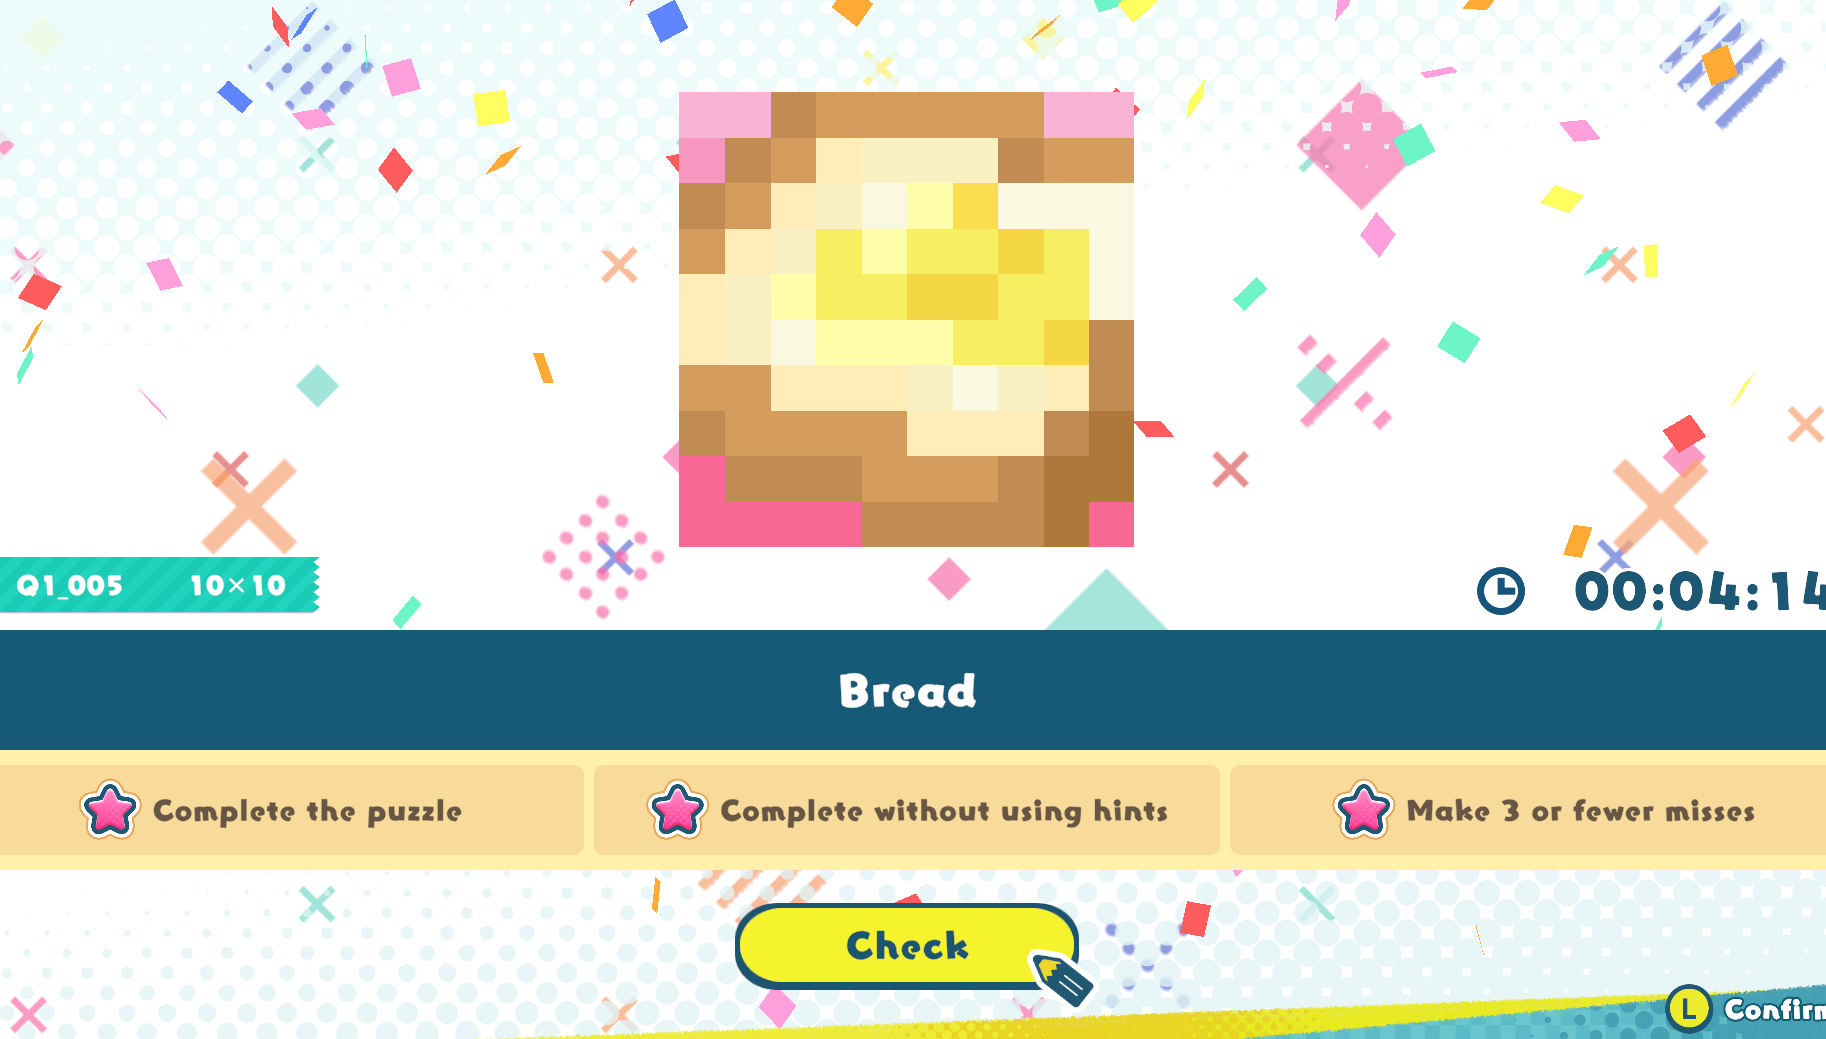


.jpg)
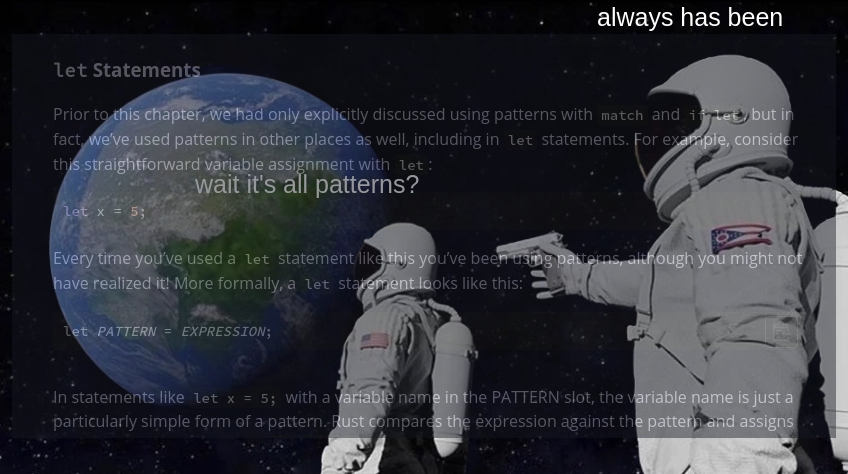
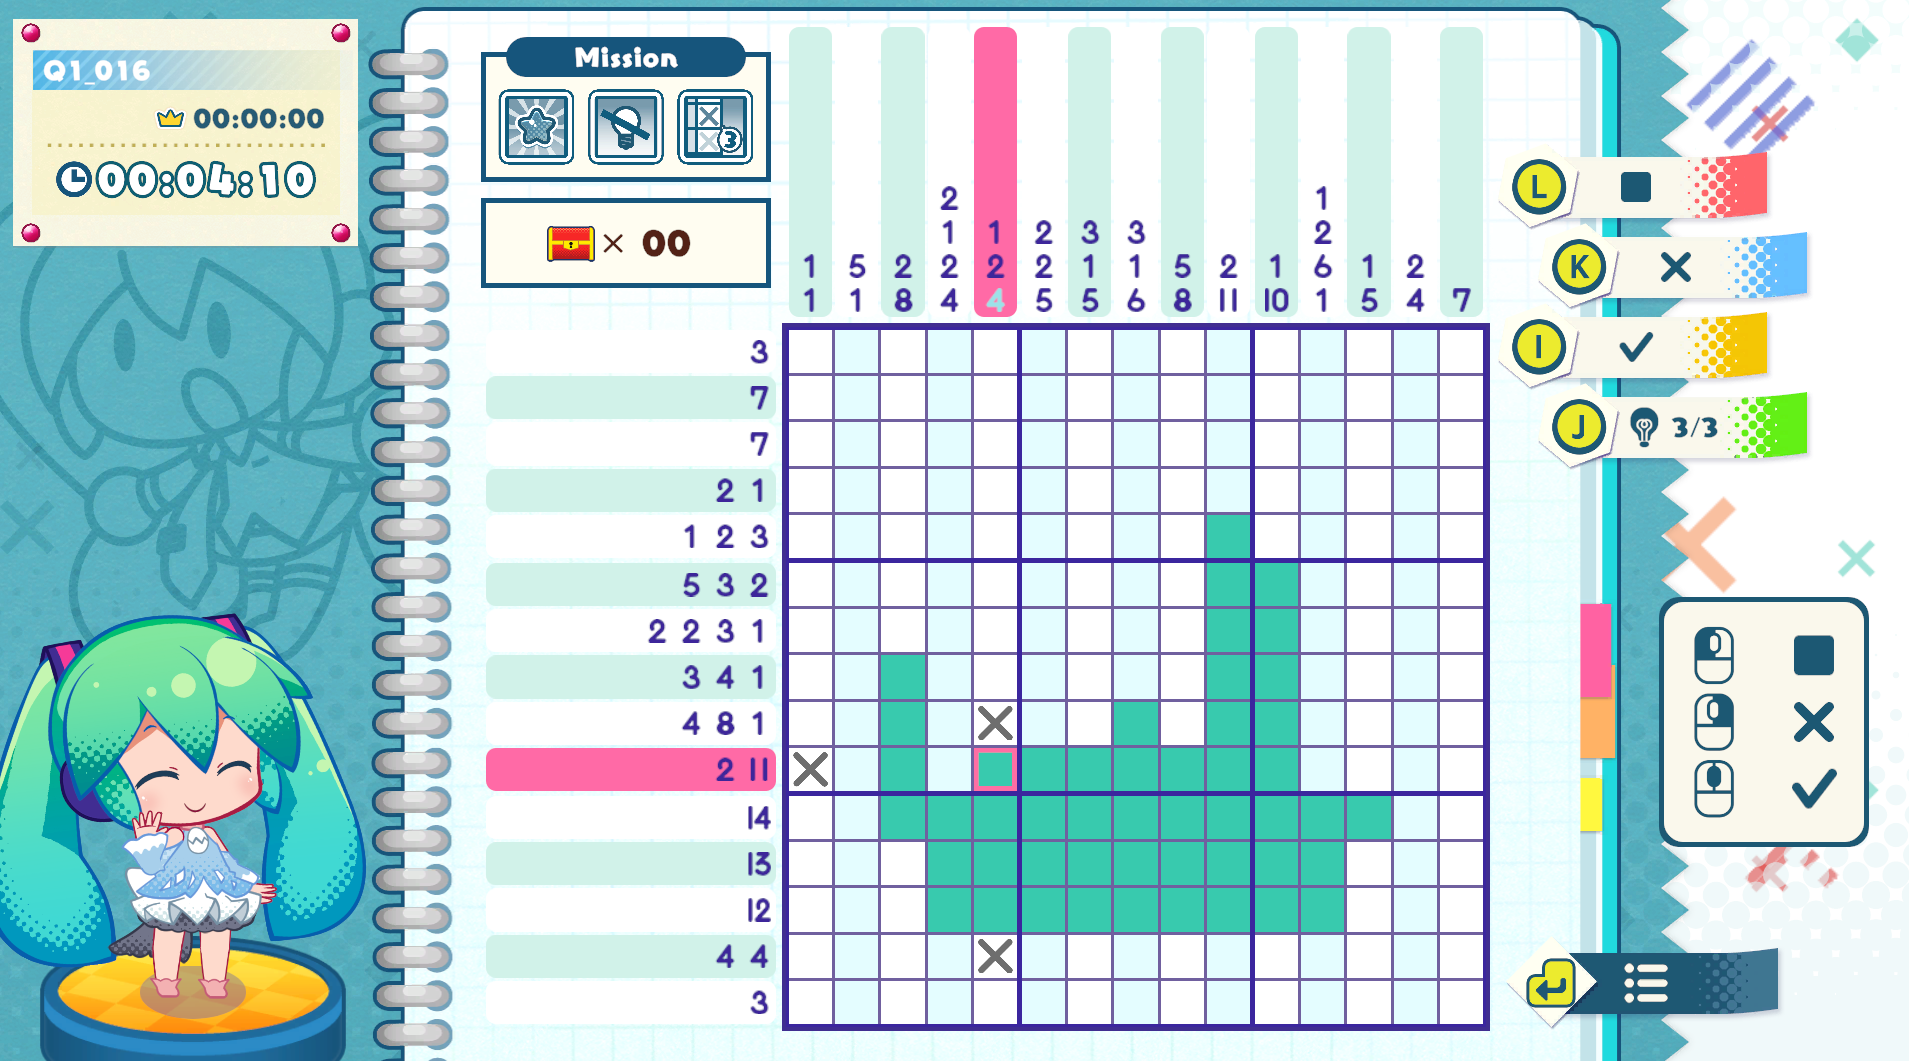
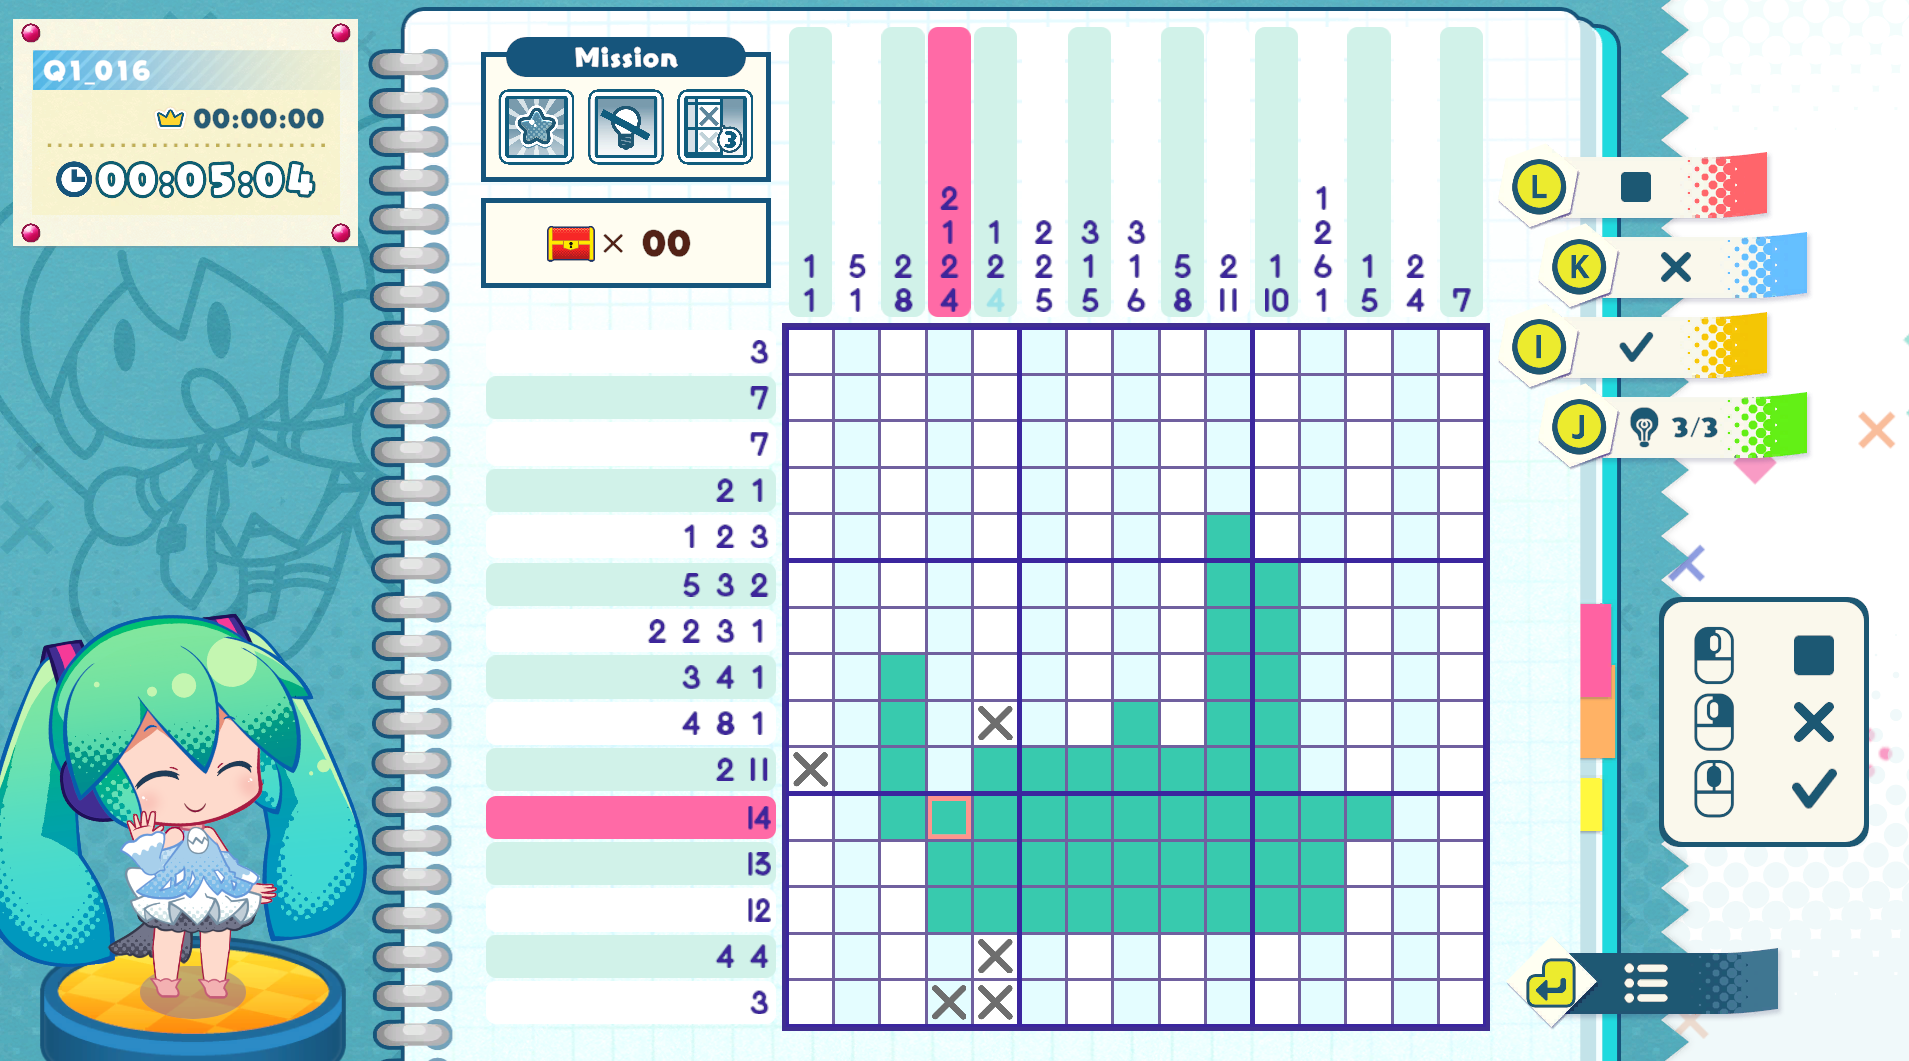
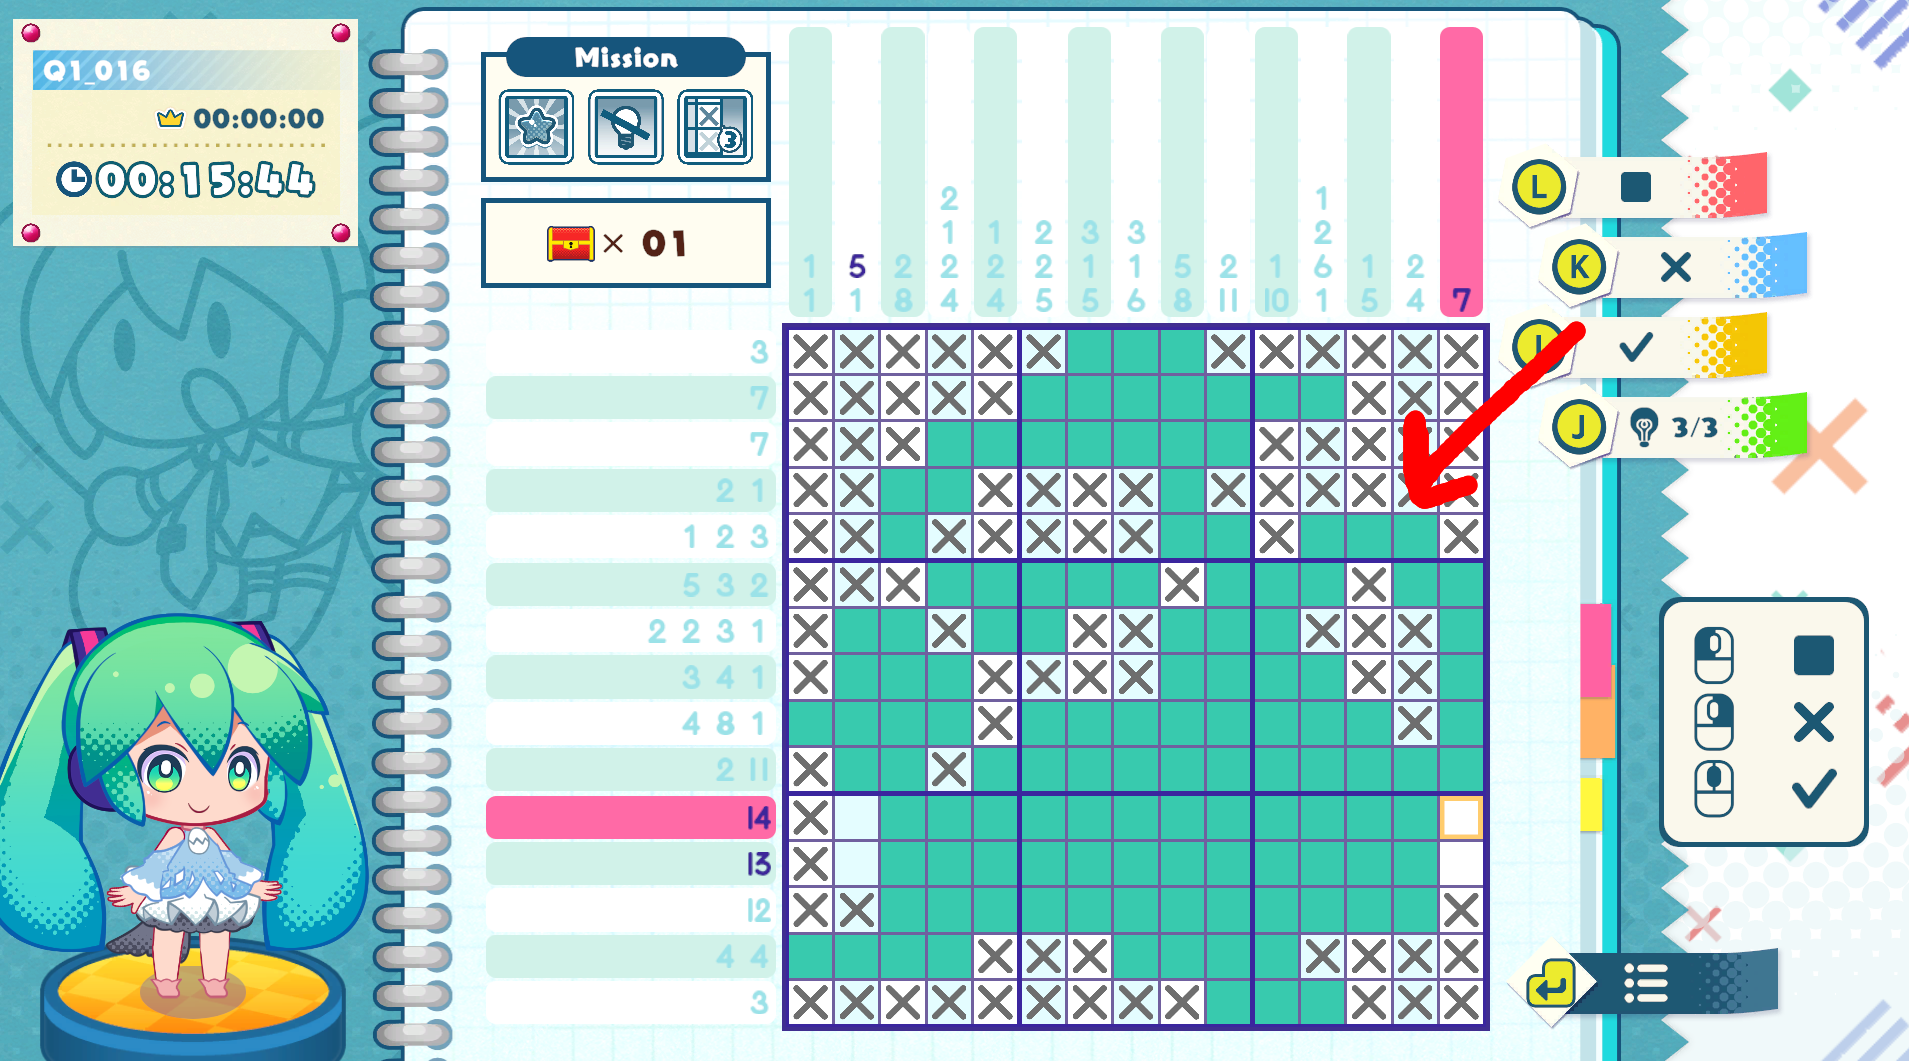
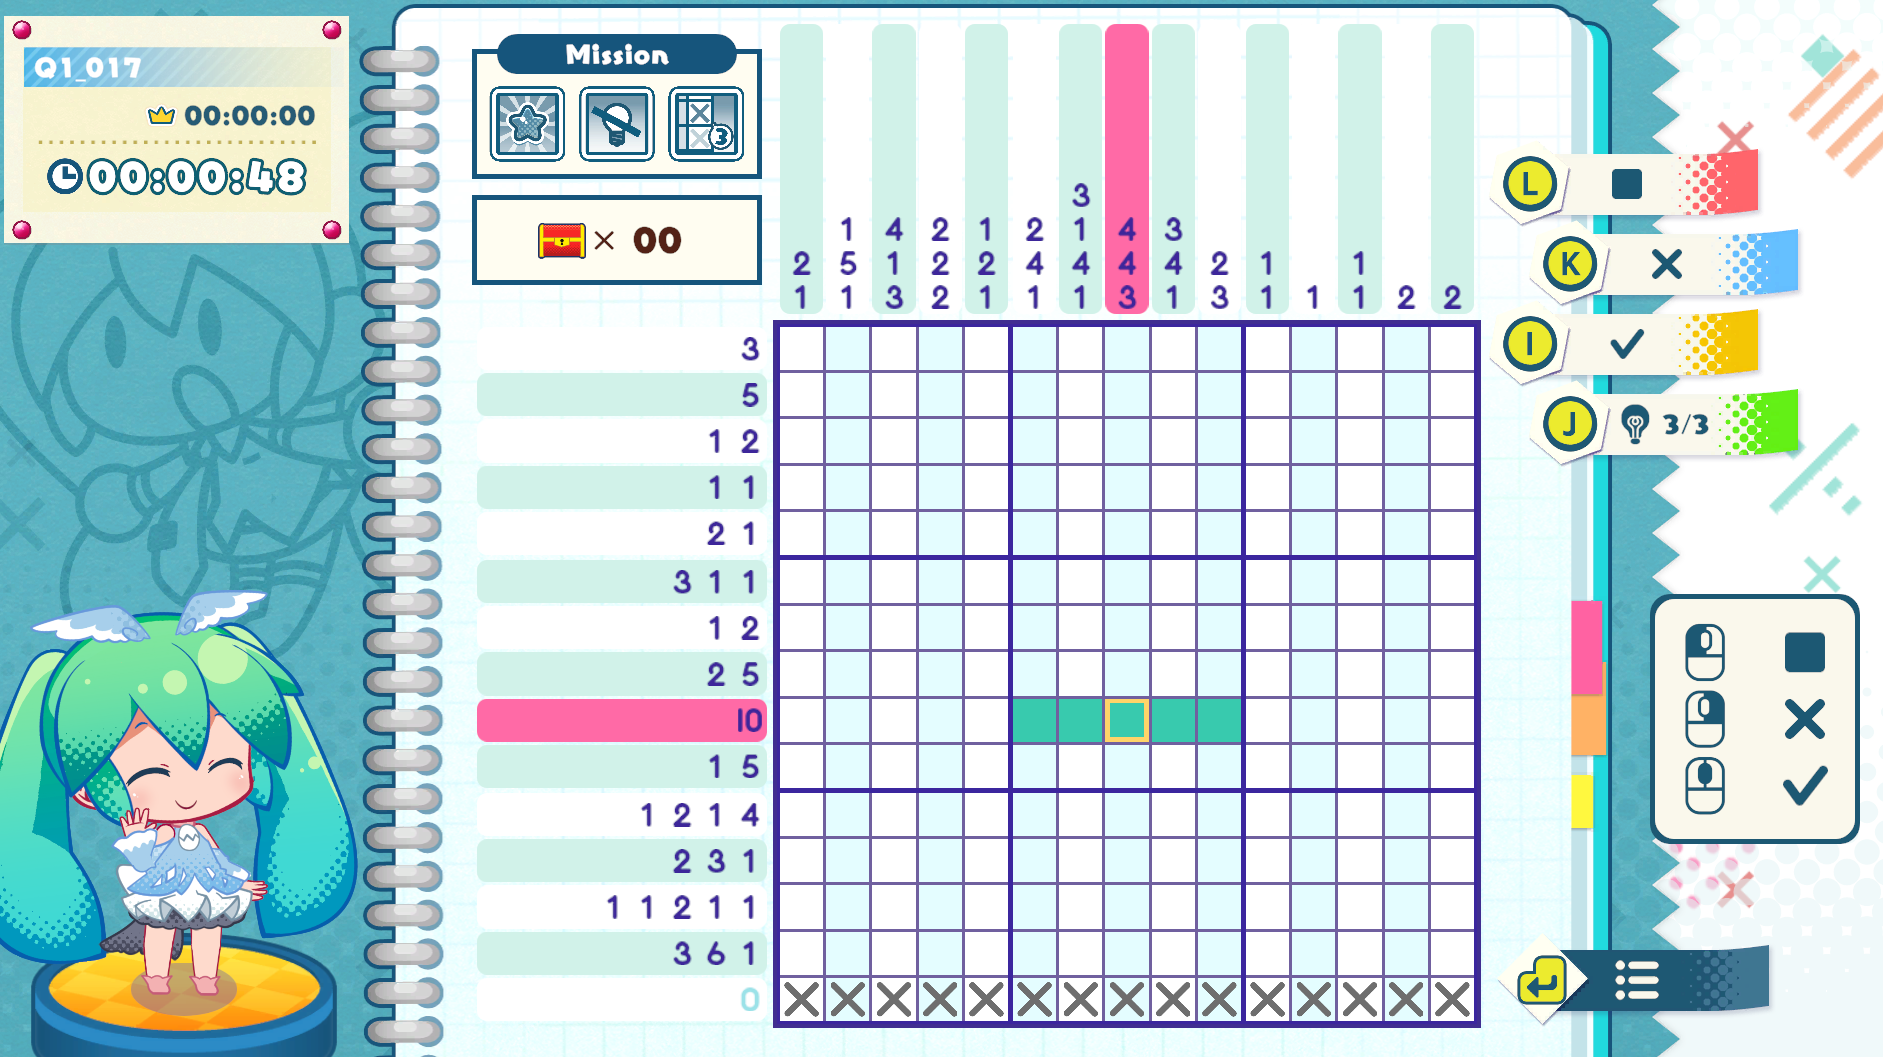


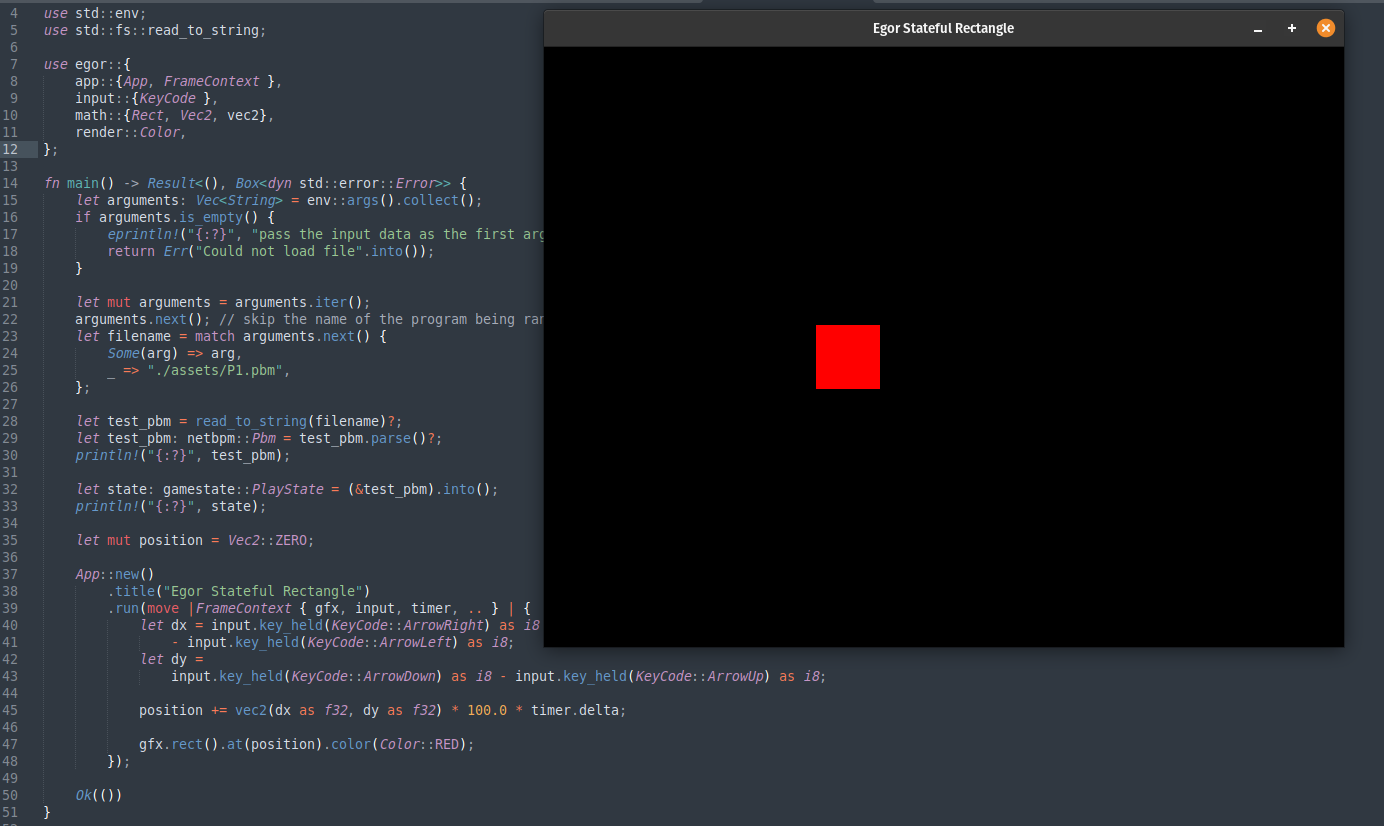
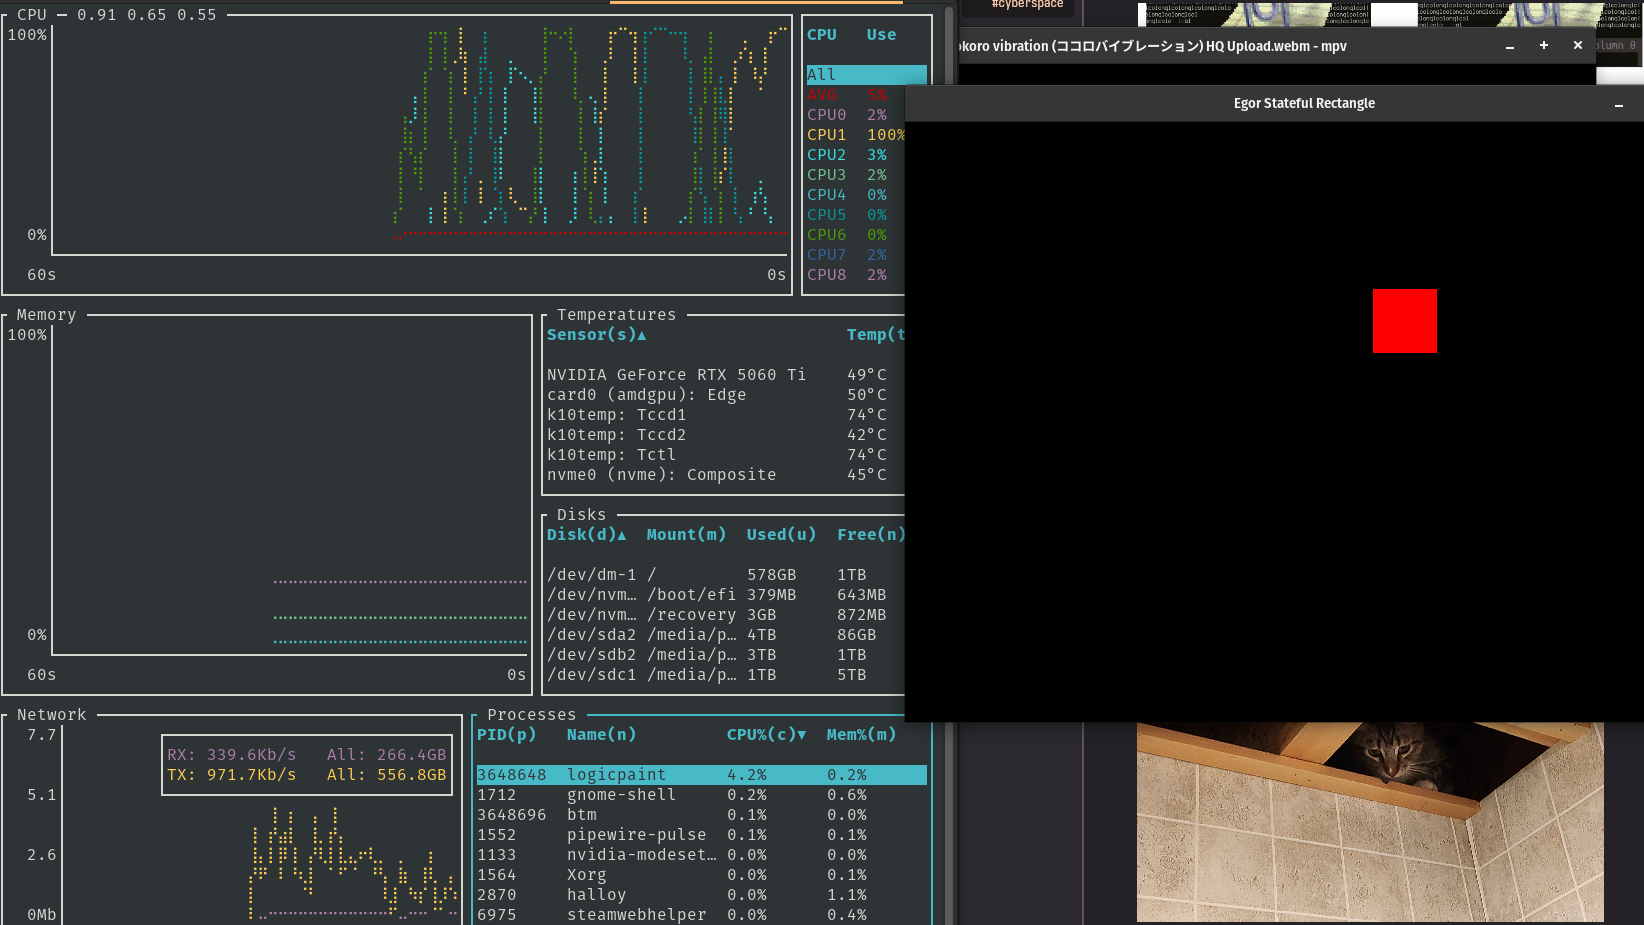

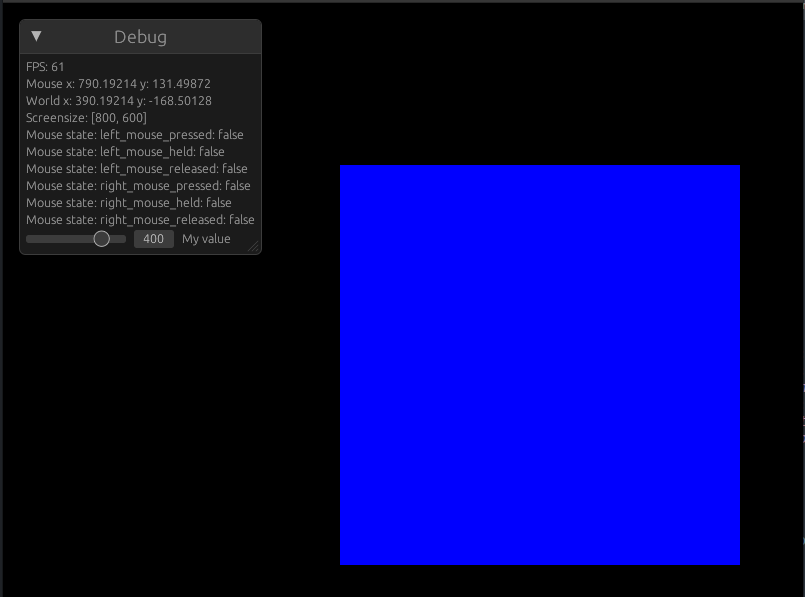
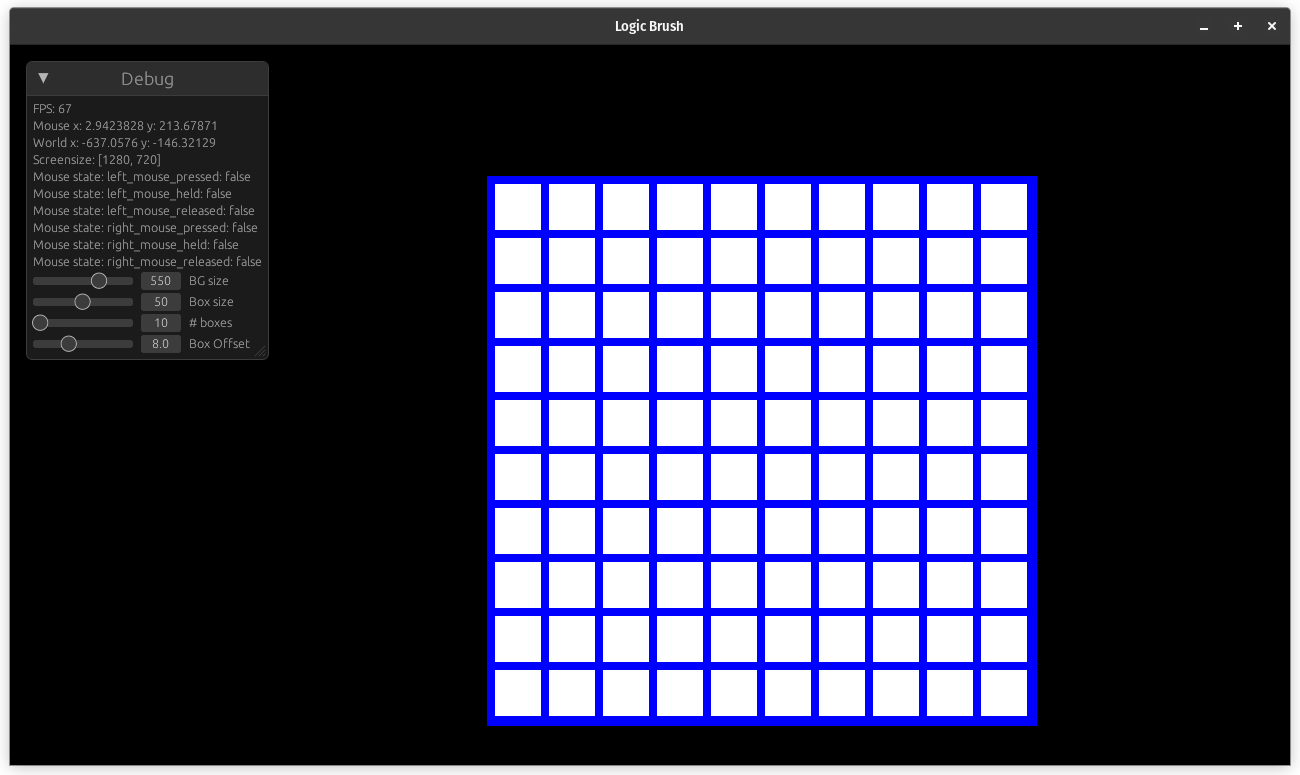
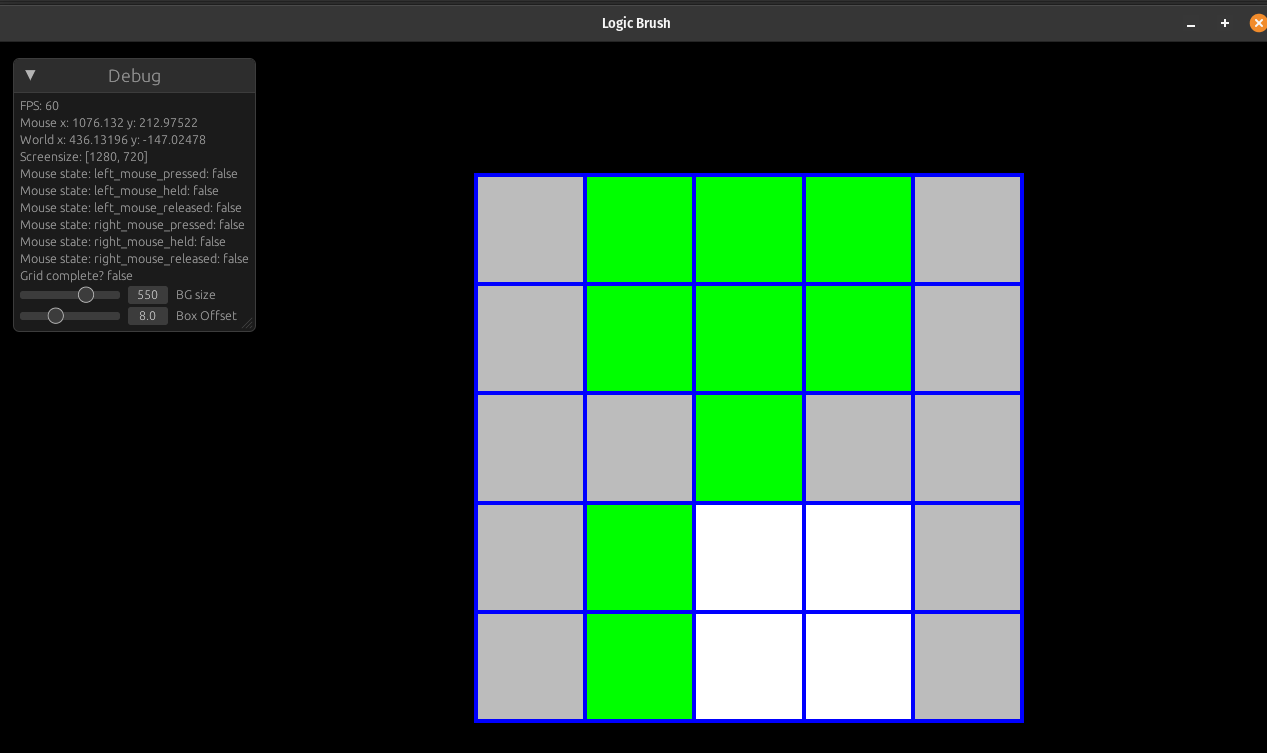
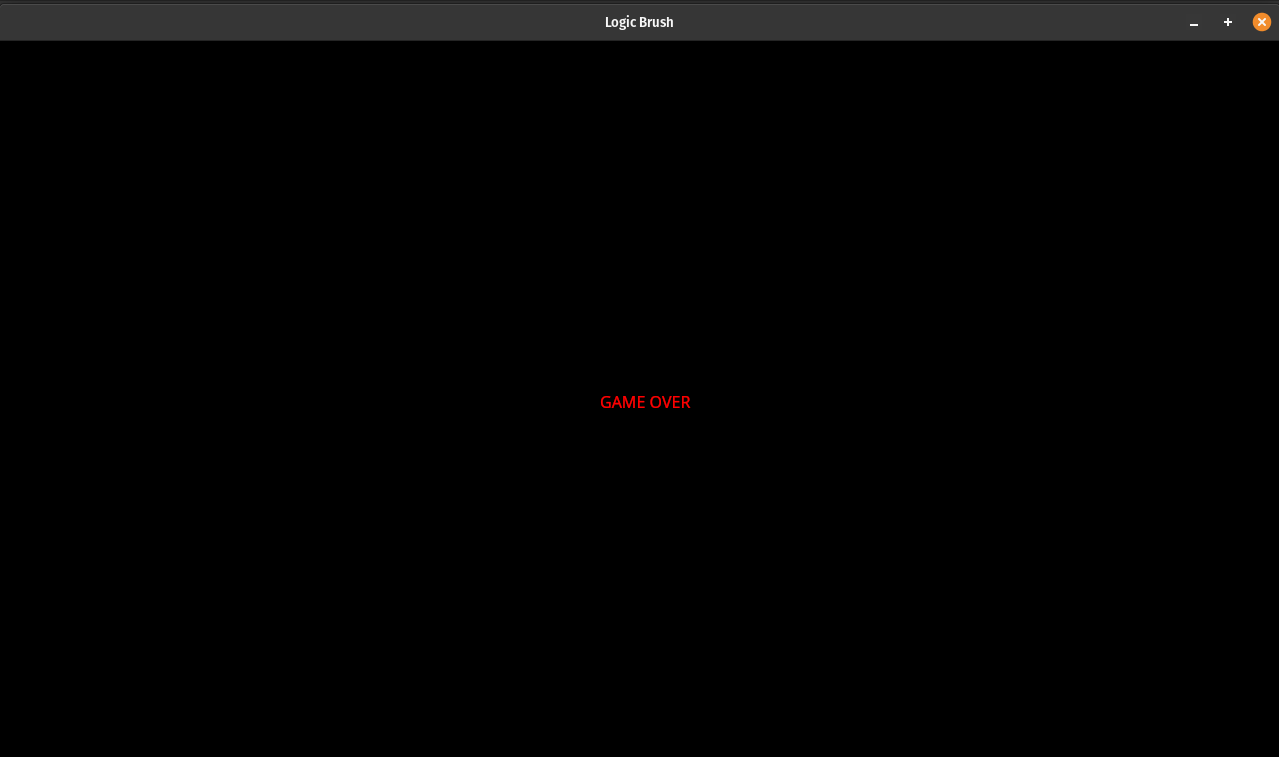

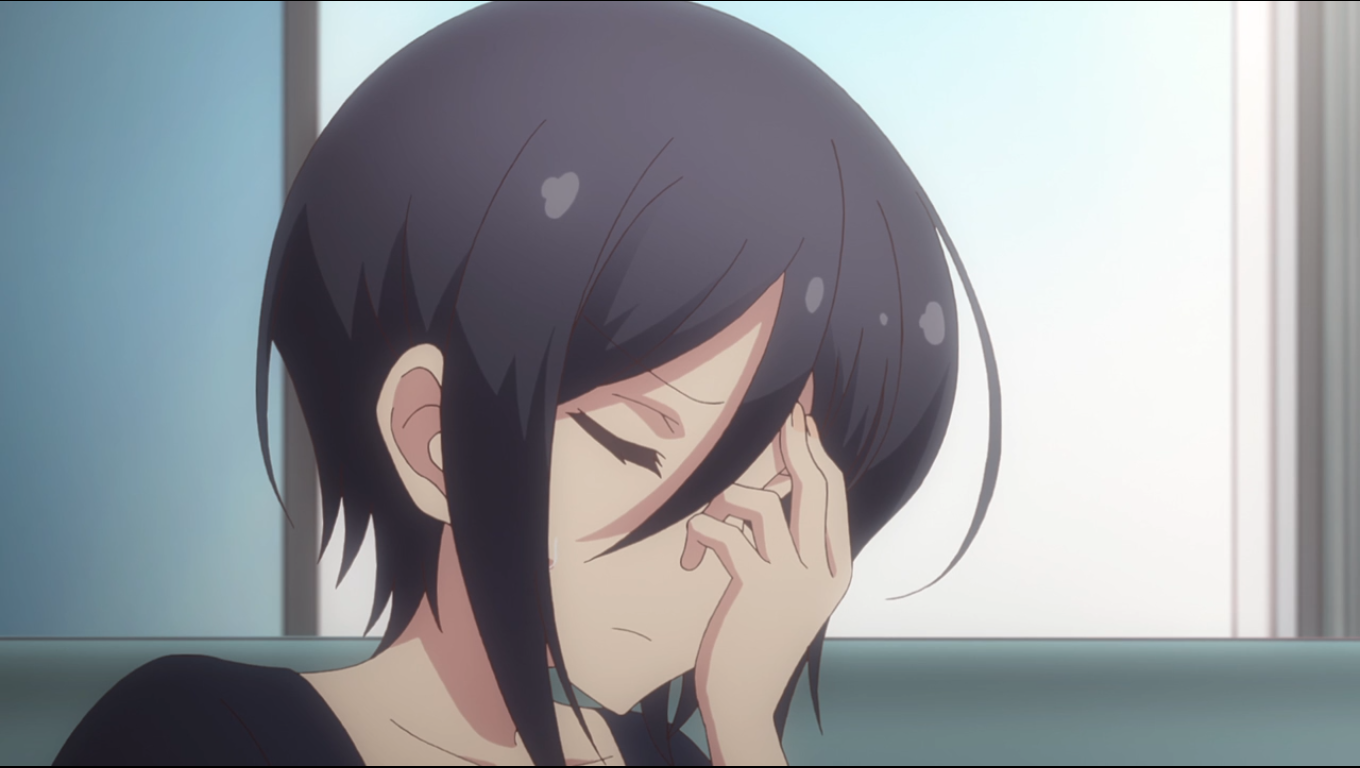
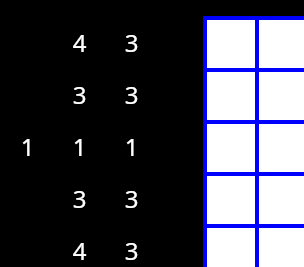
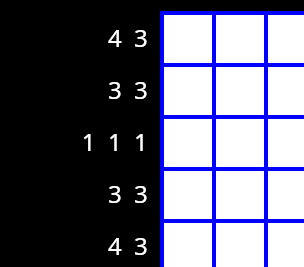
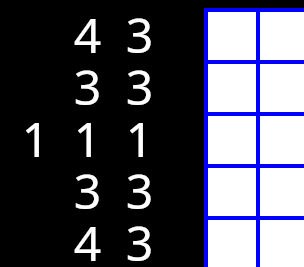
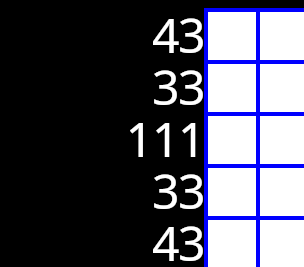
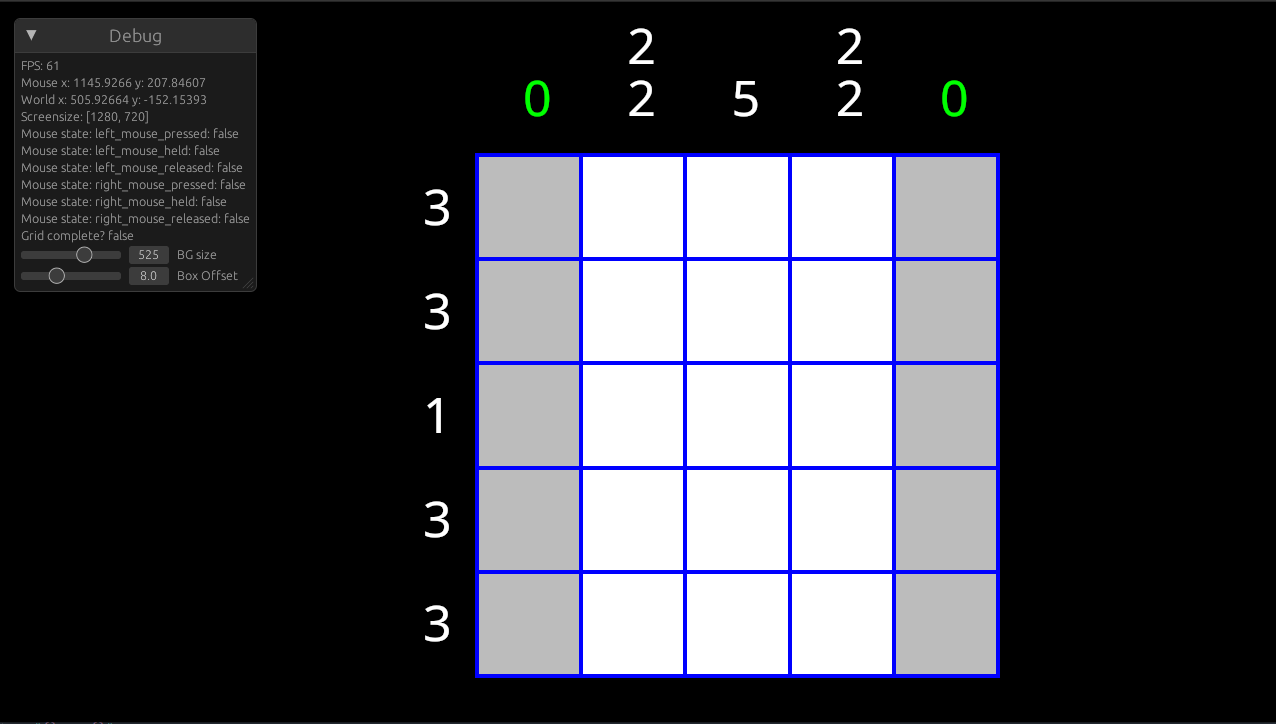
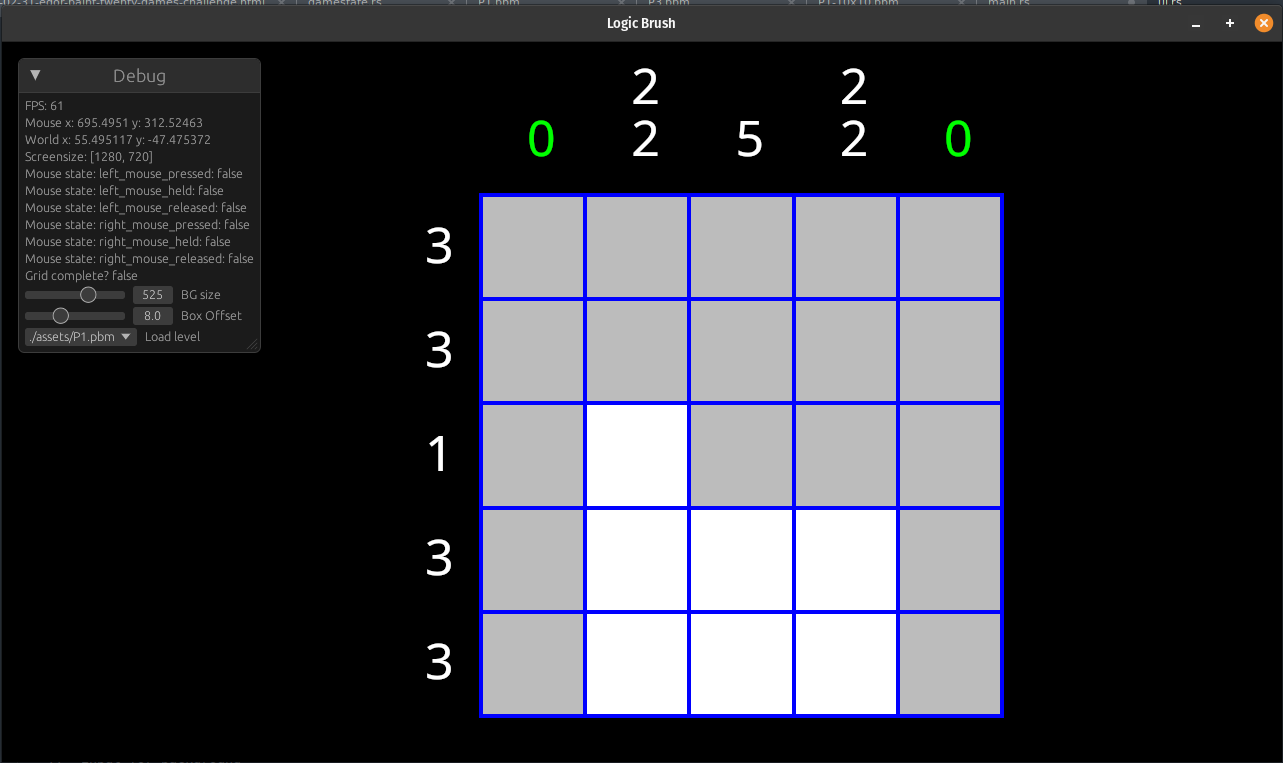
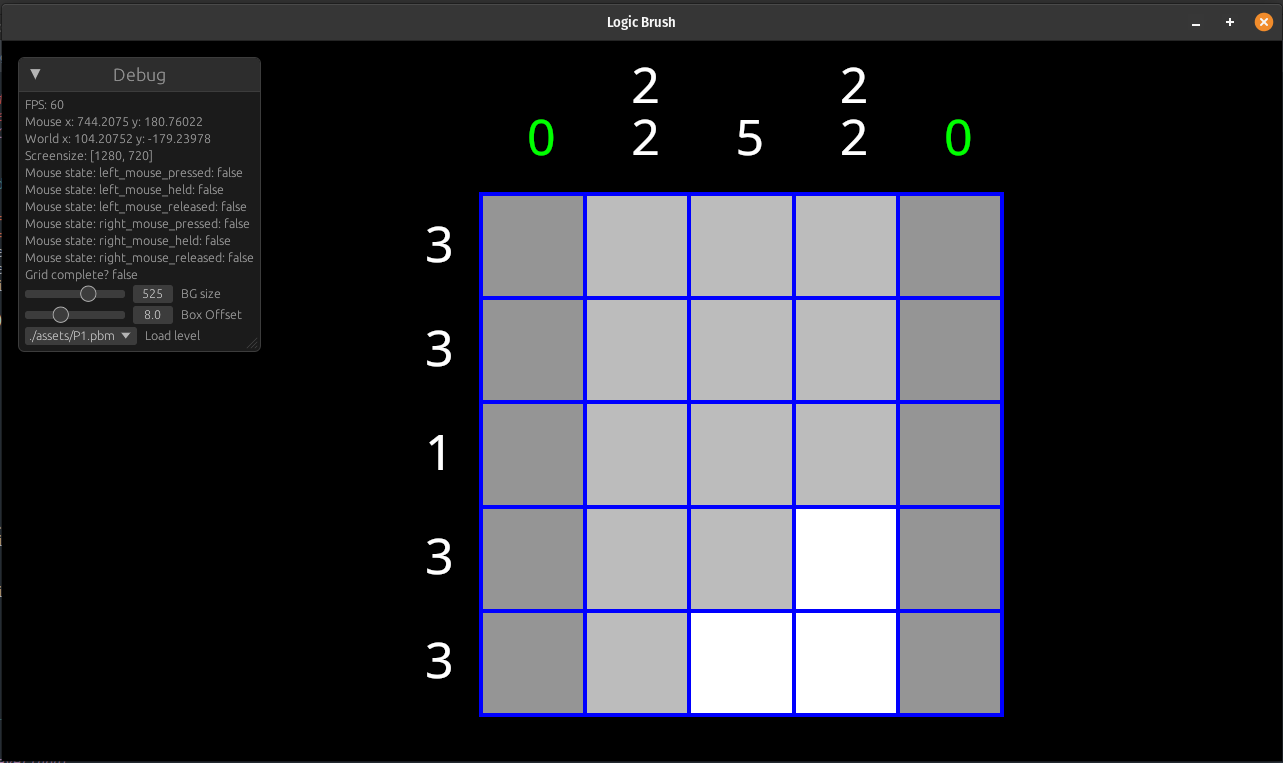

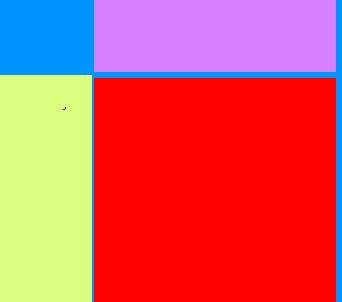
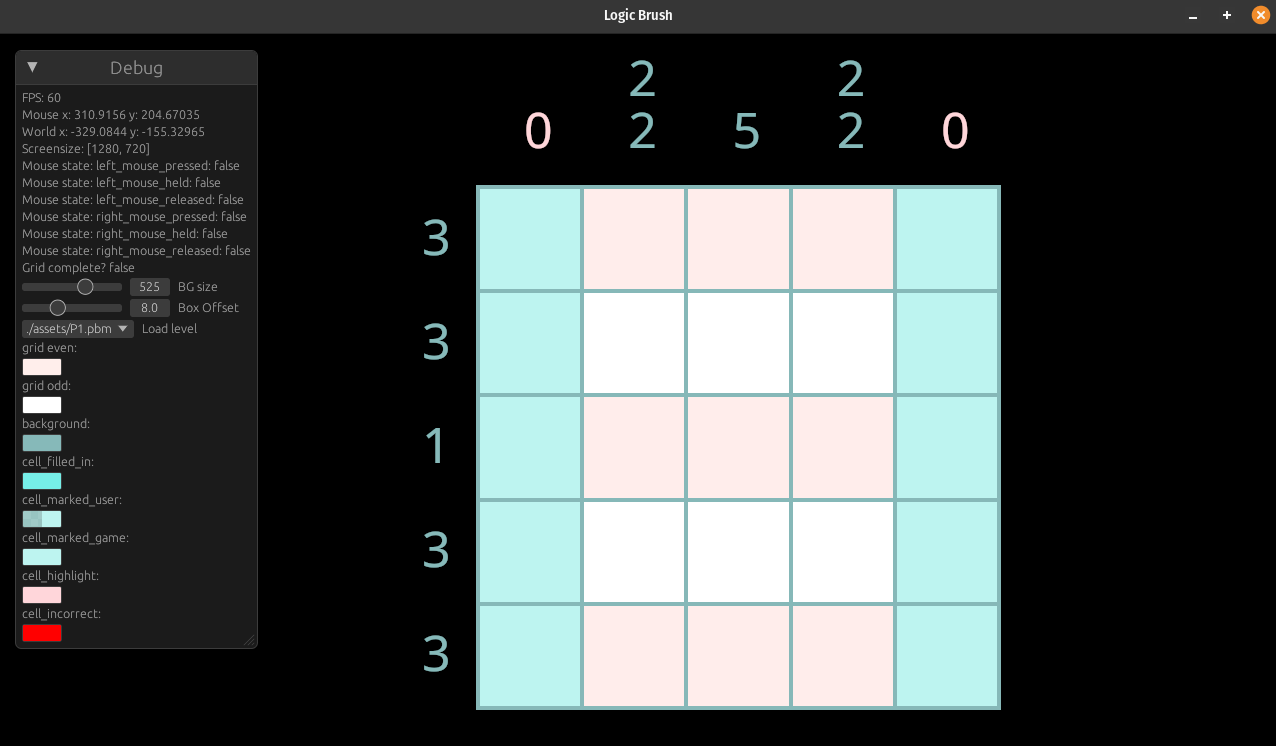
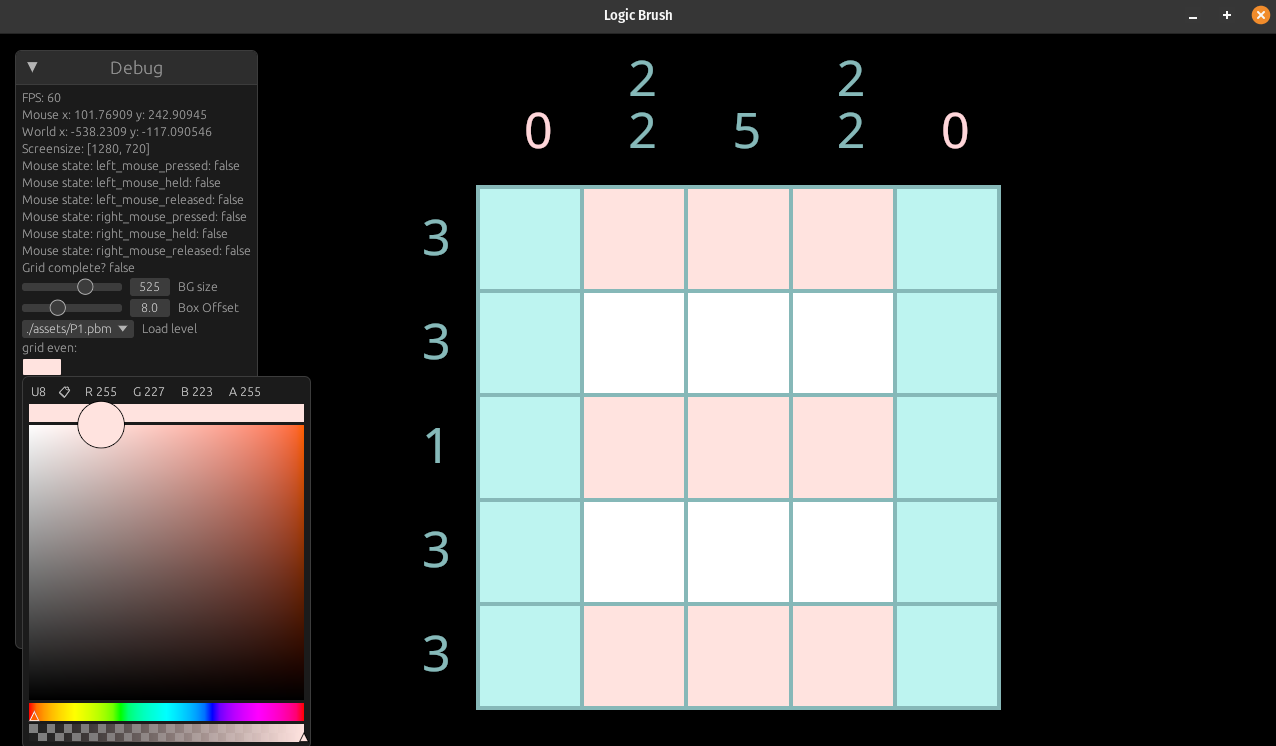
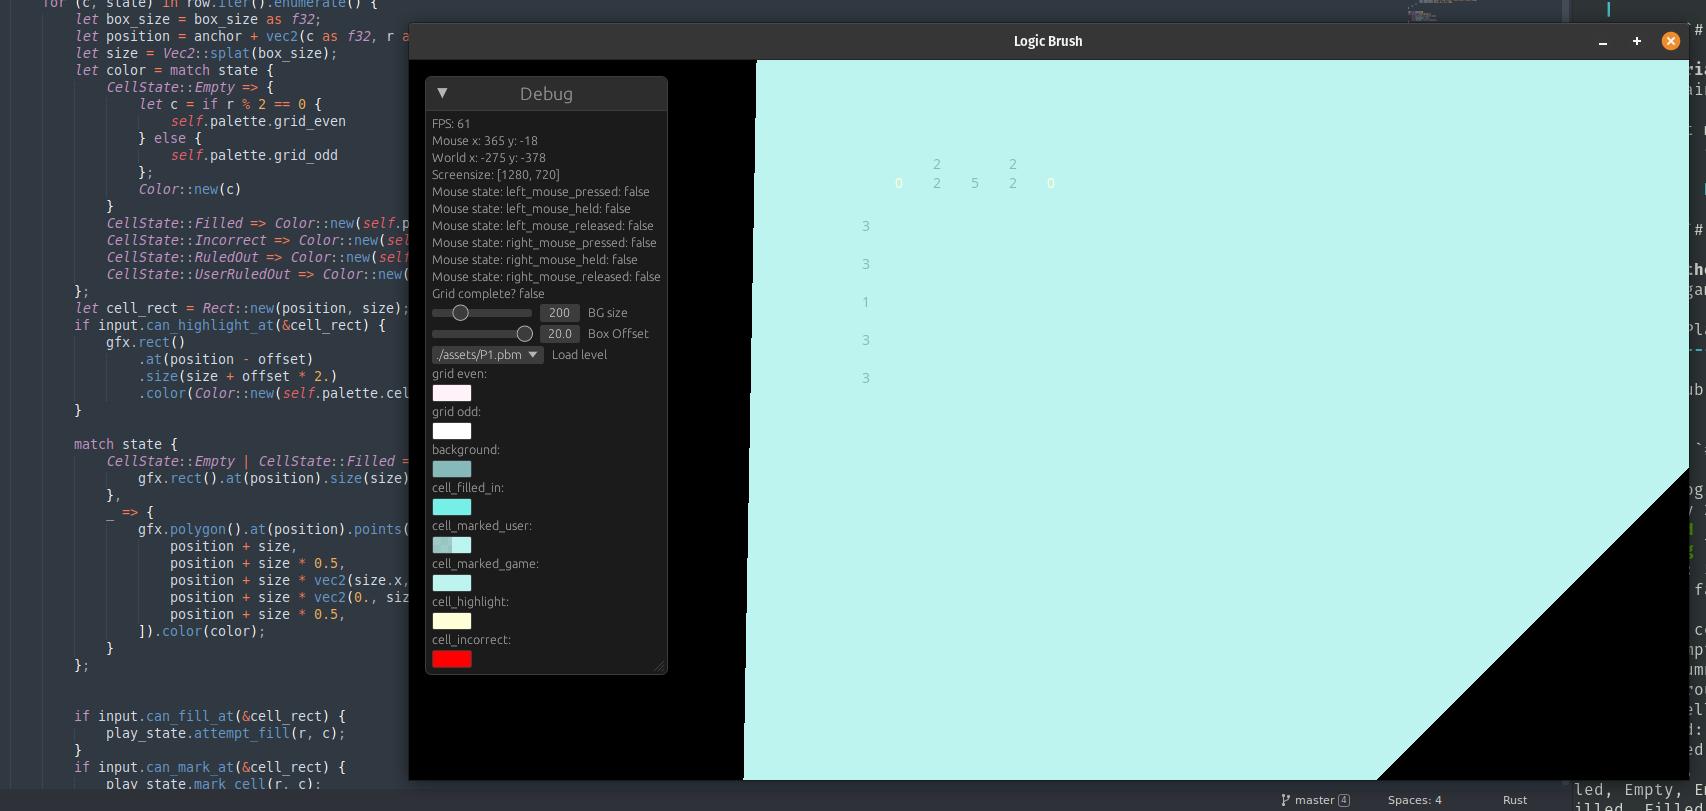

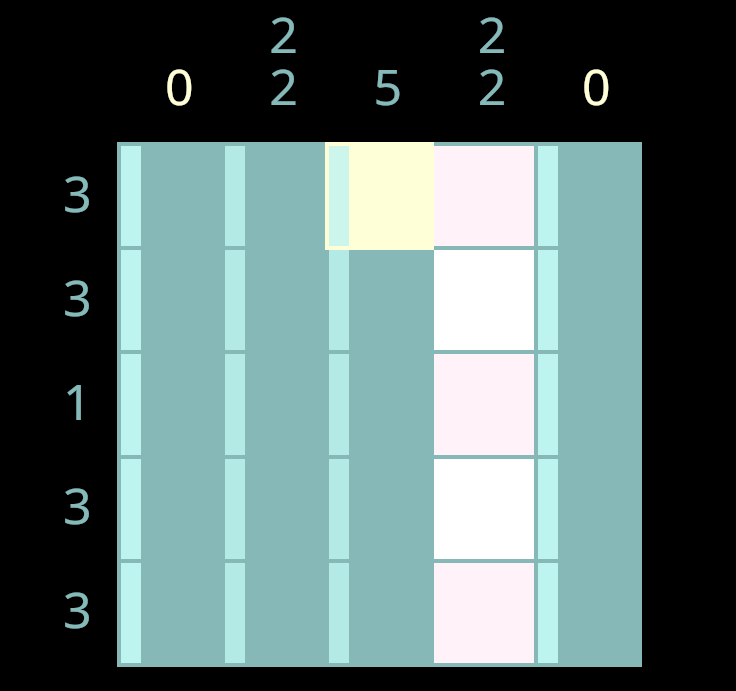
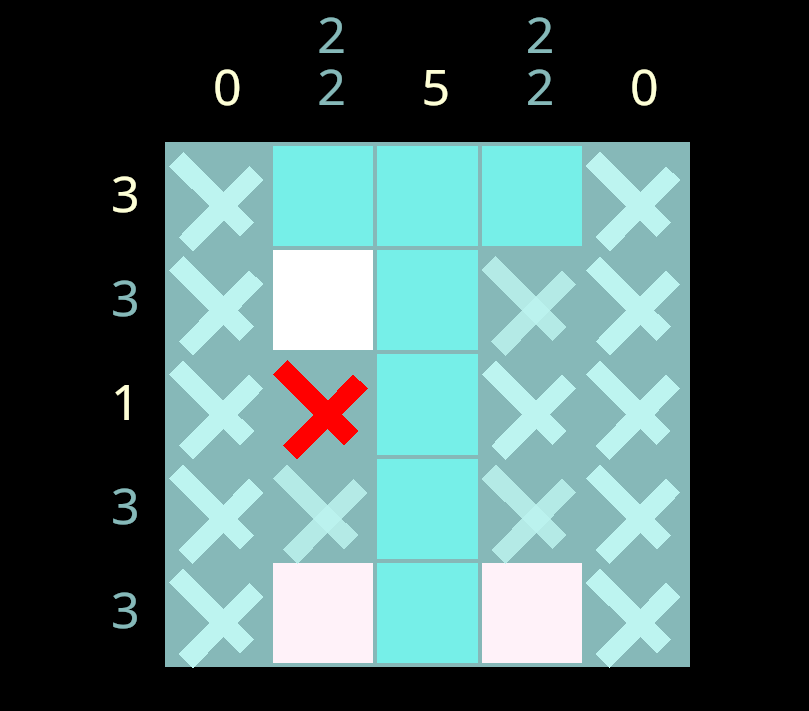
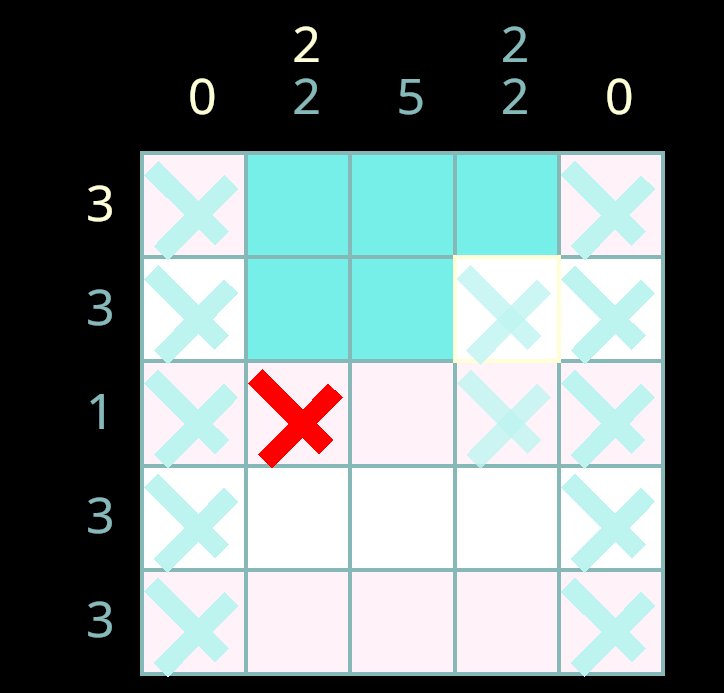

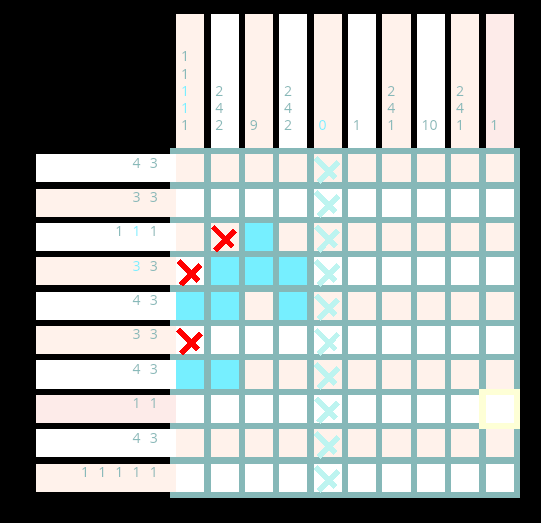
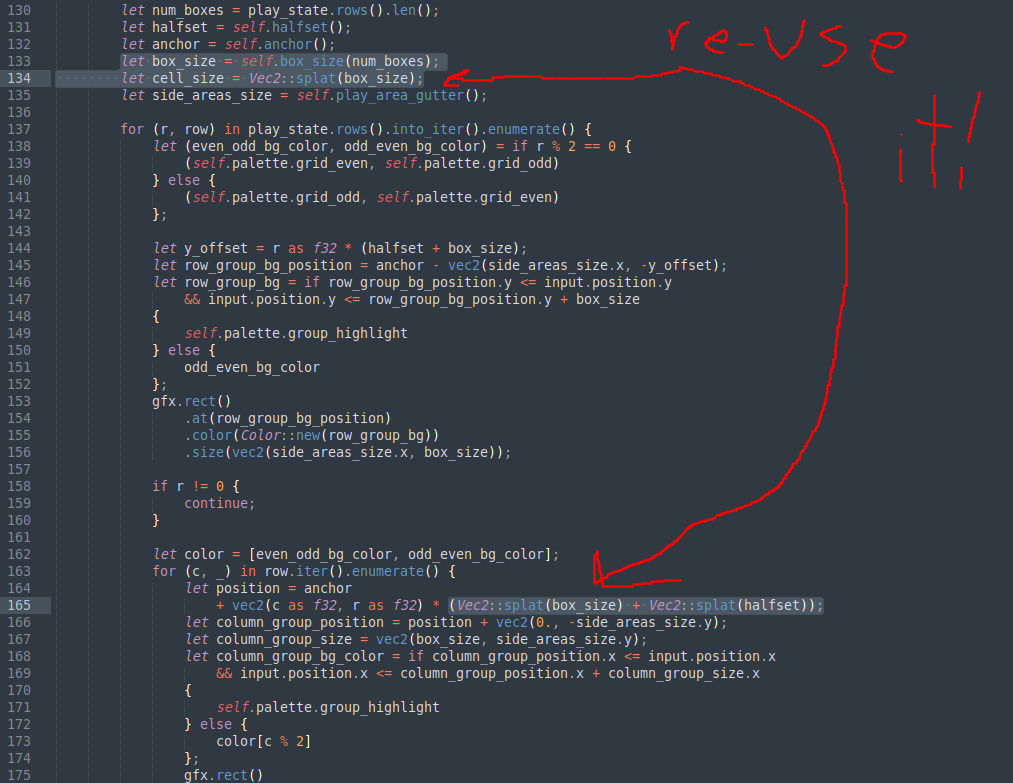
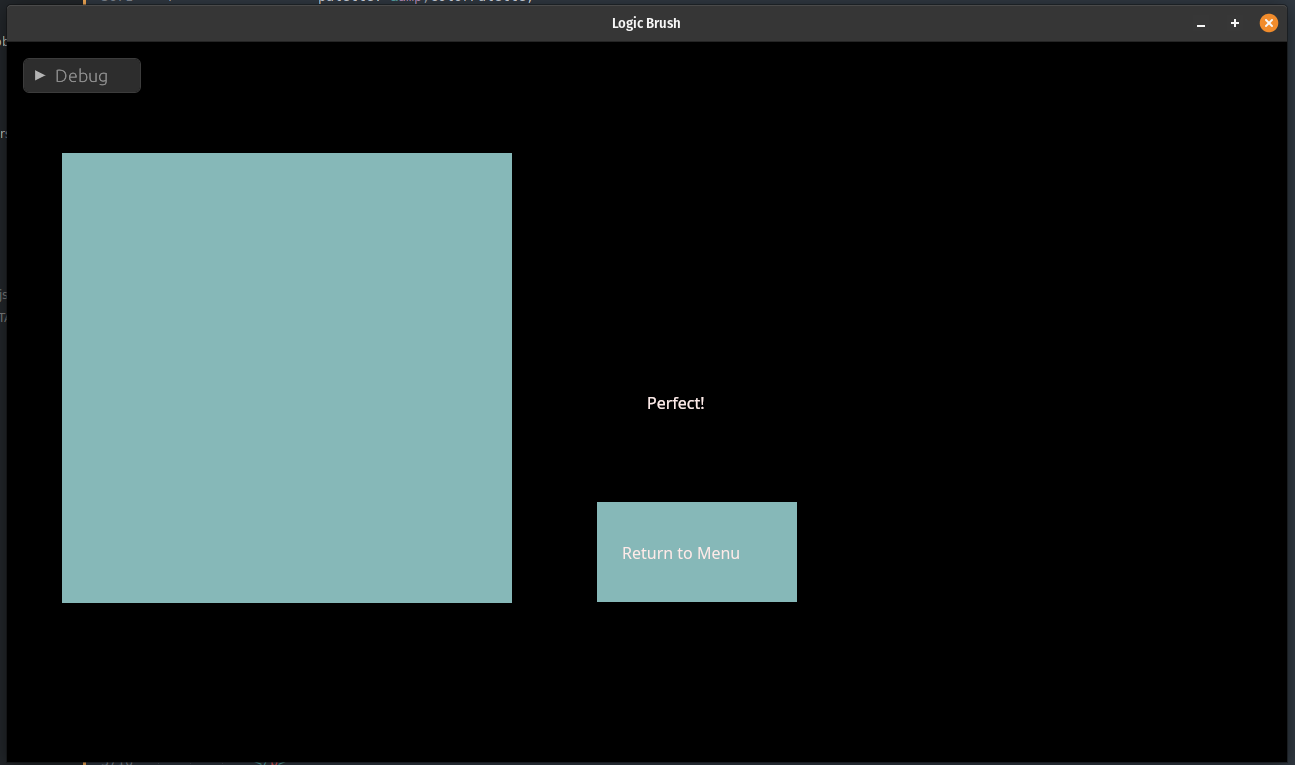
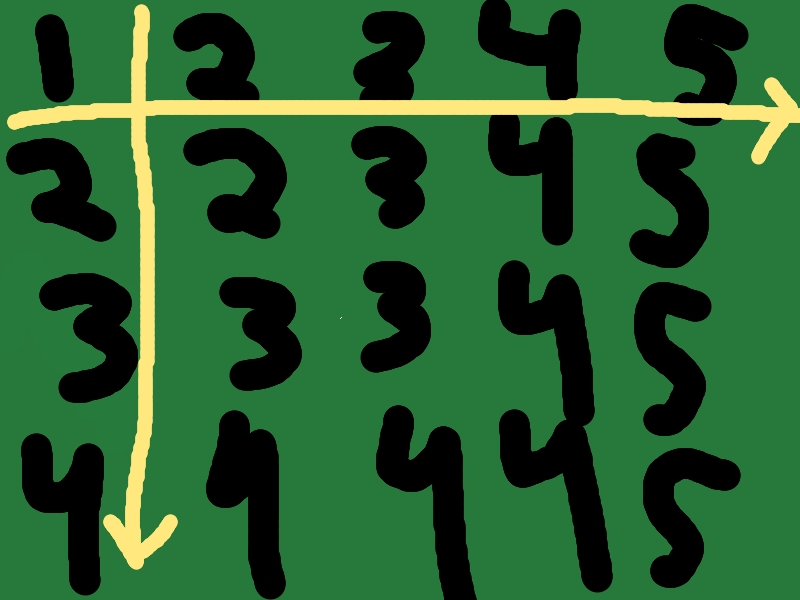

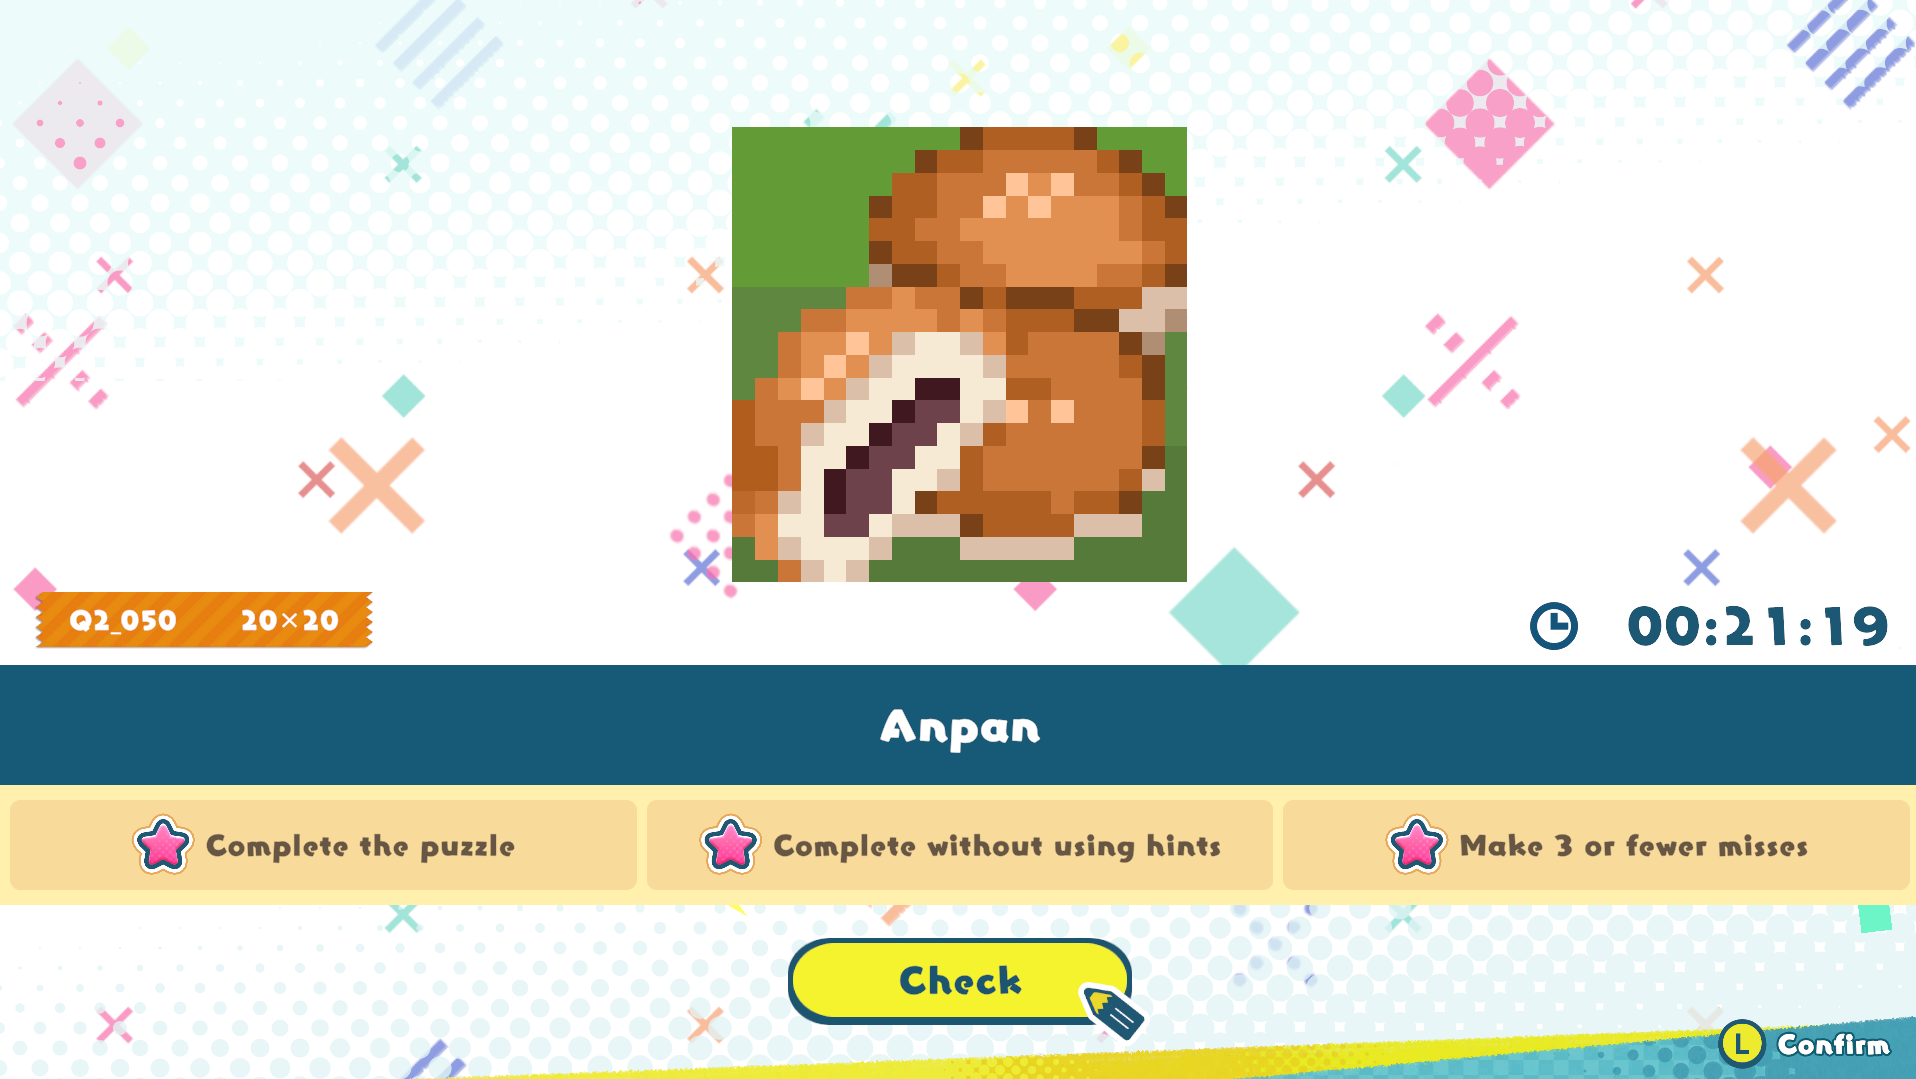
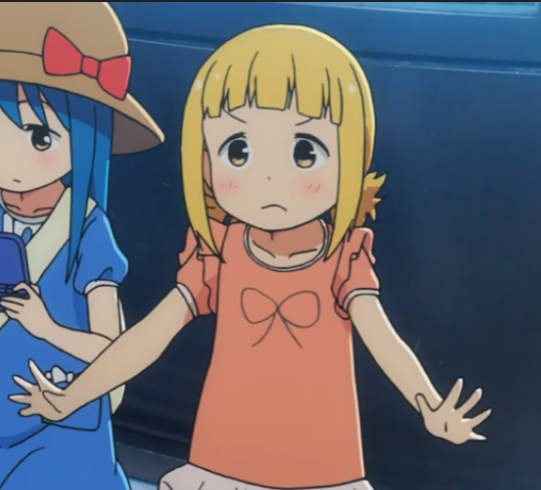
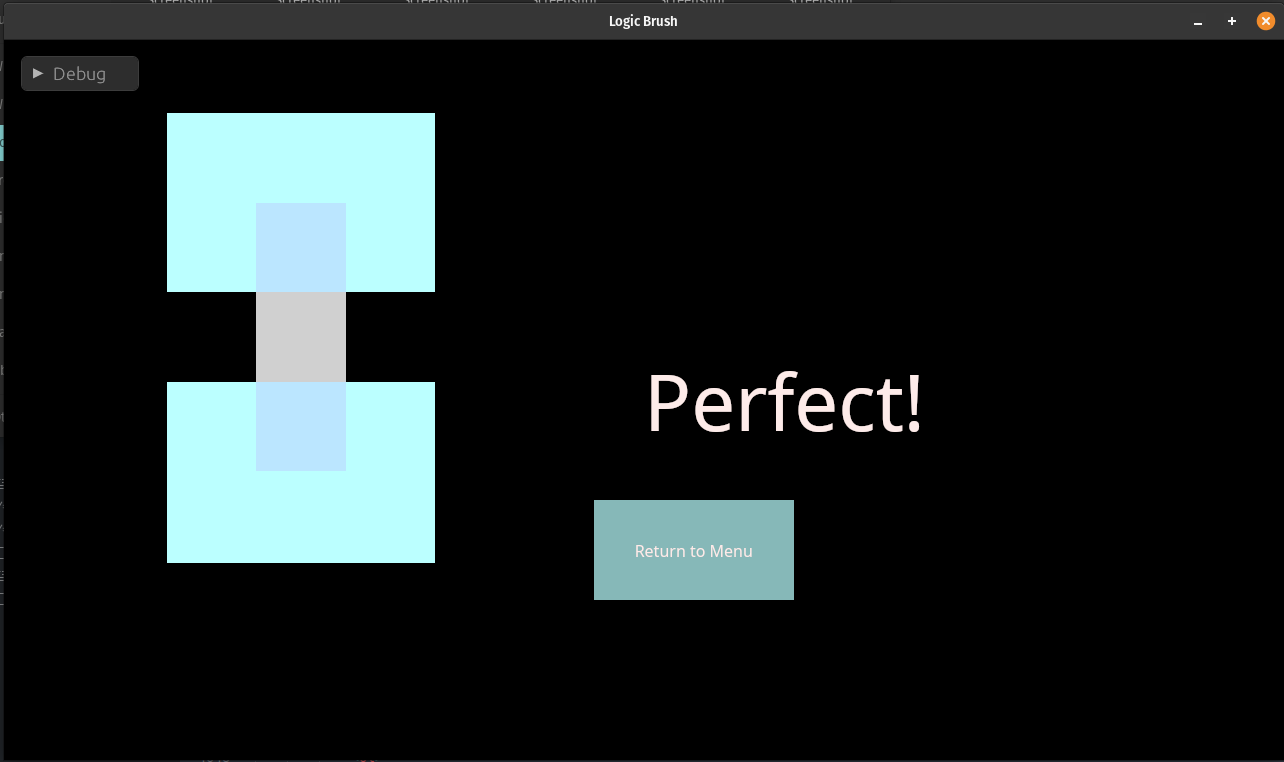
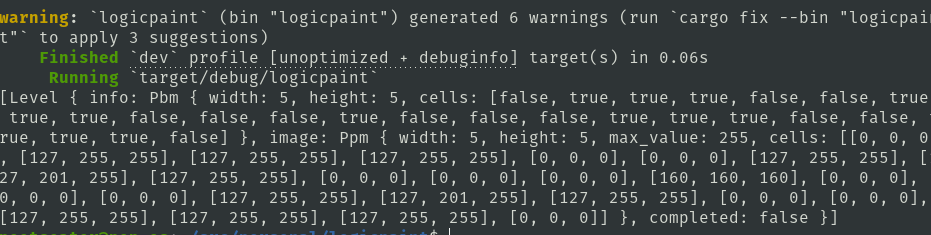


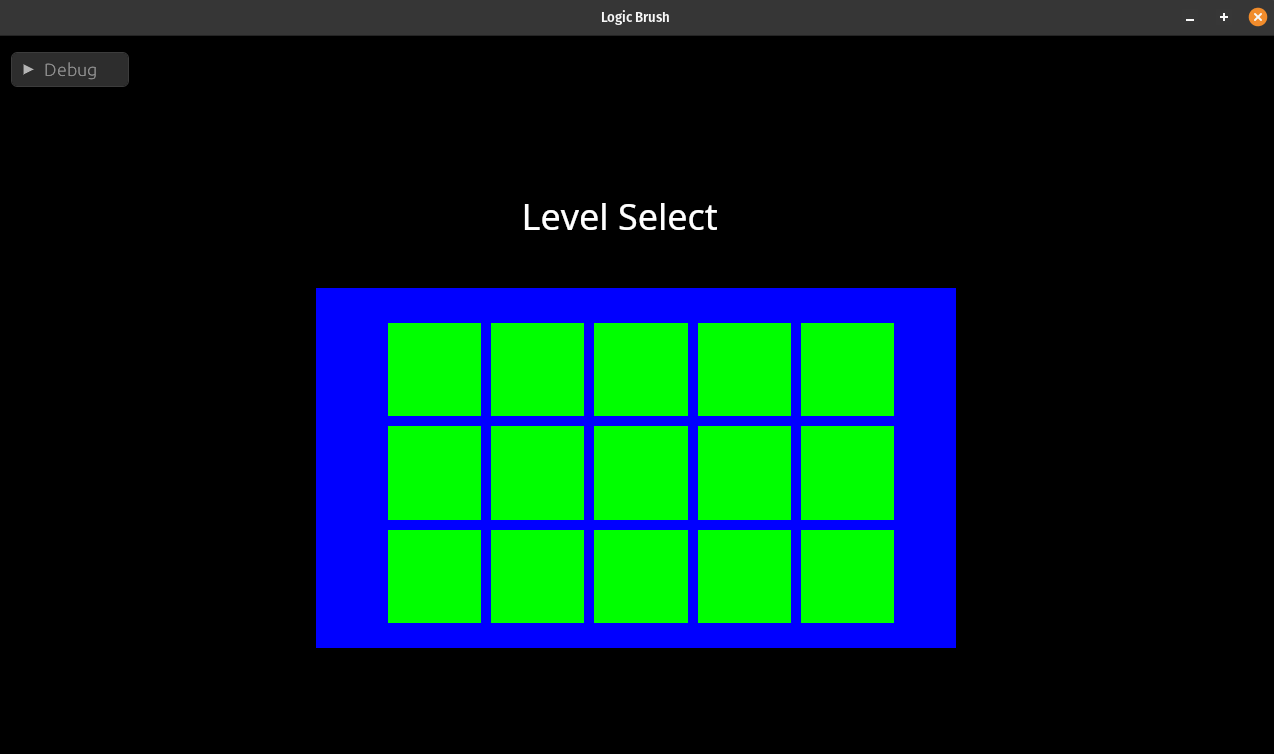
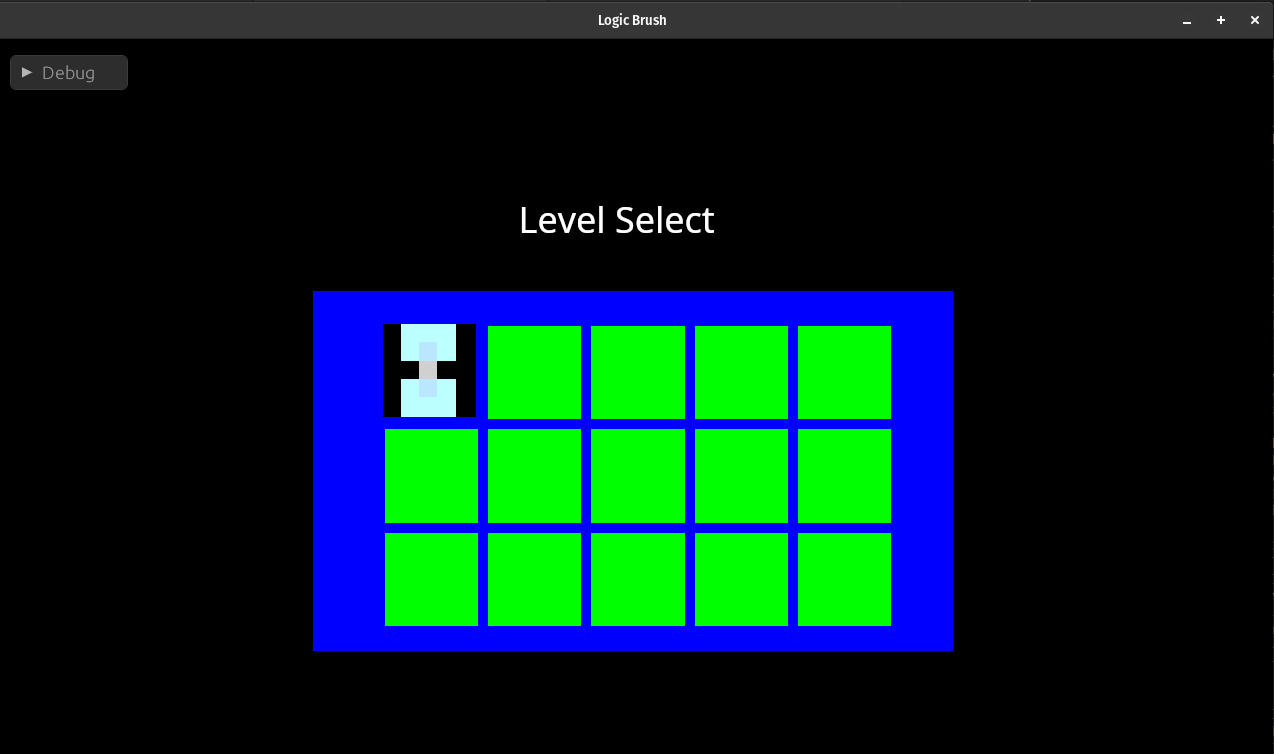
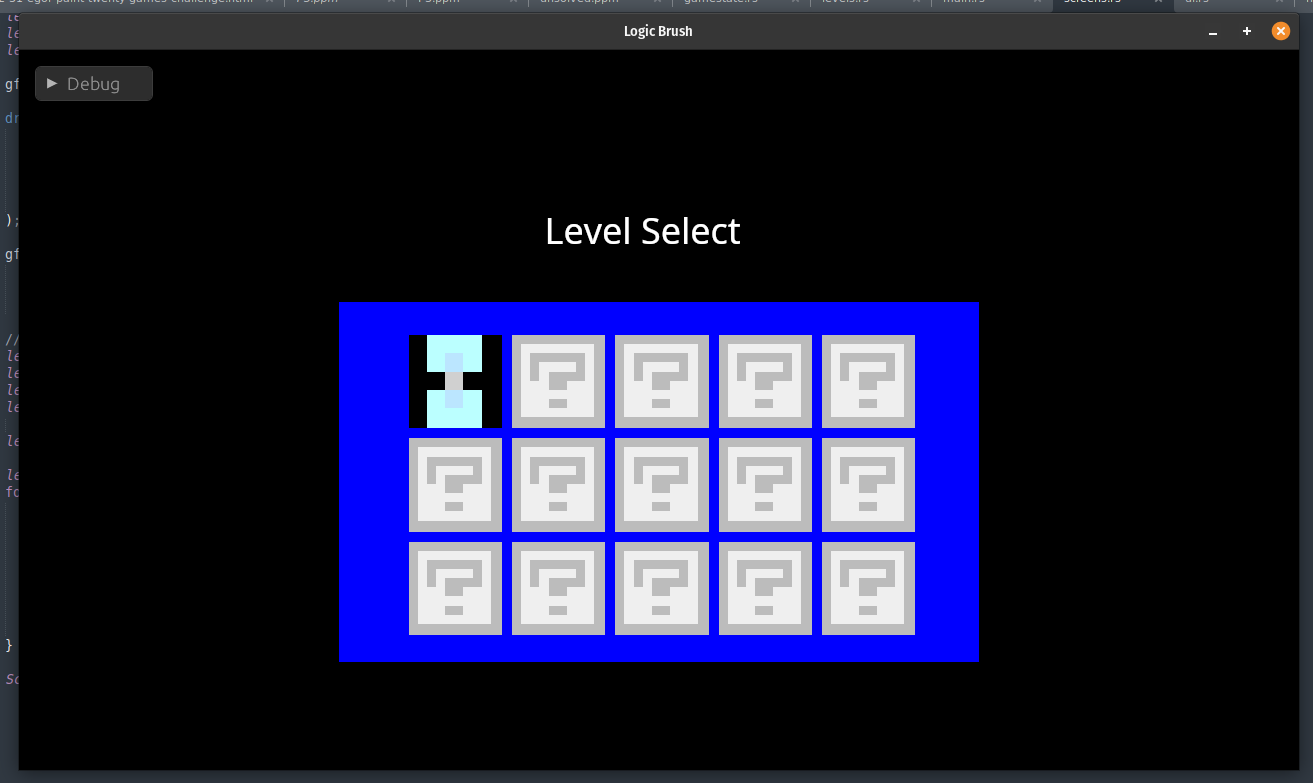


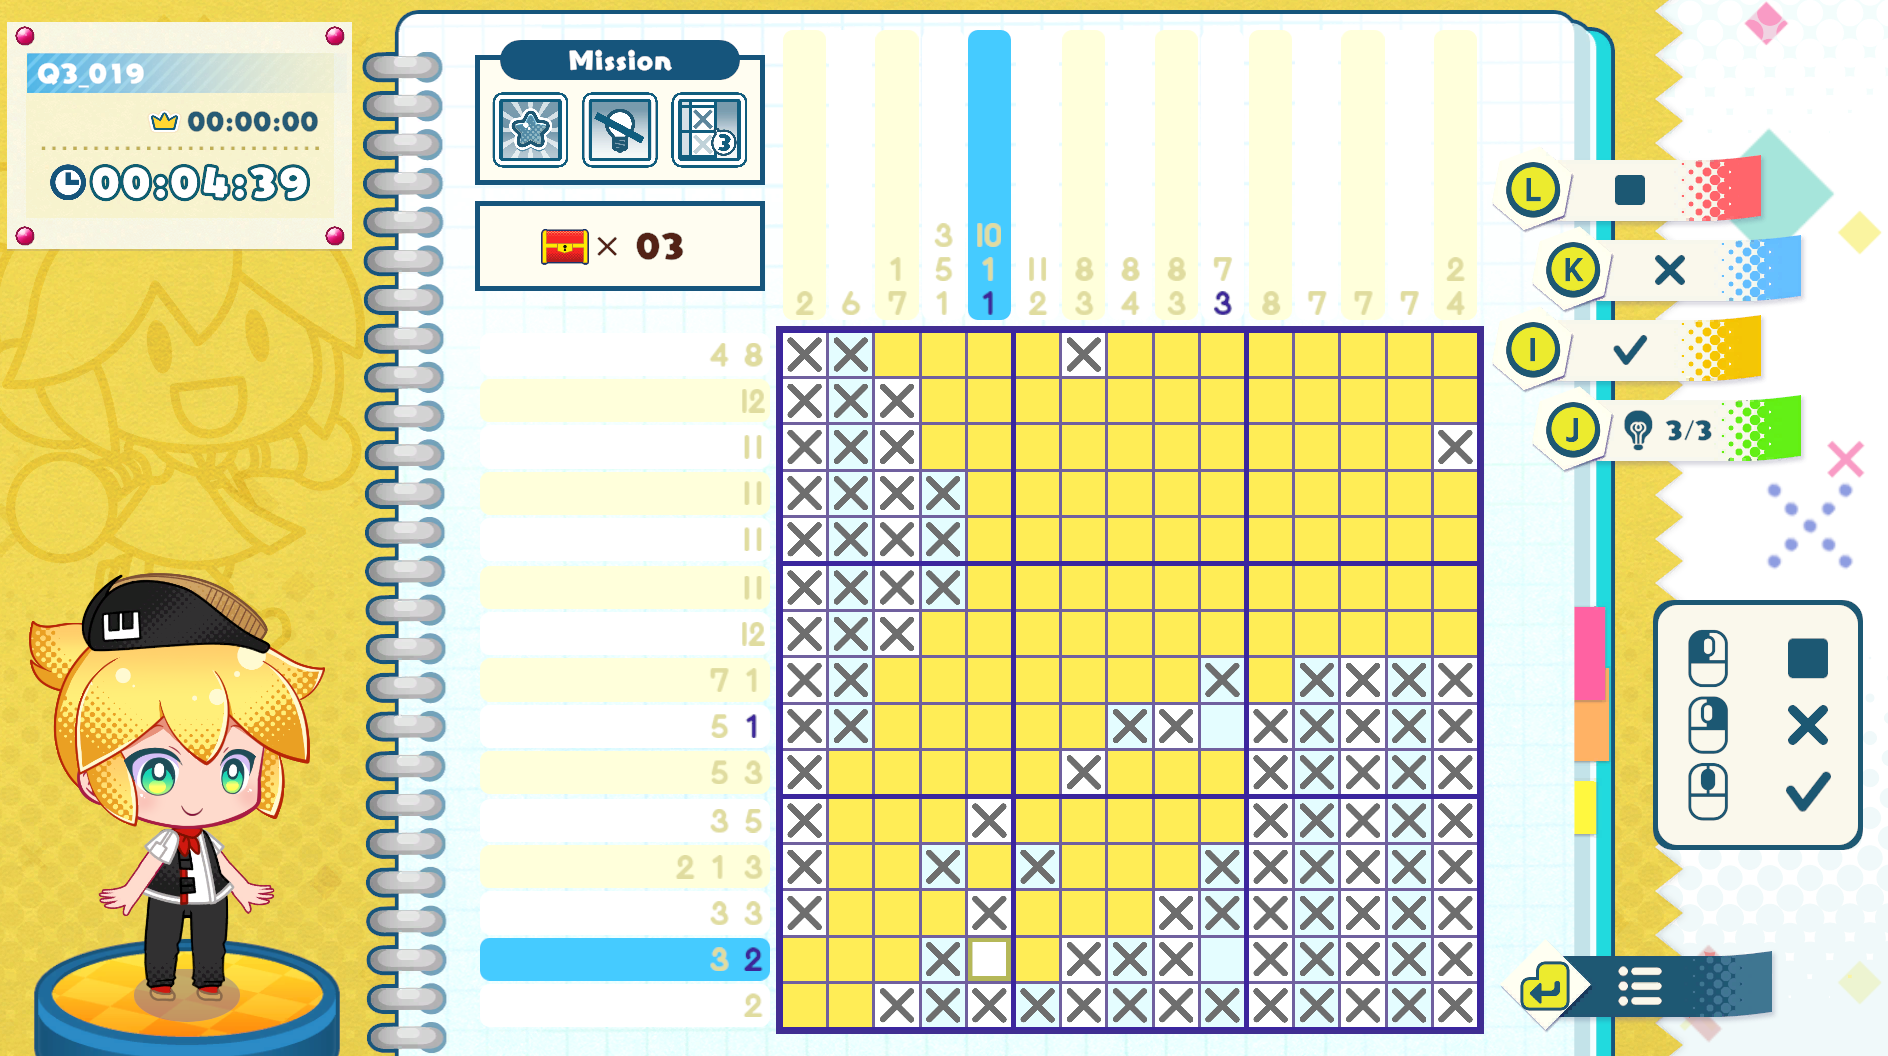
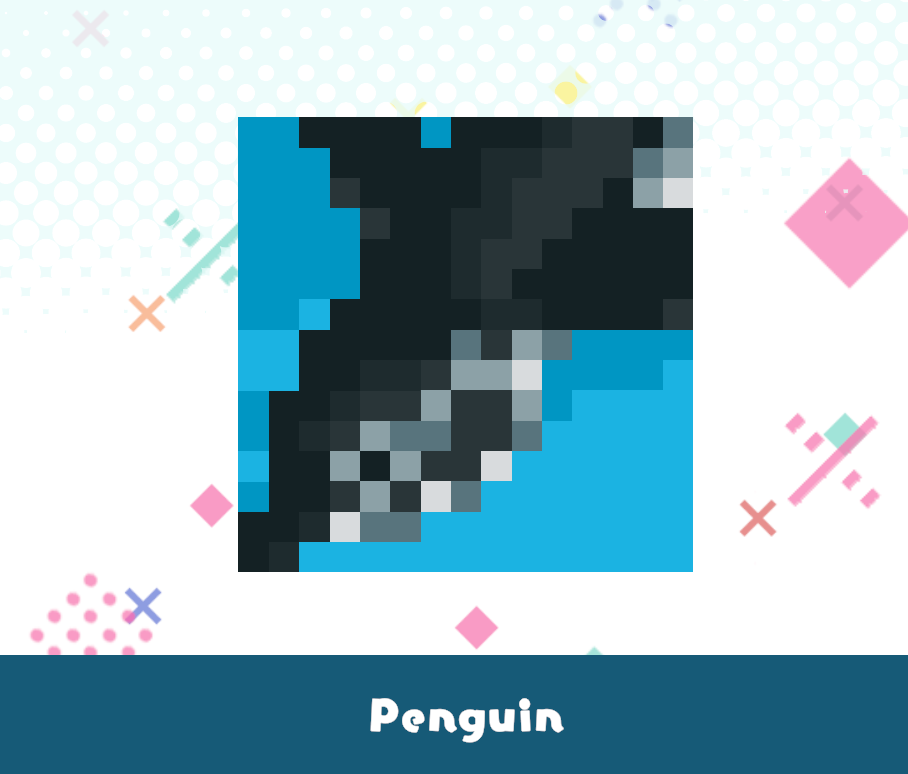
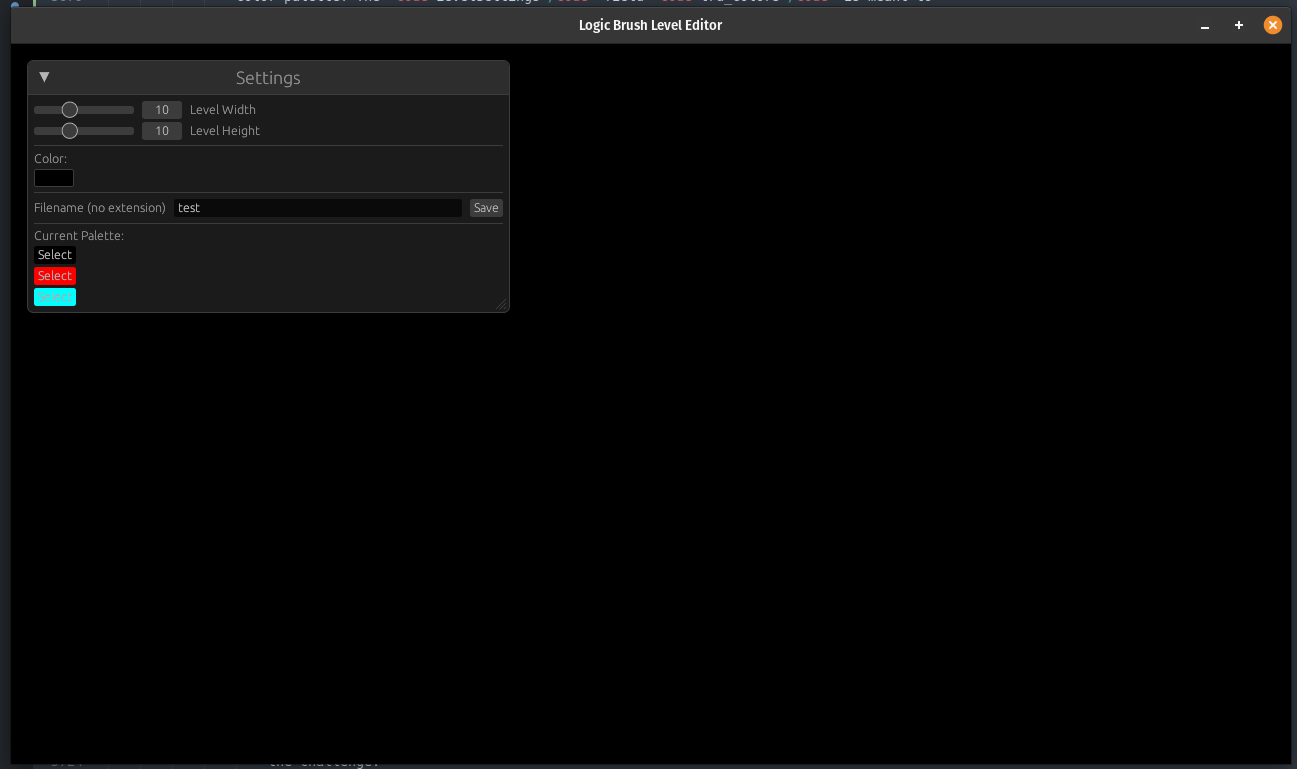
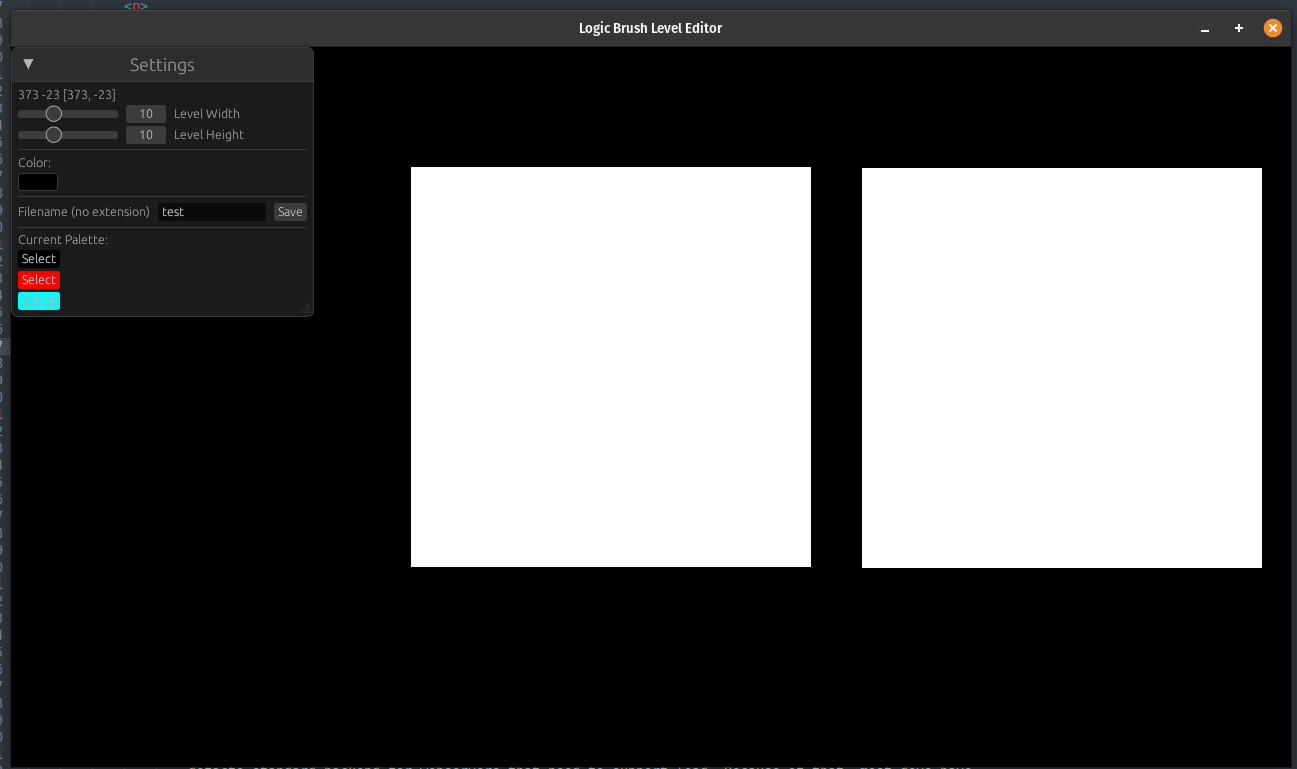
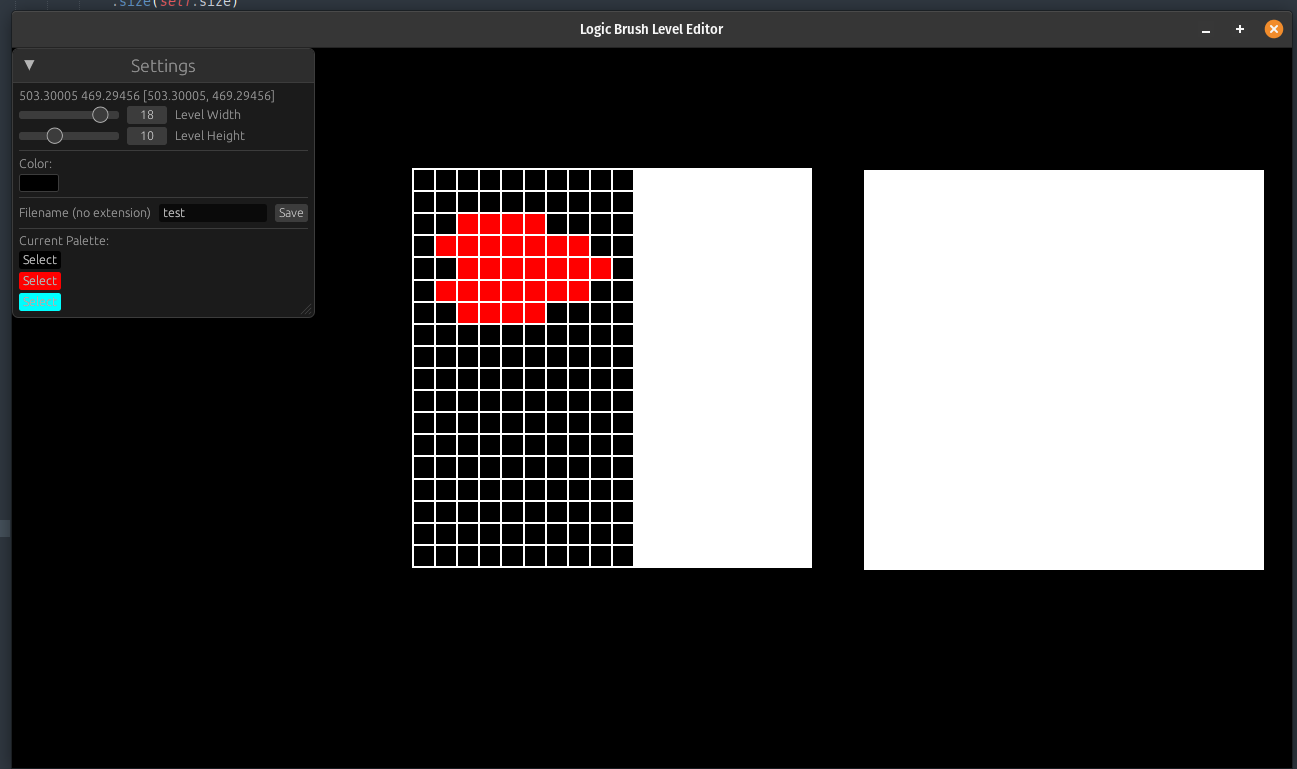

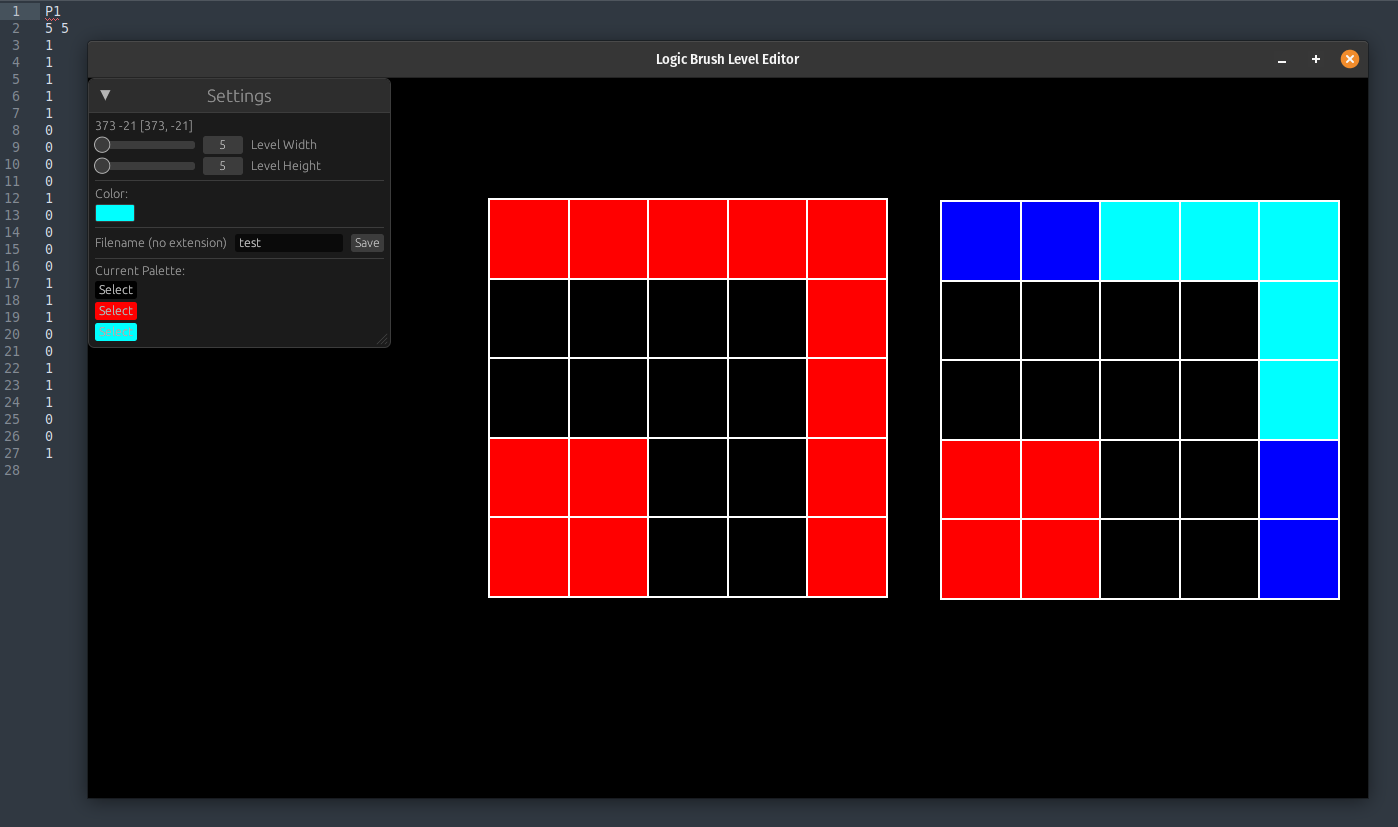
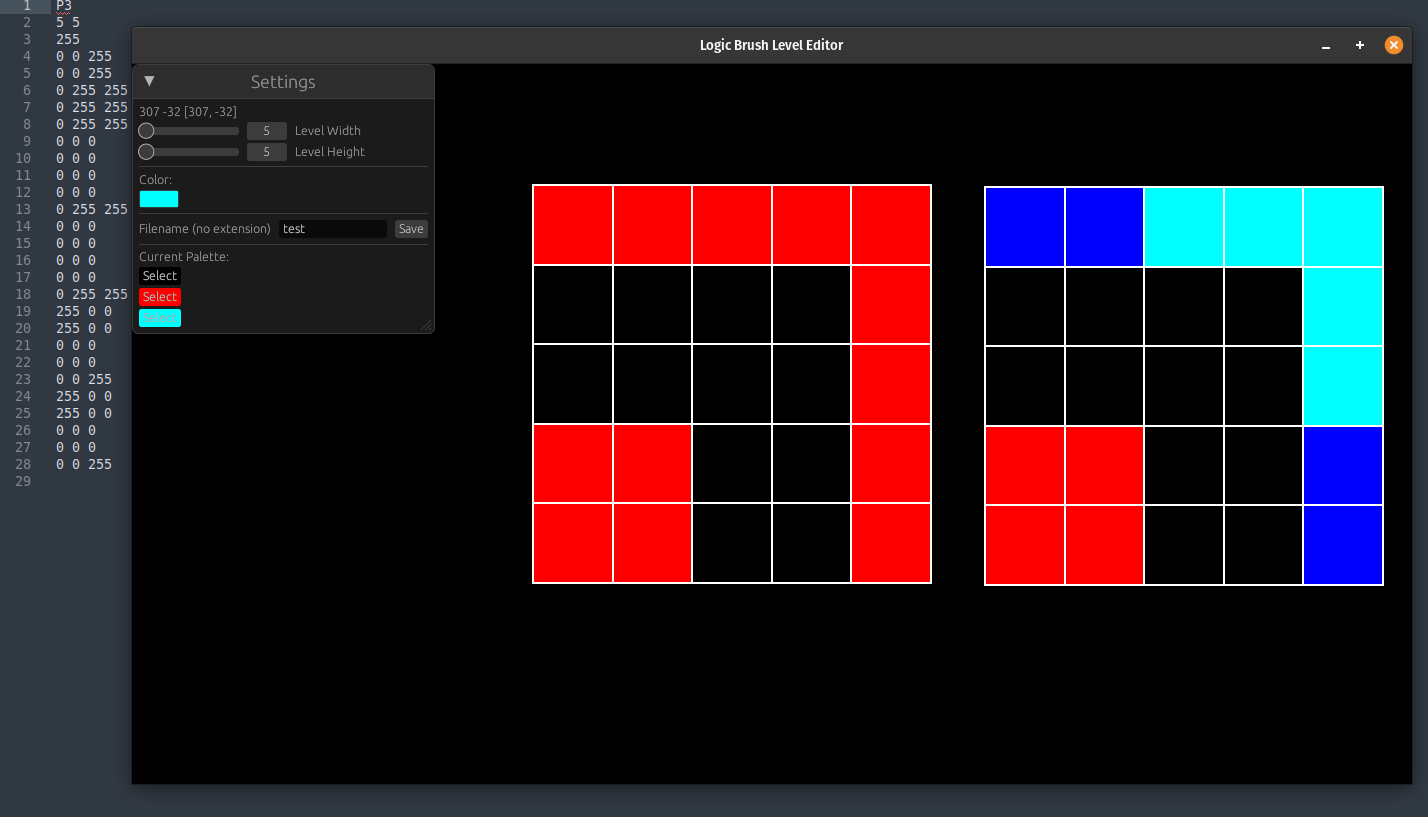
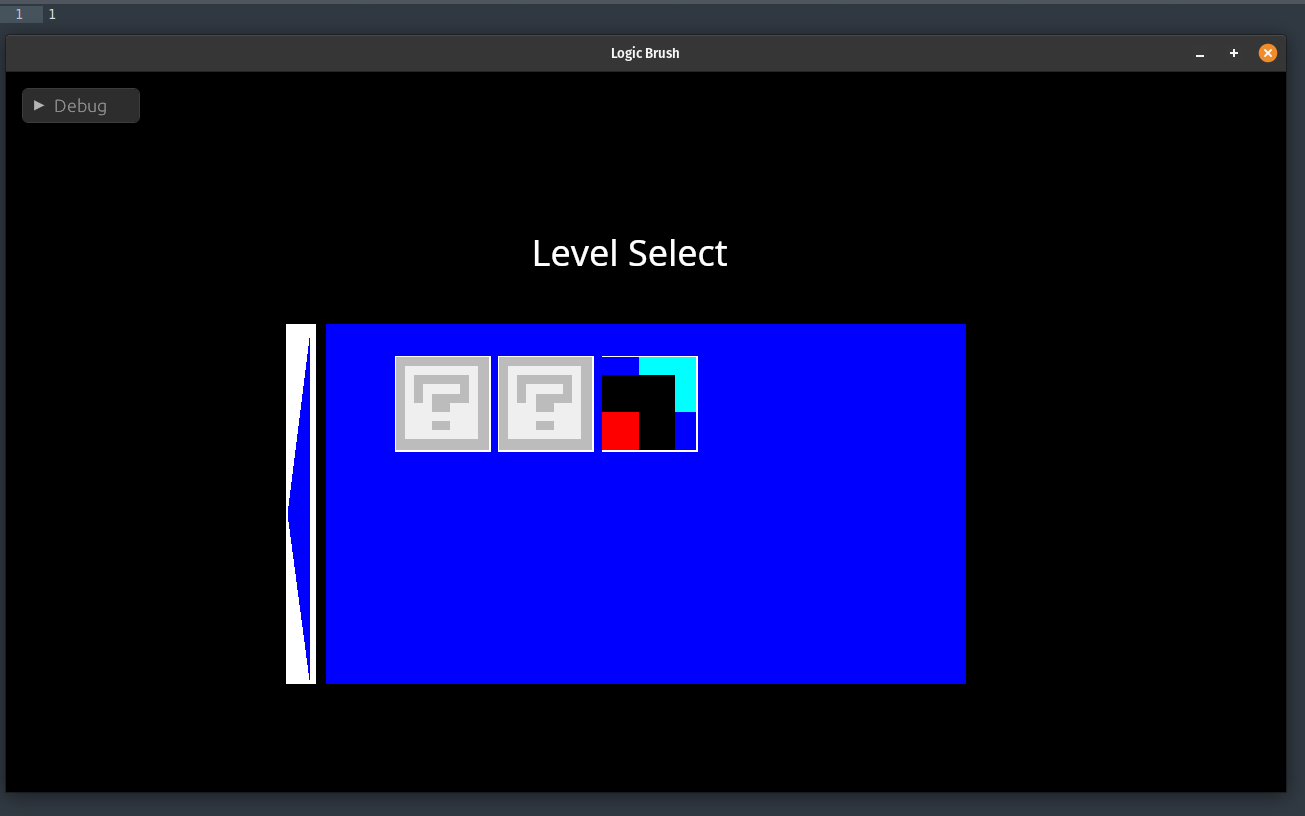

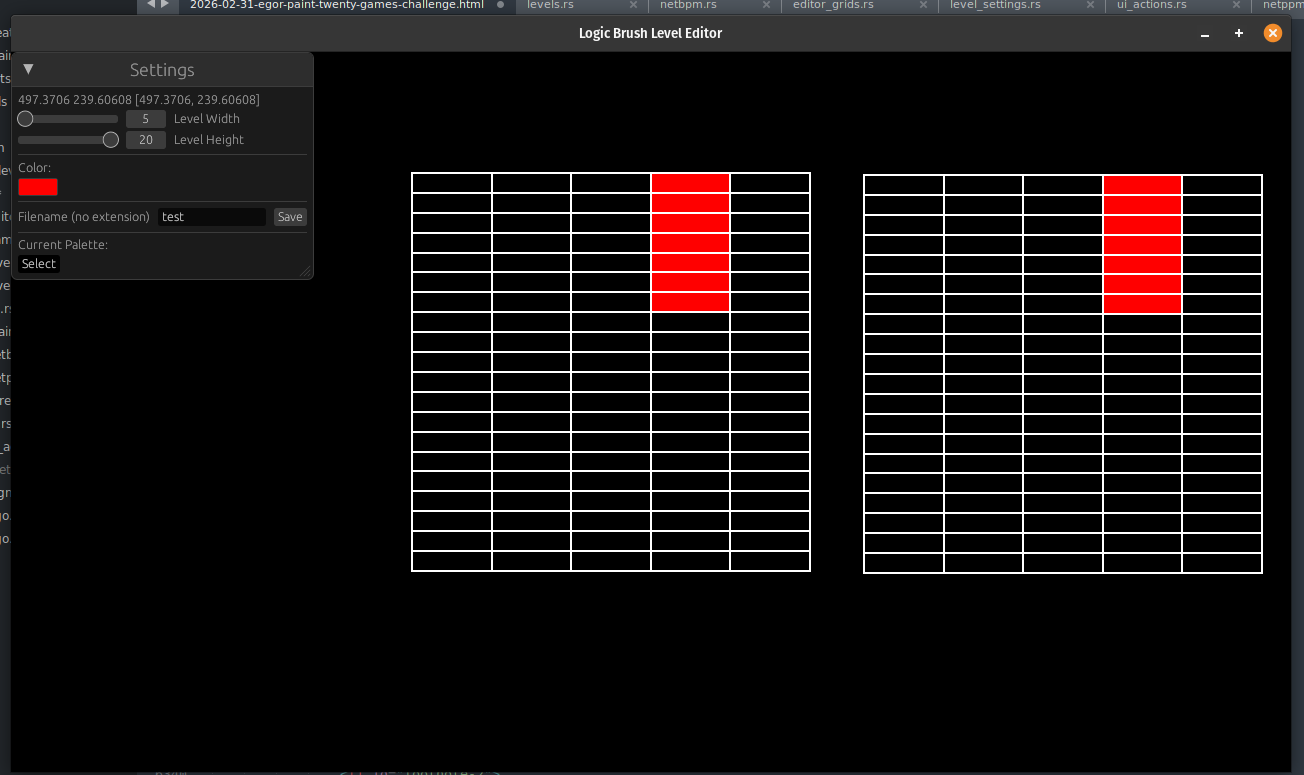

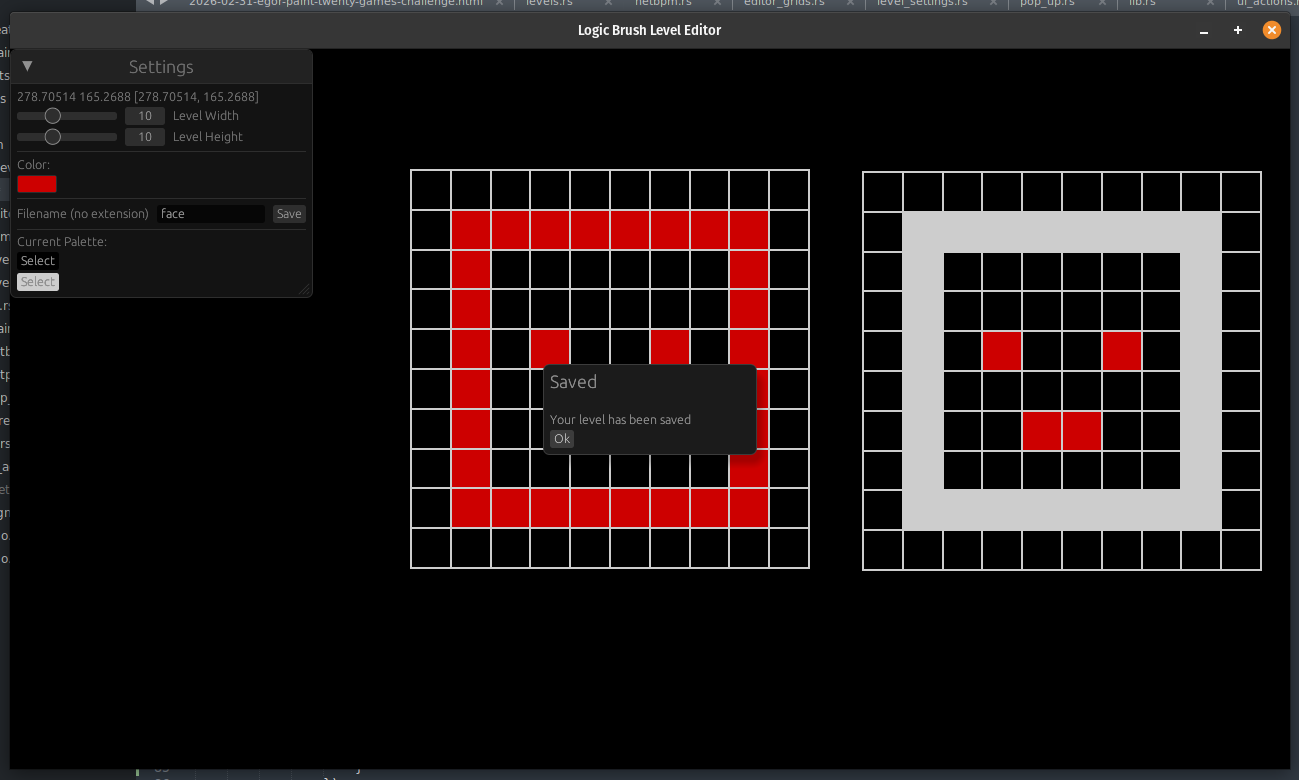
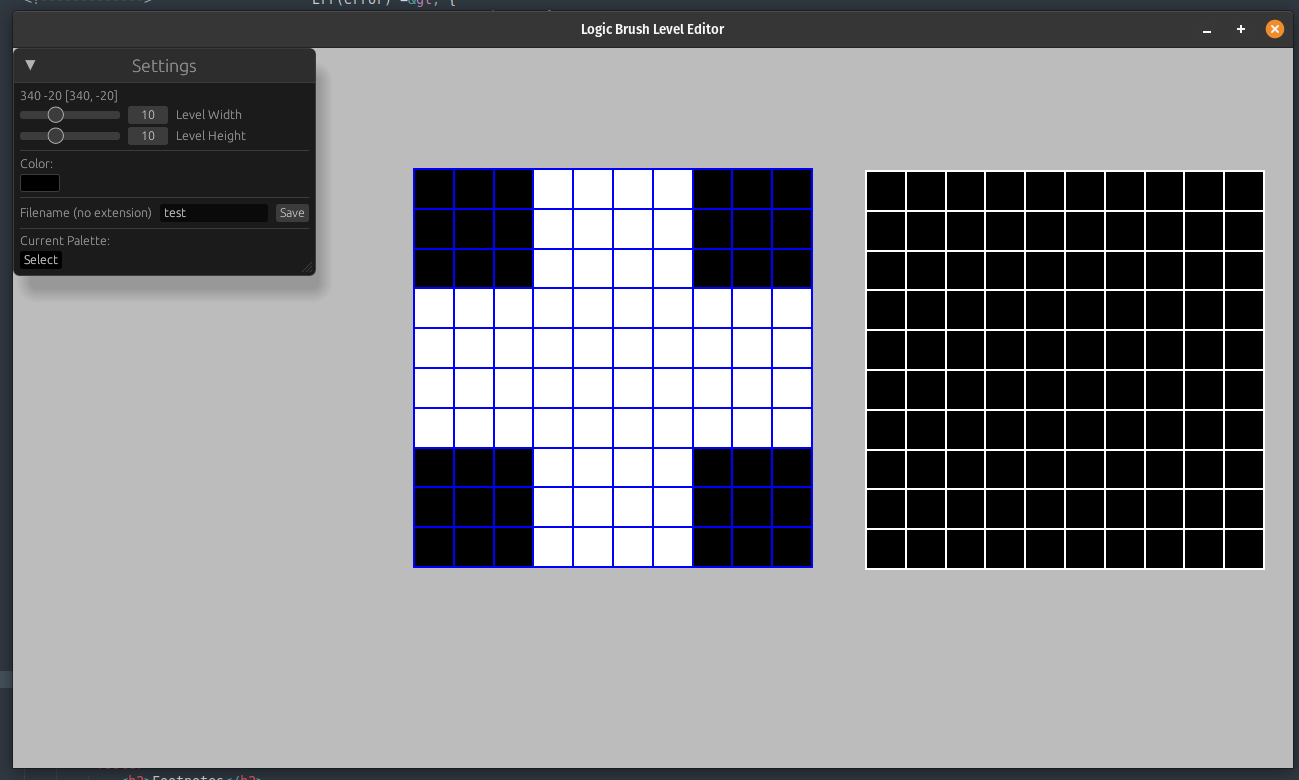
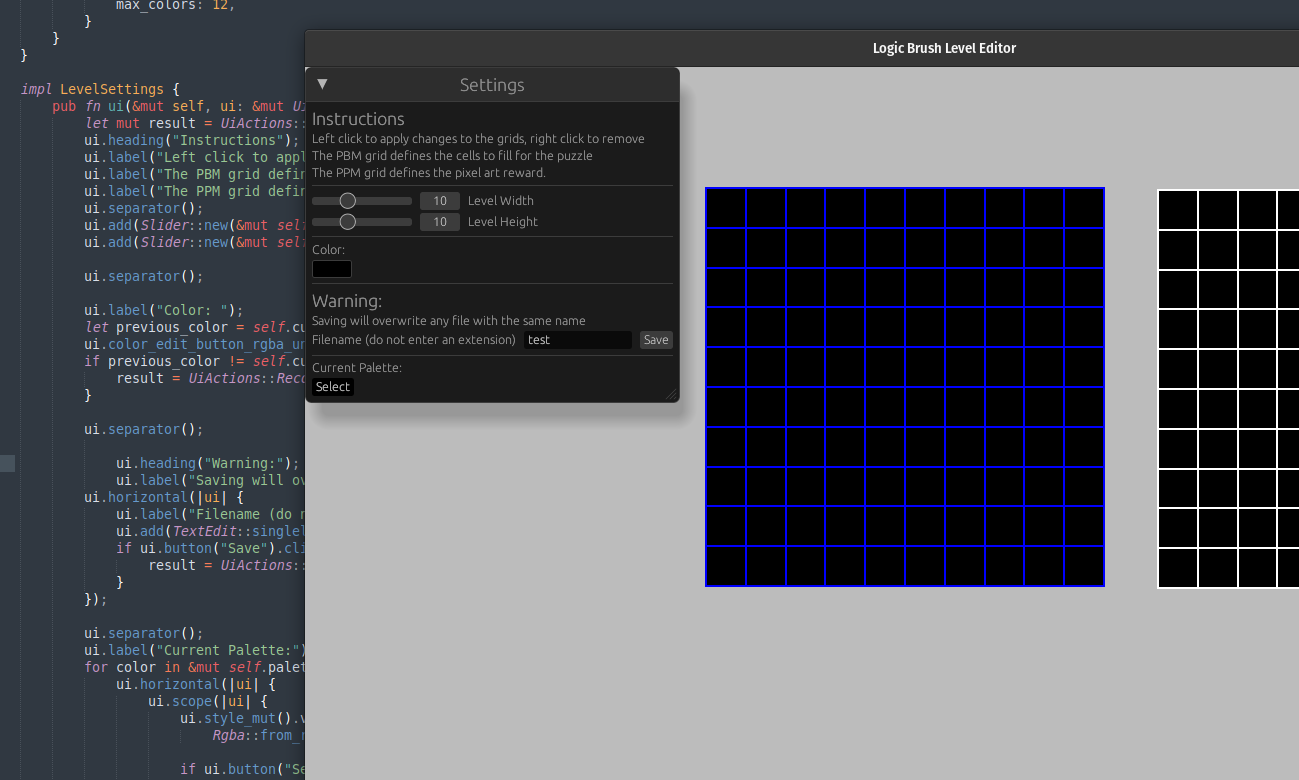
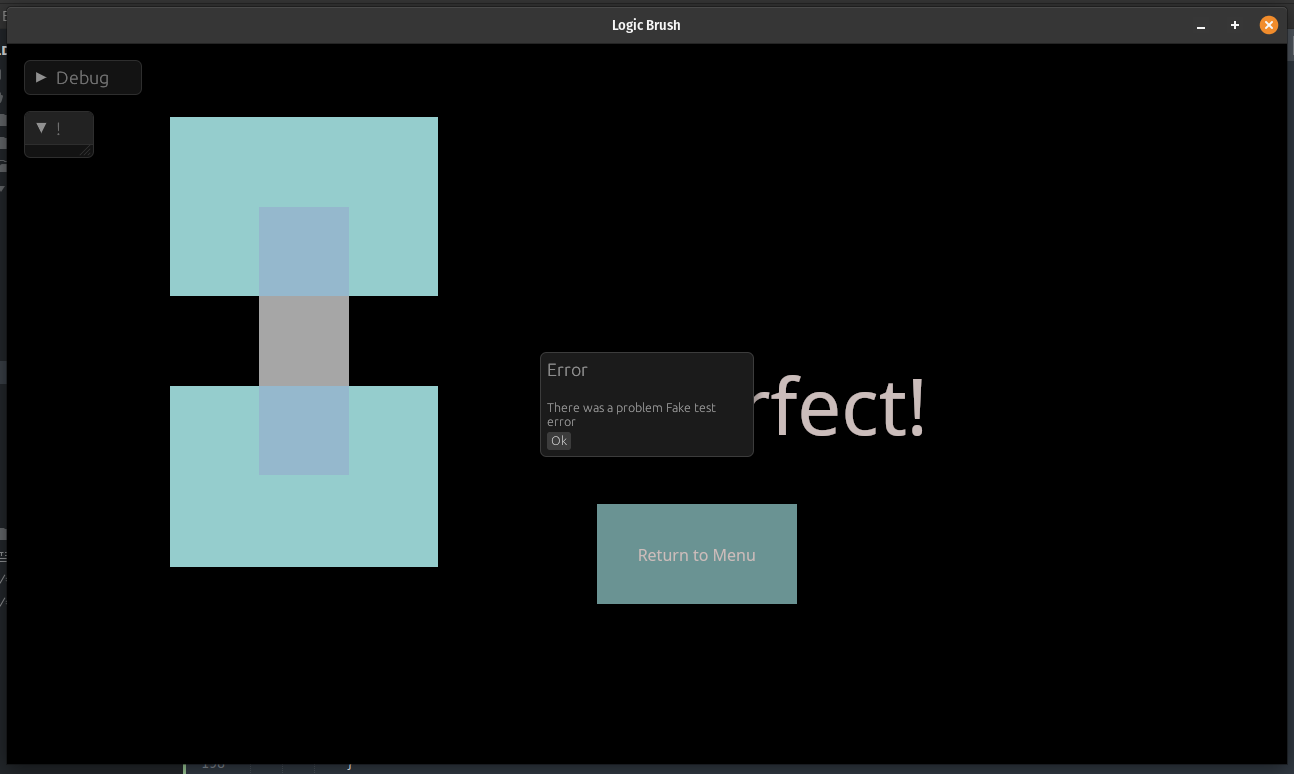

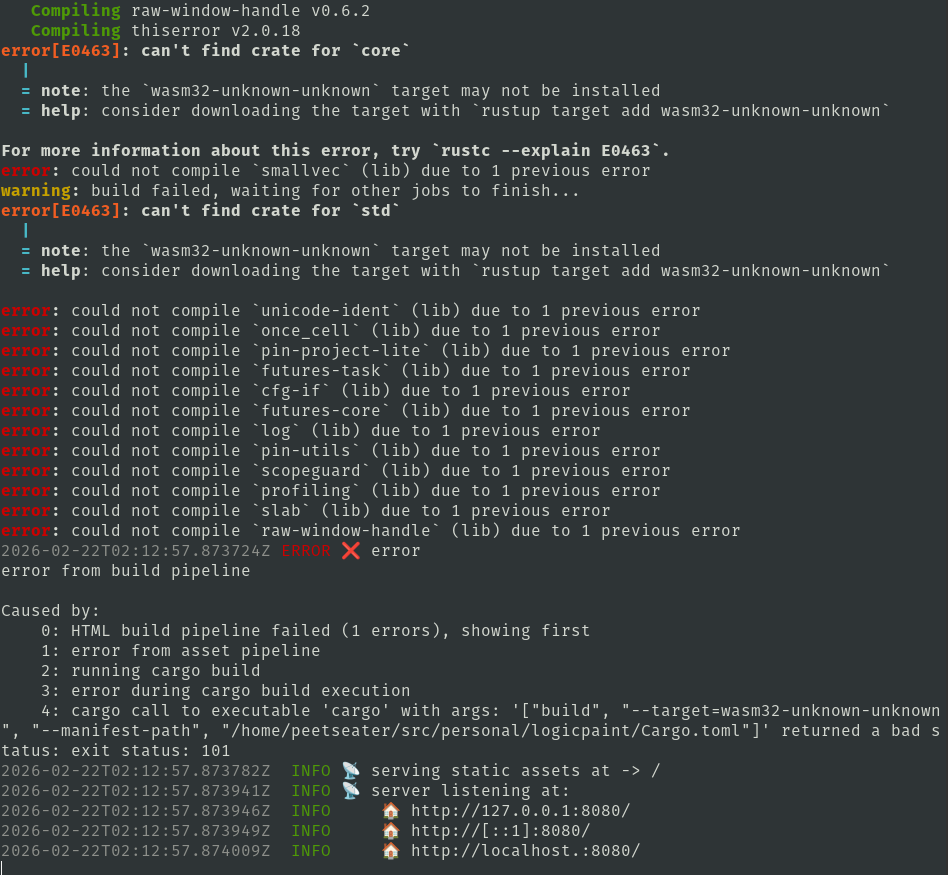
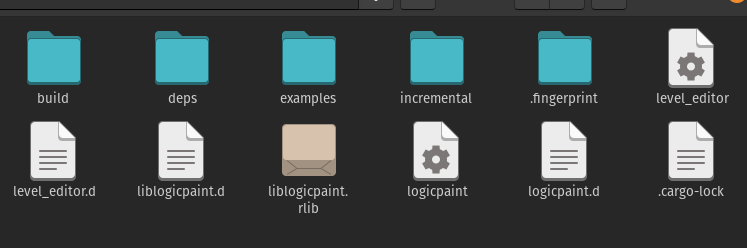

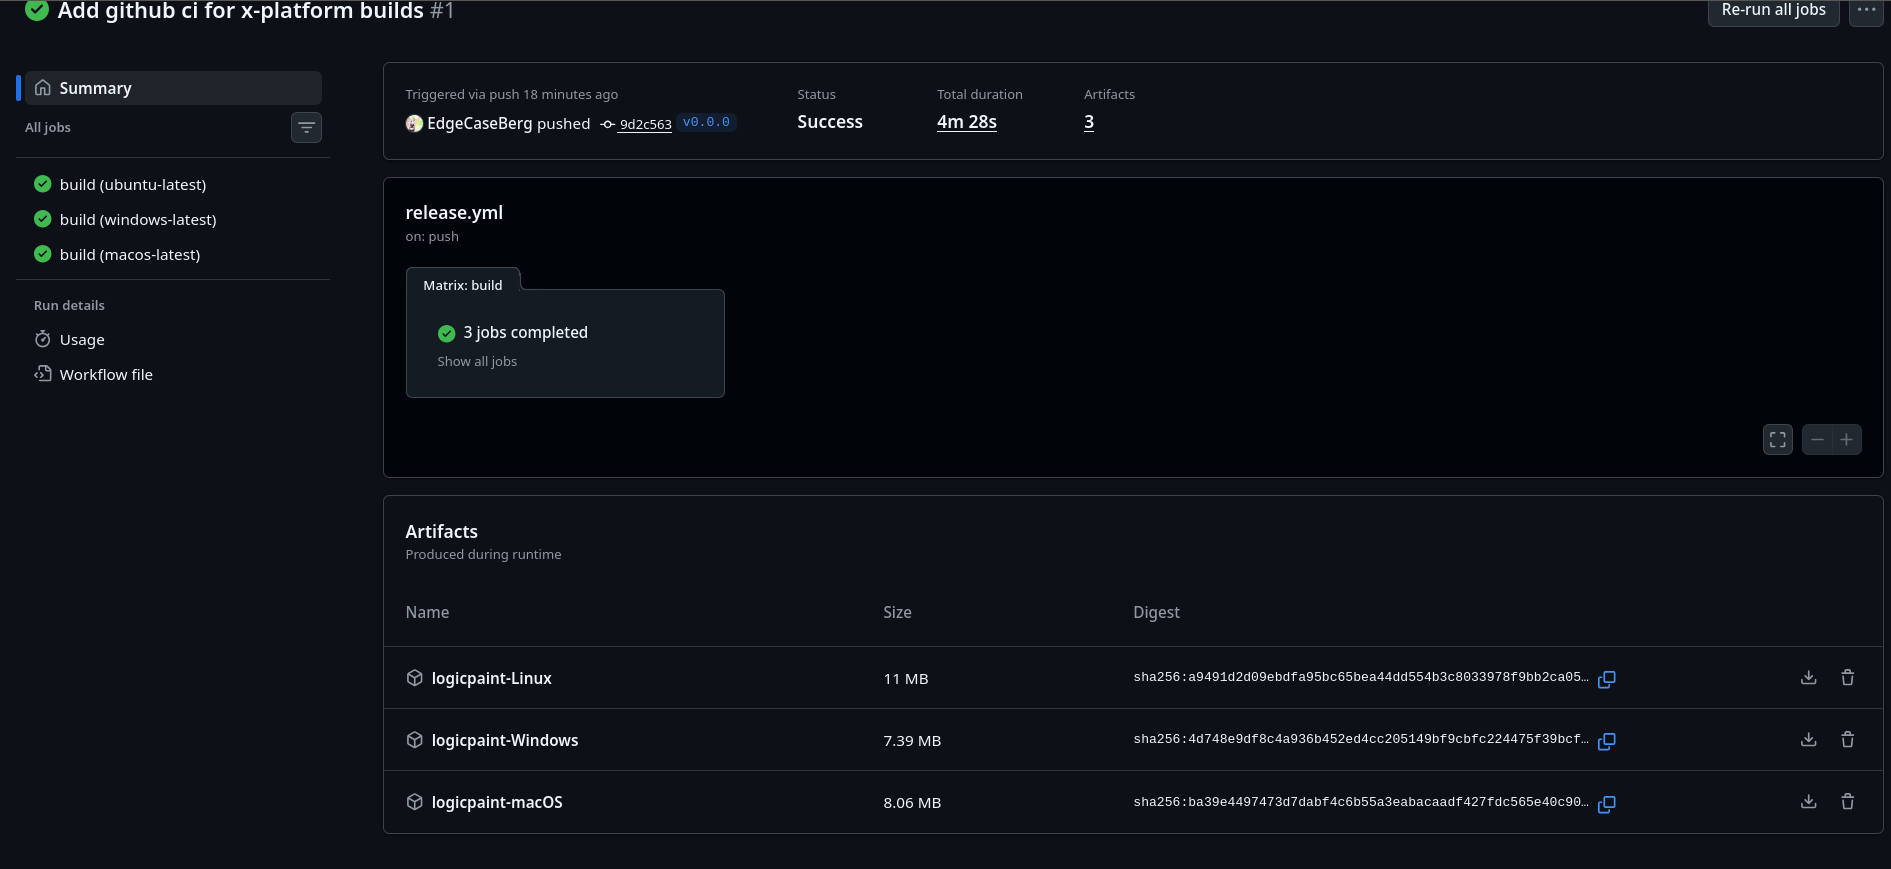

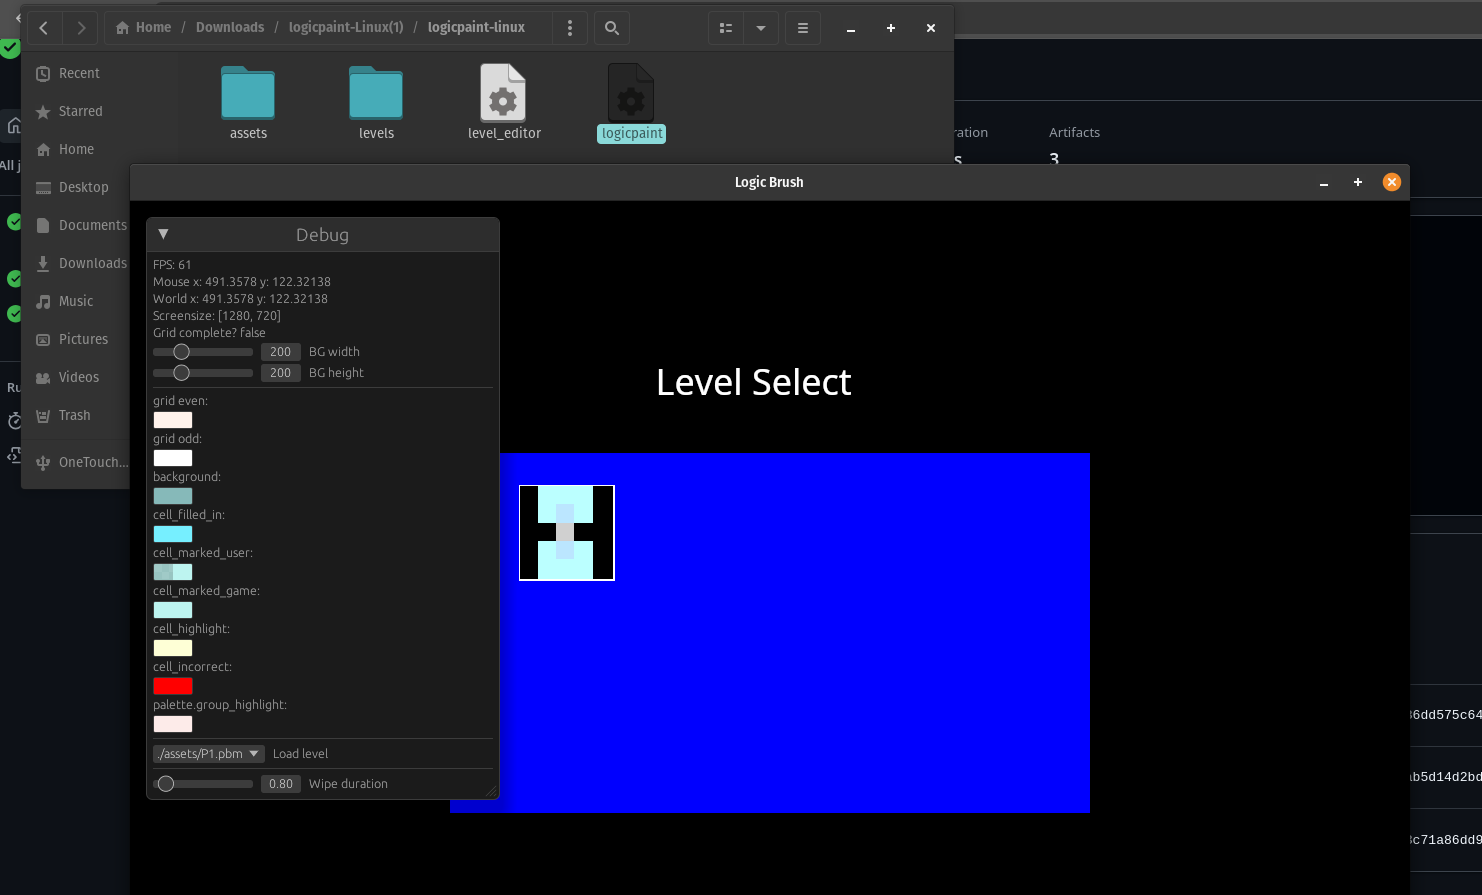

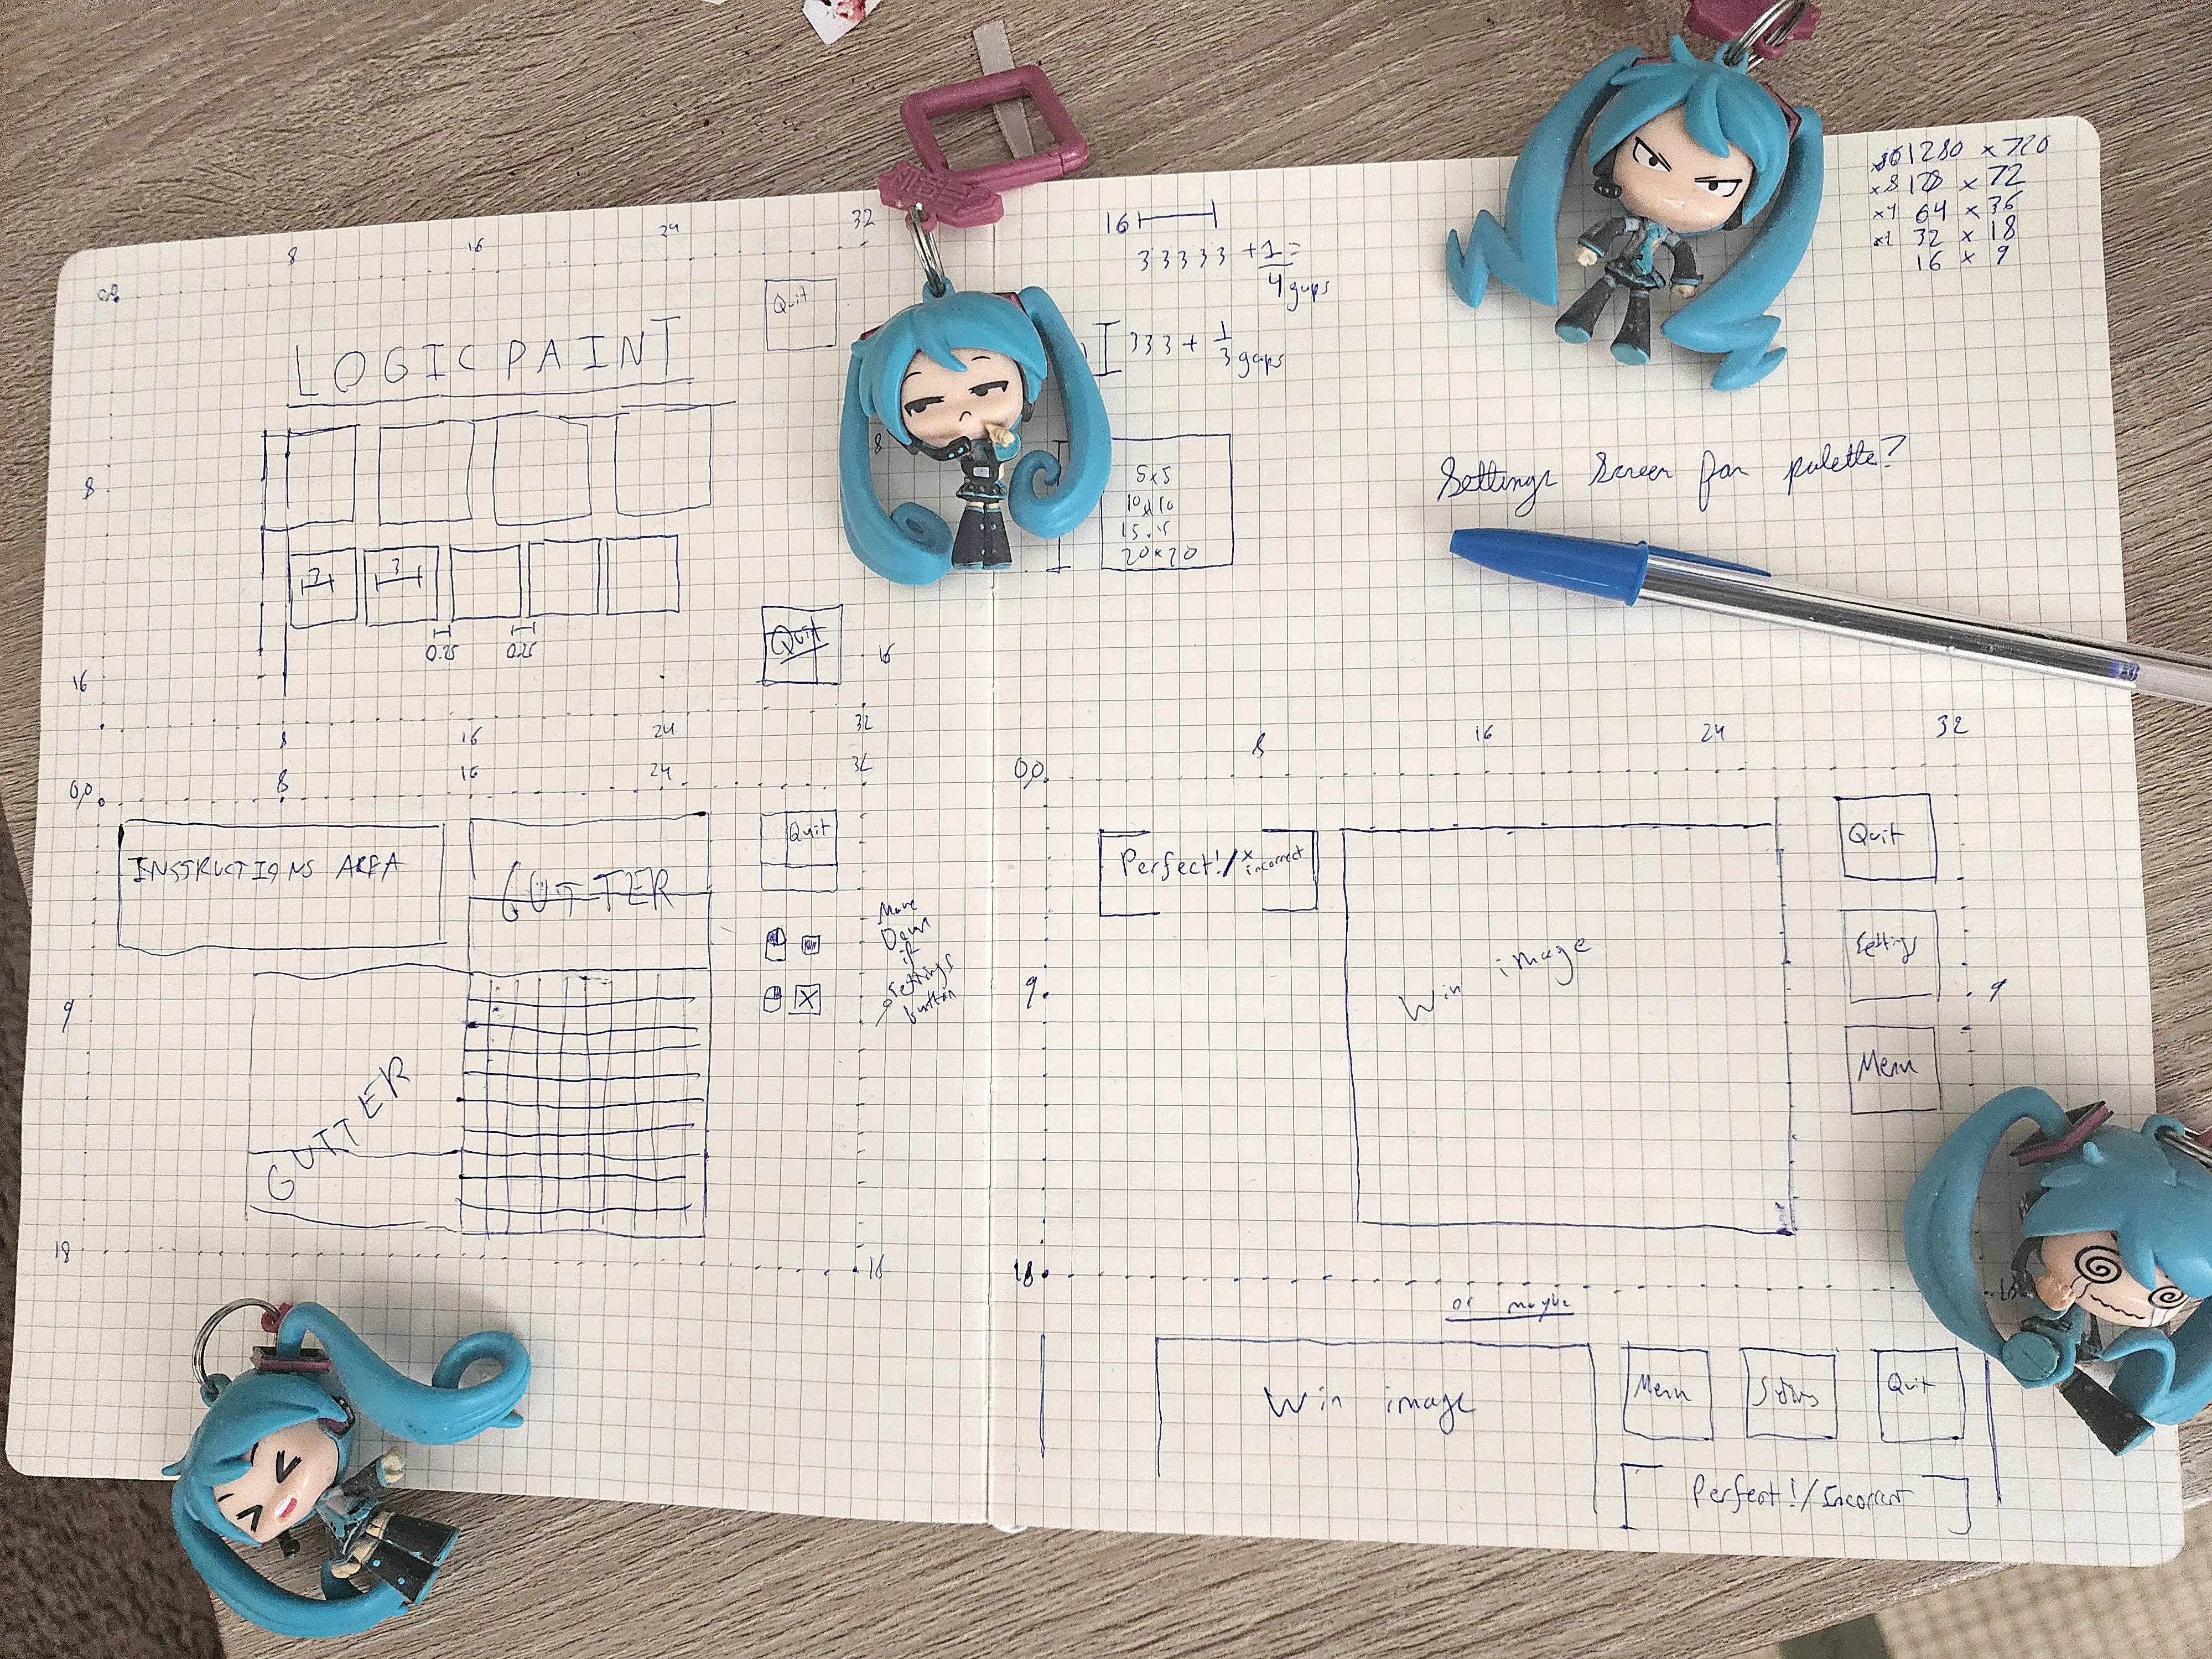
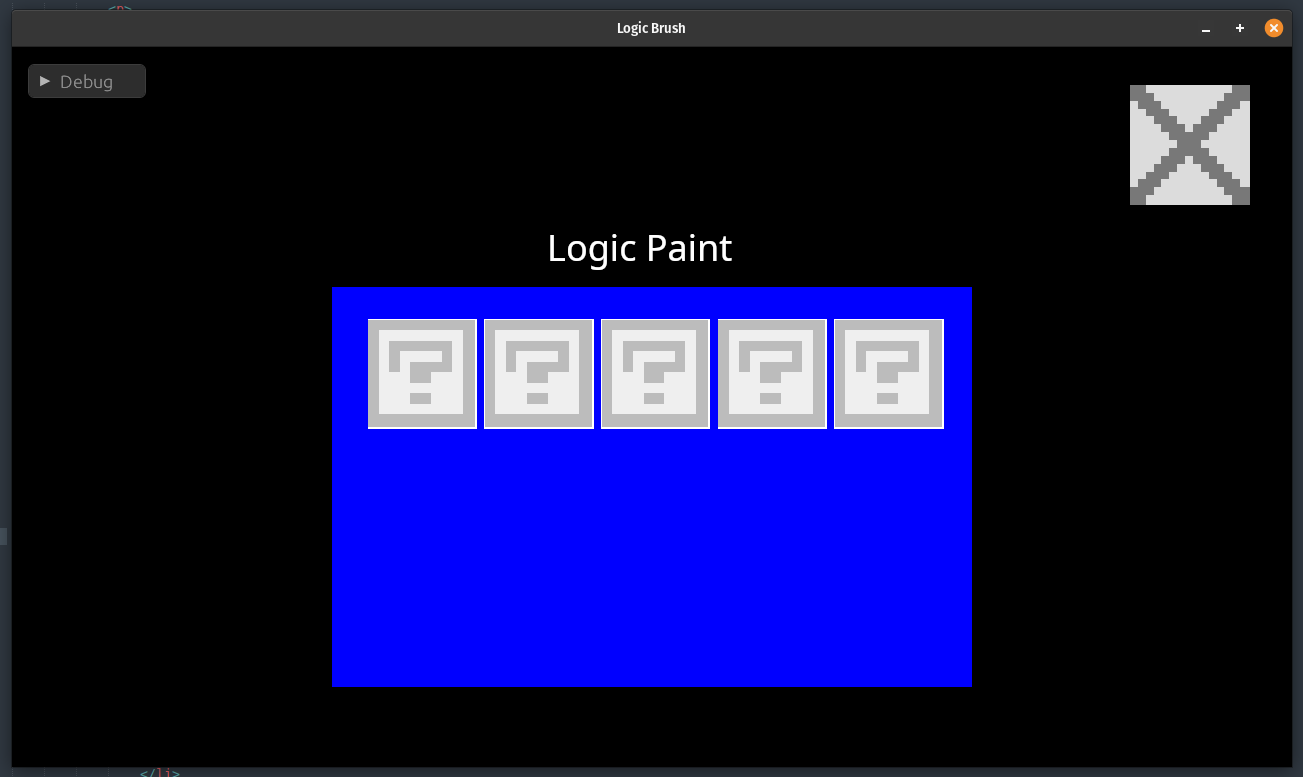
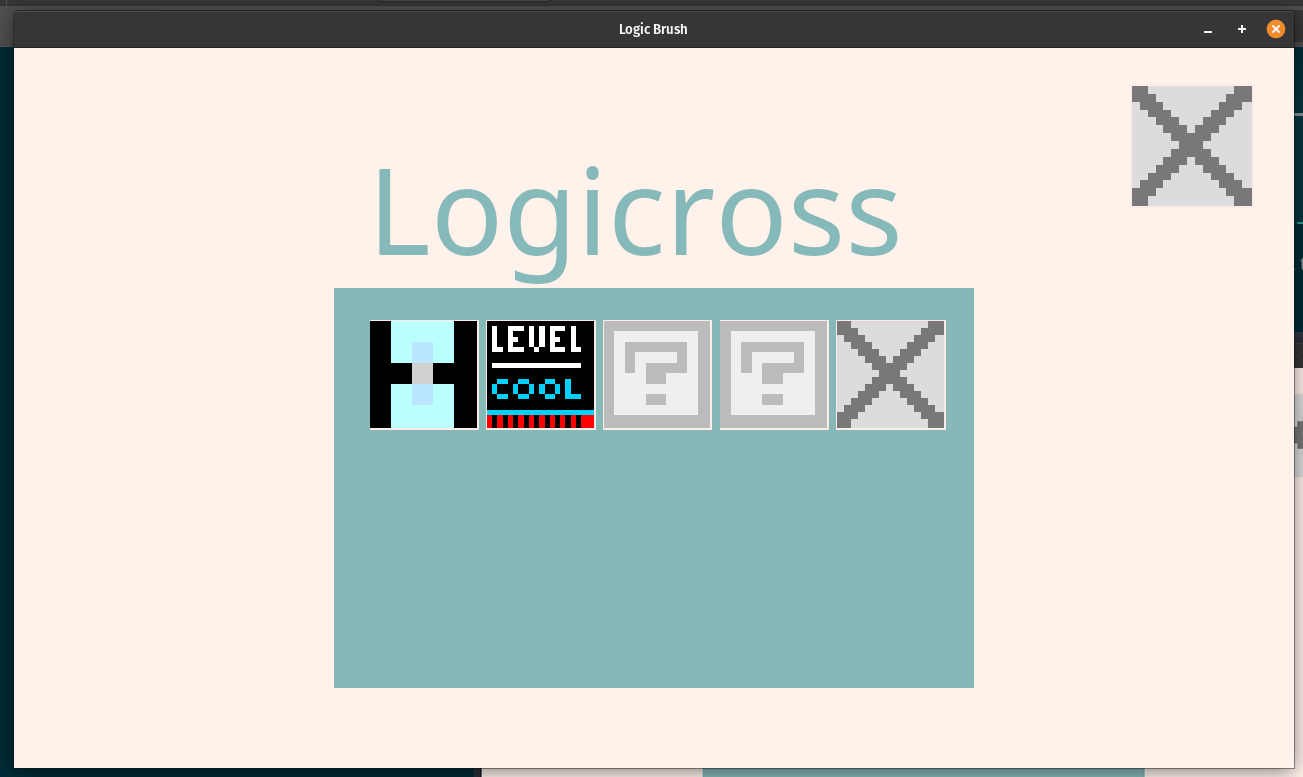
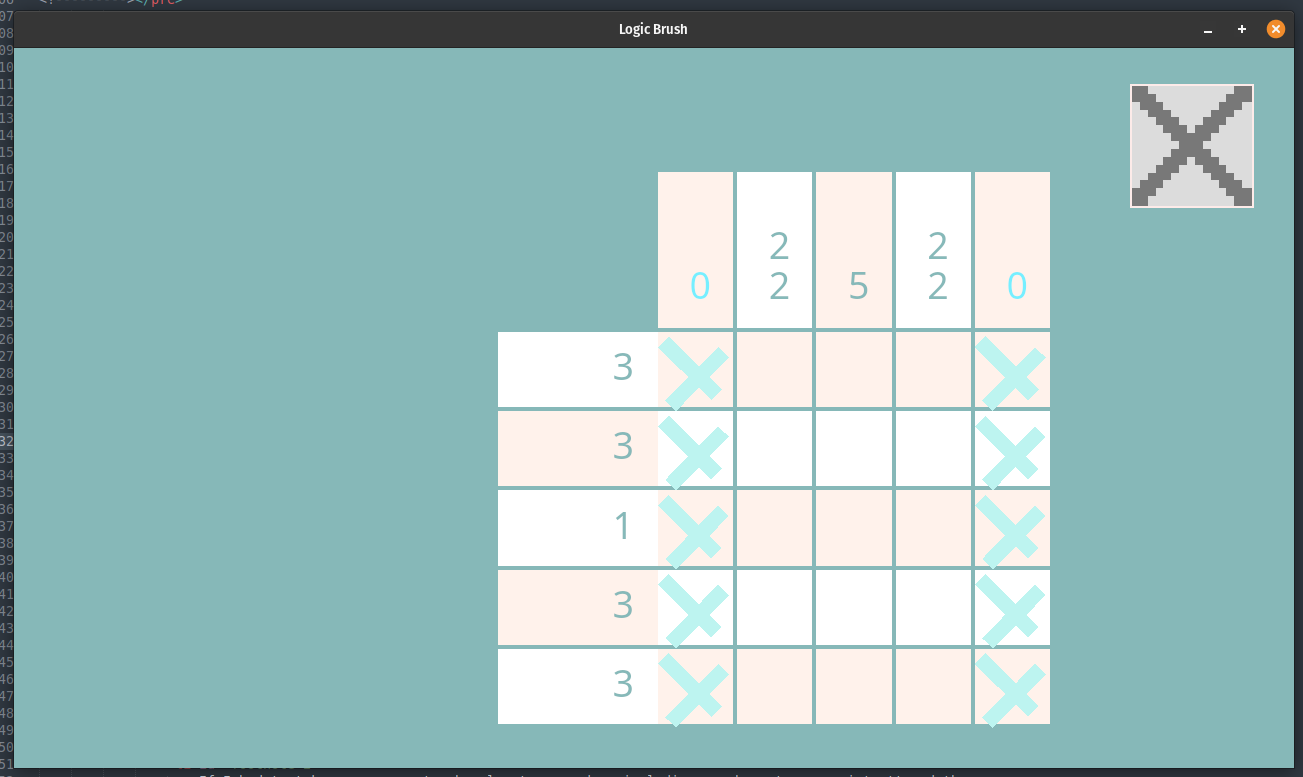
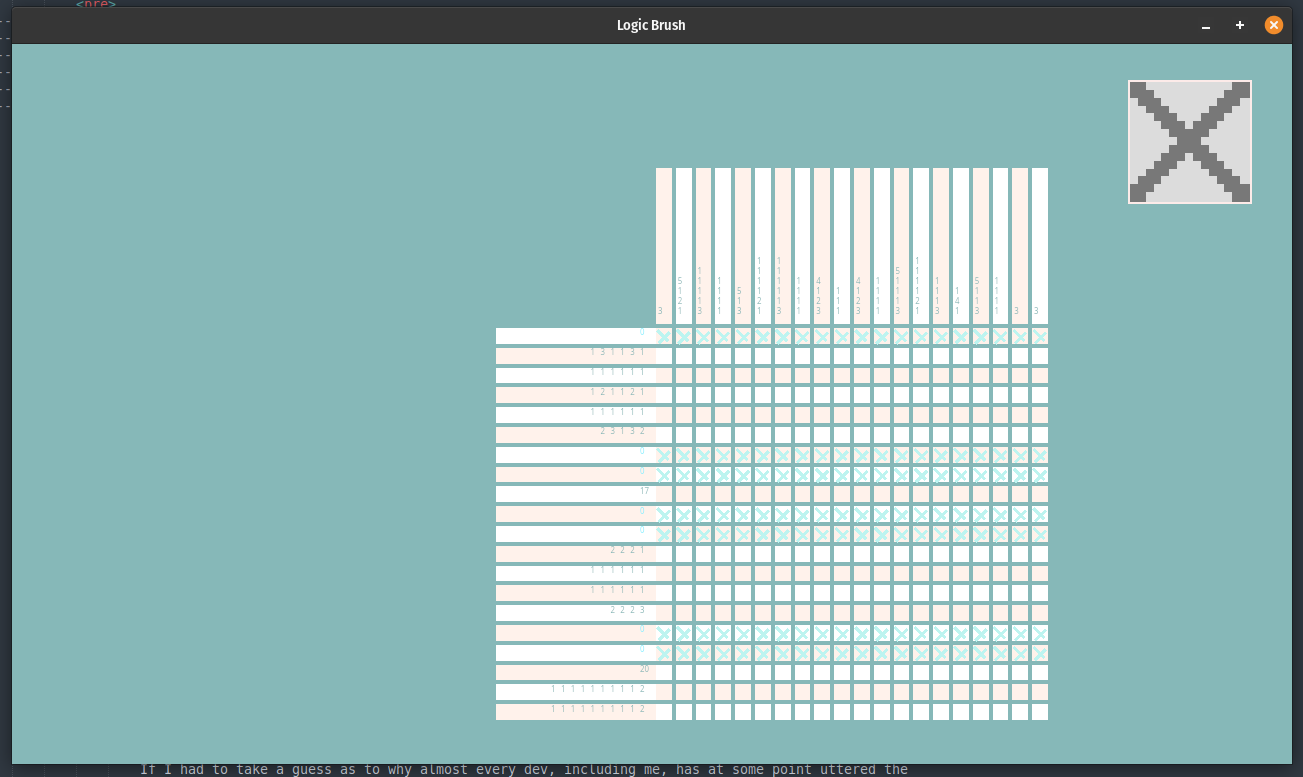
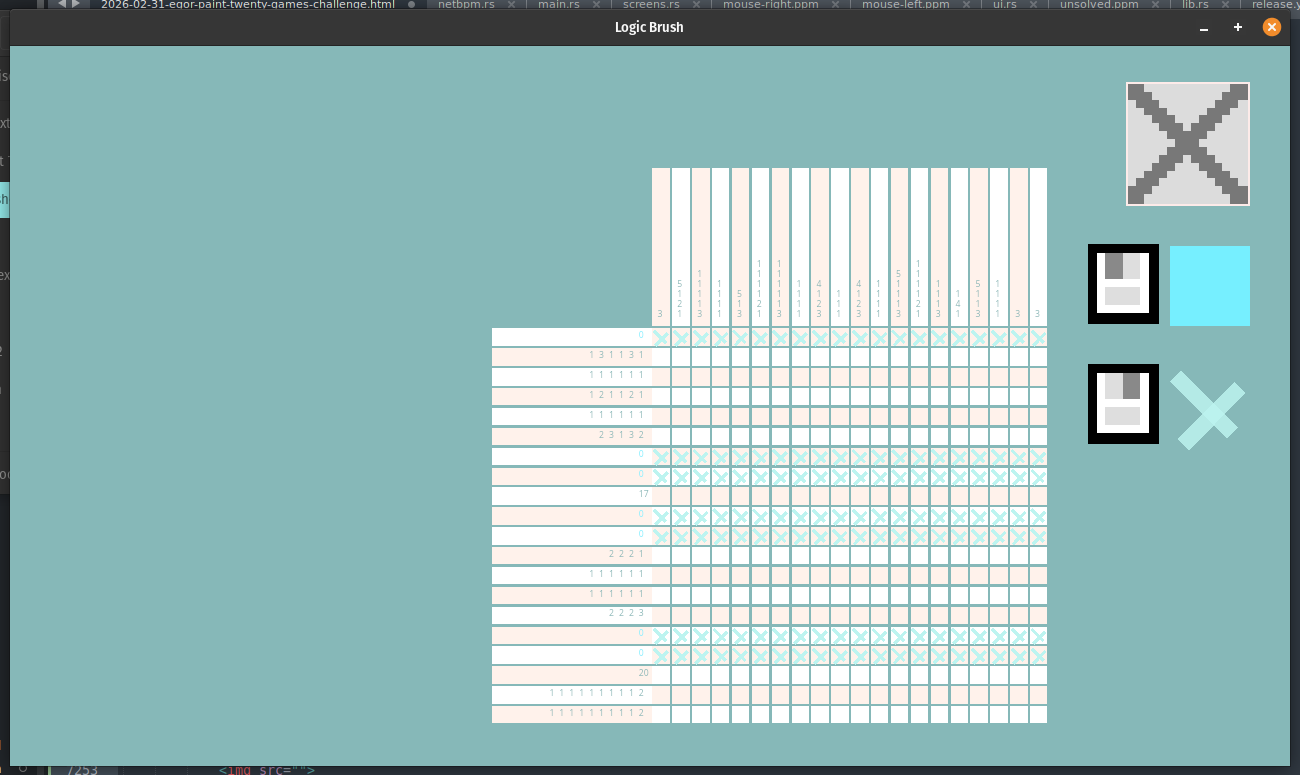
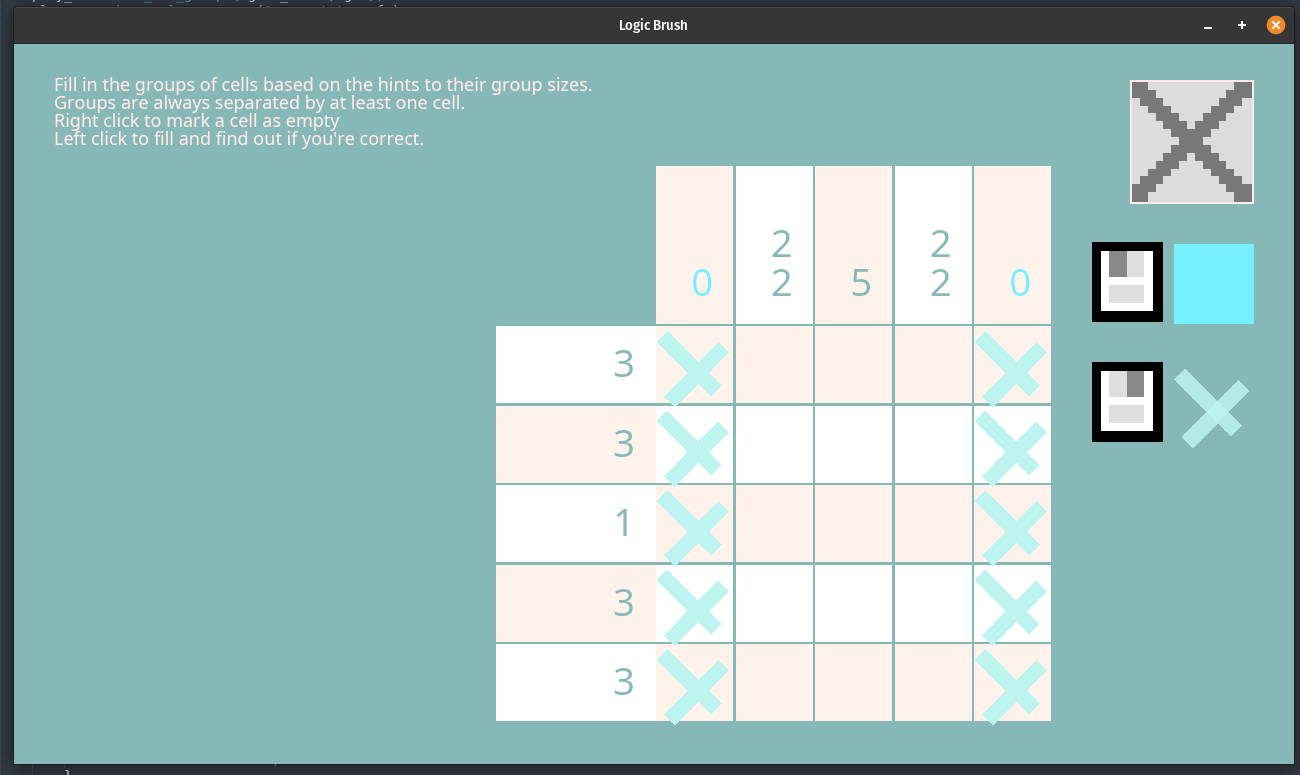


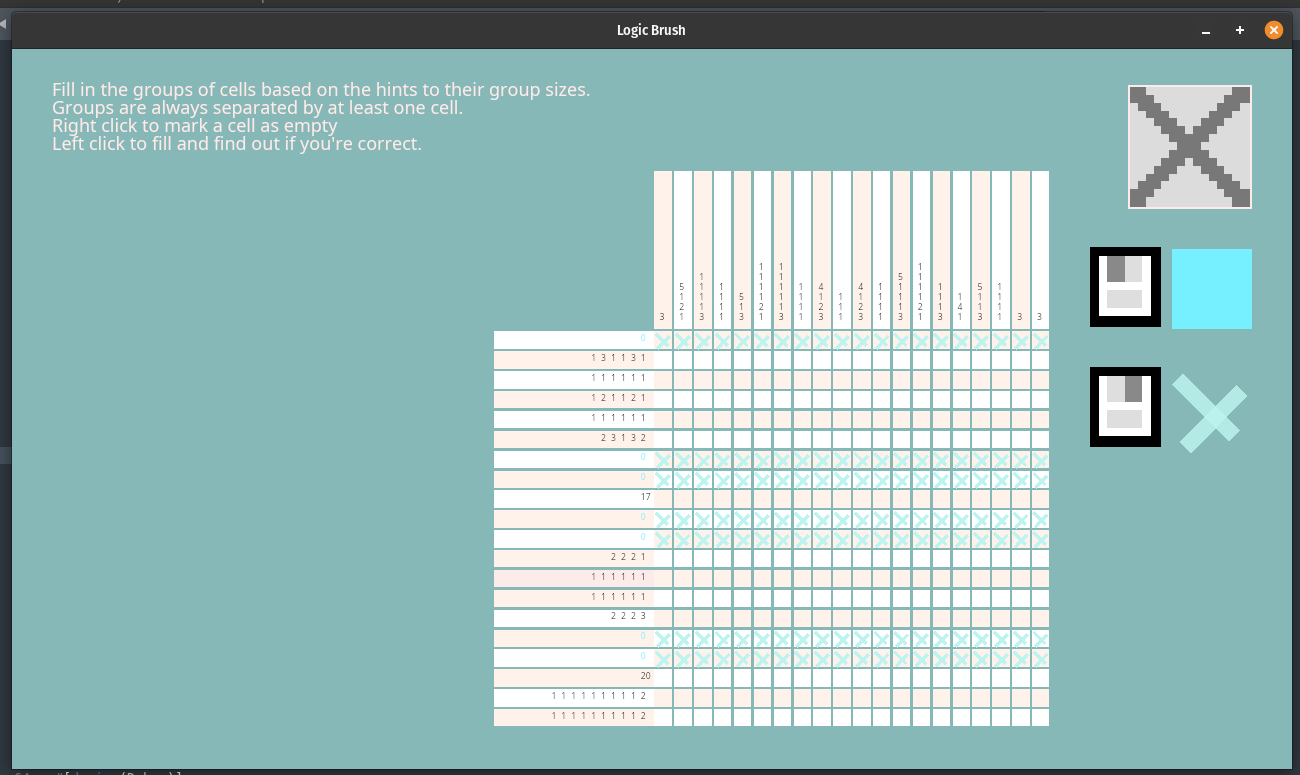
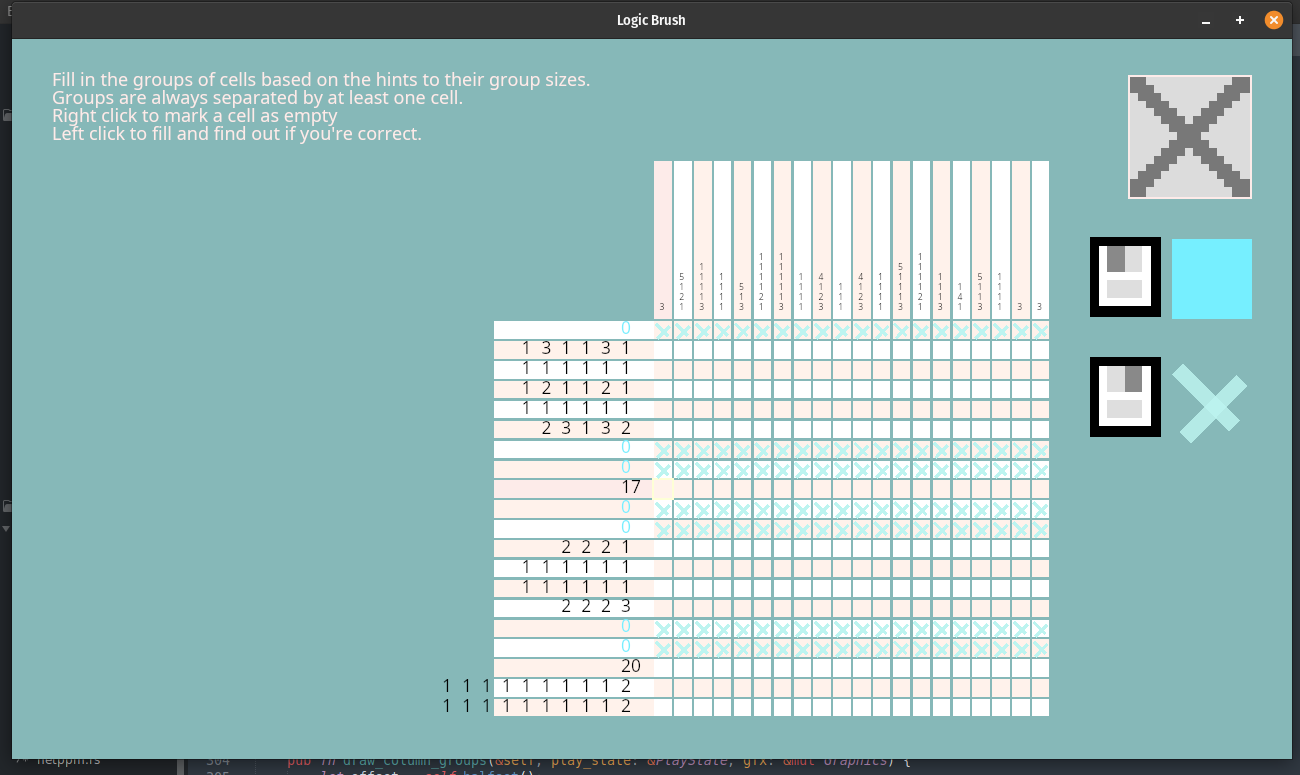
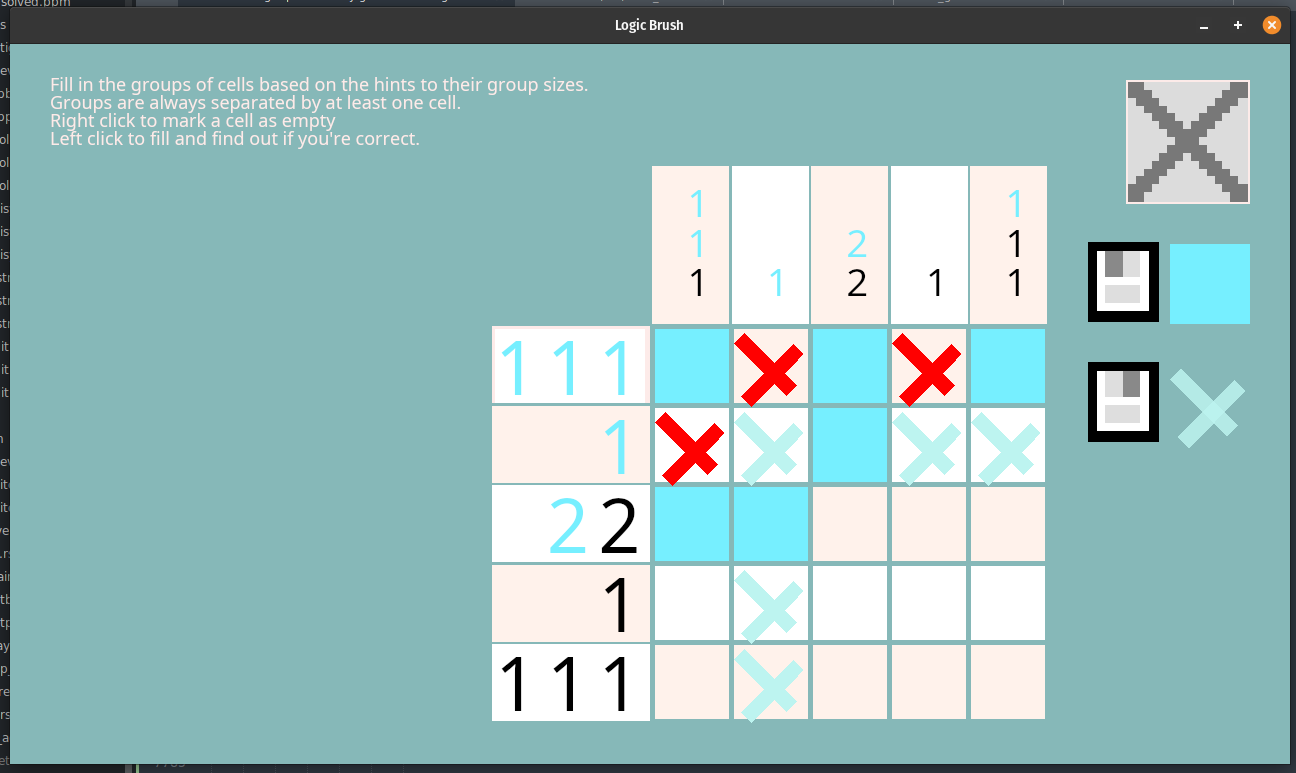

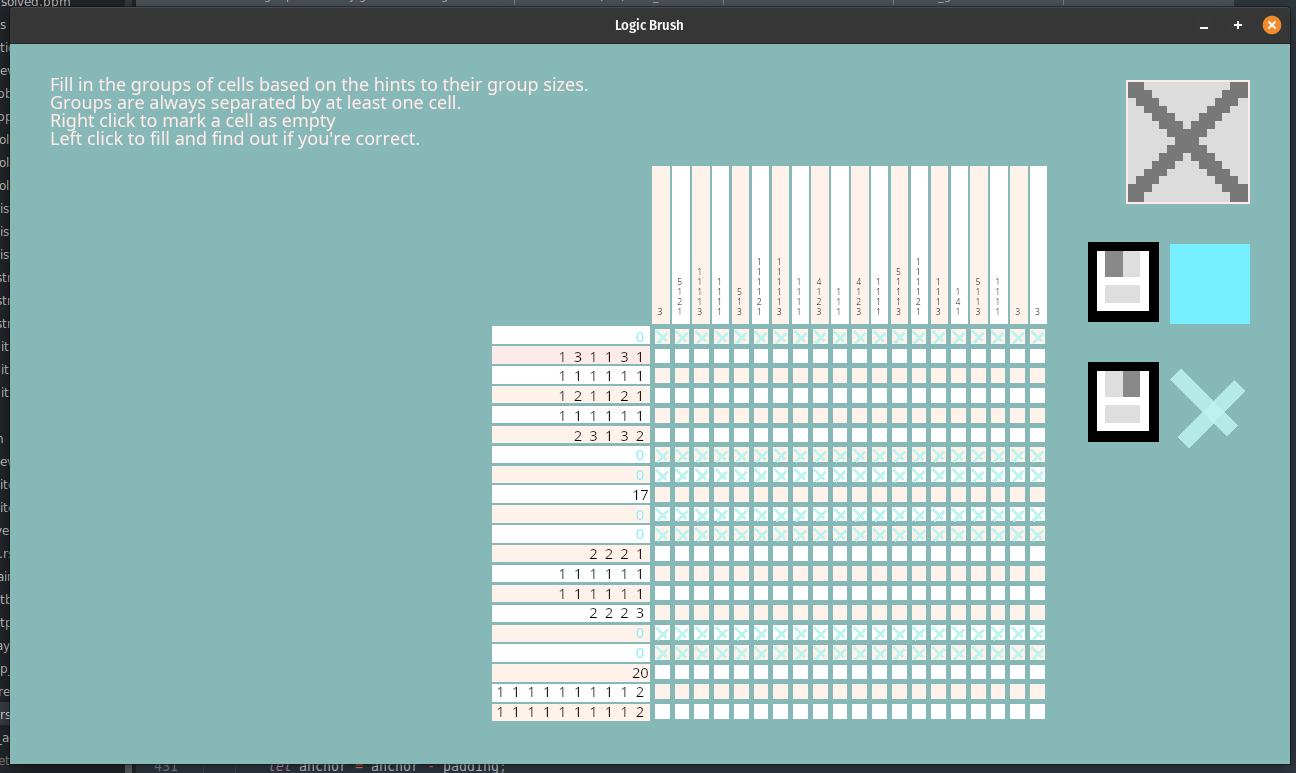
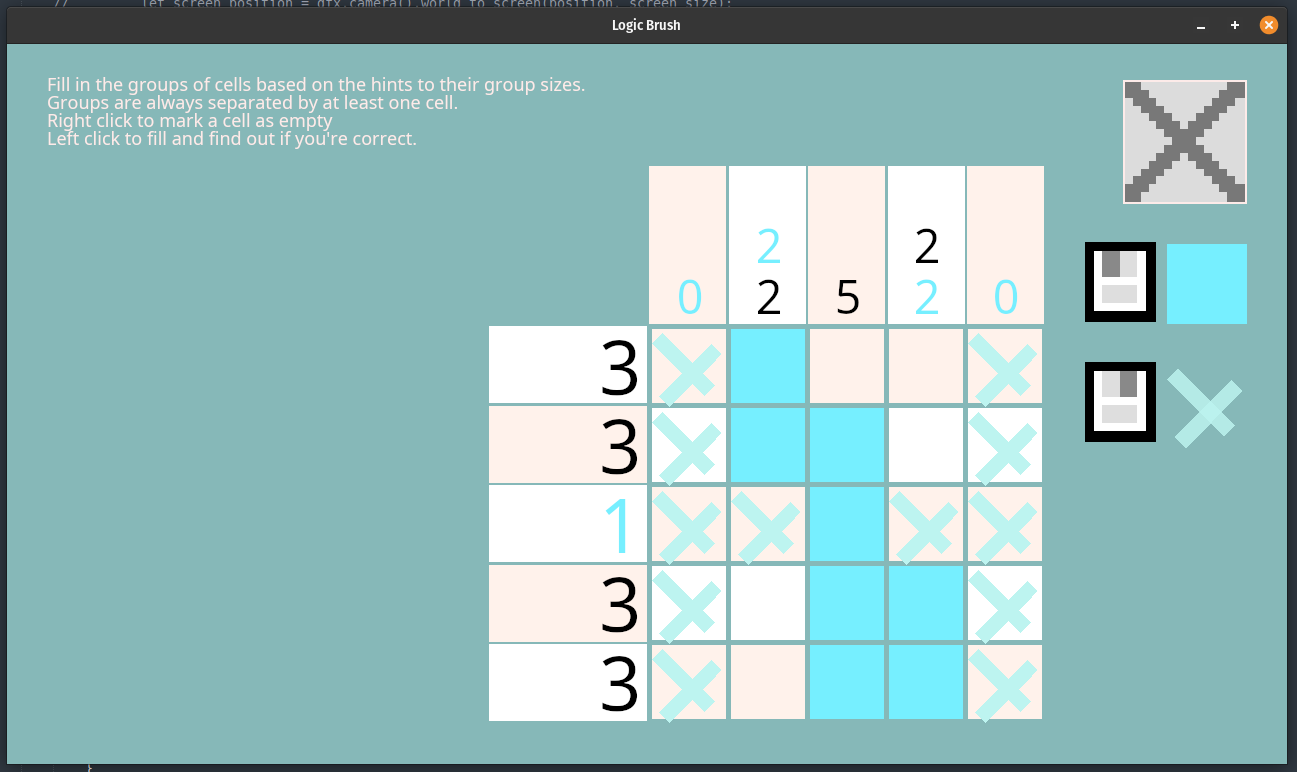
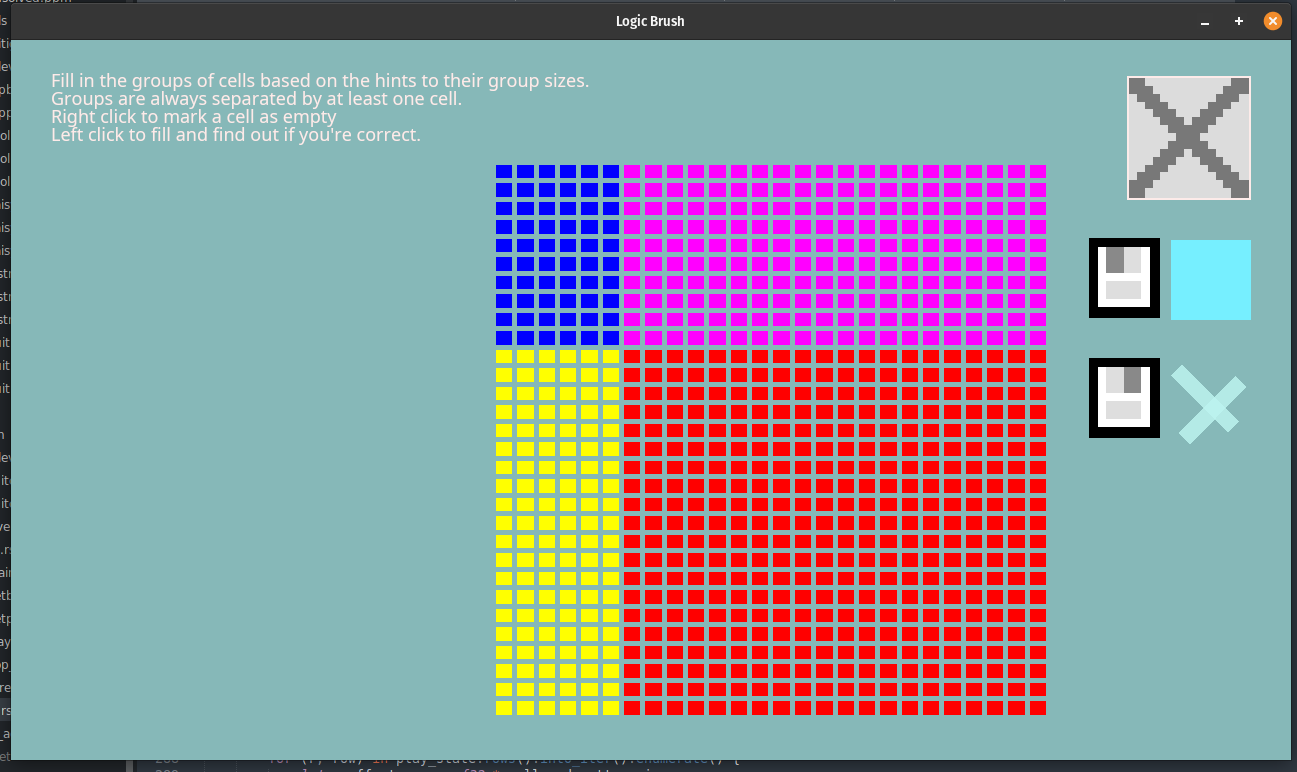
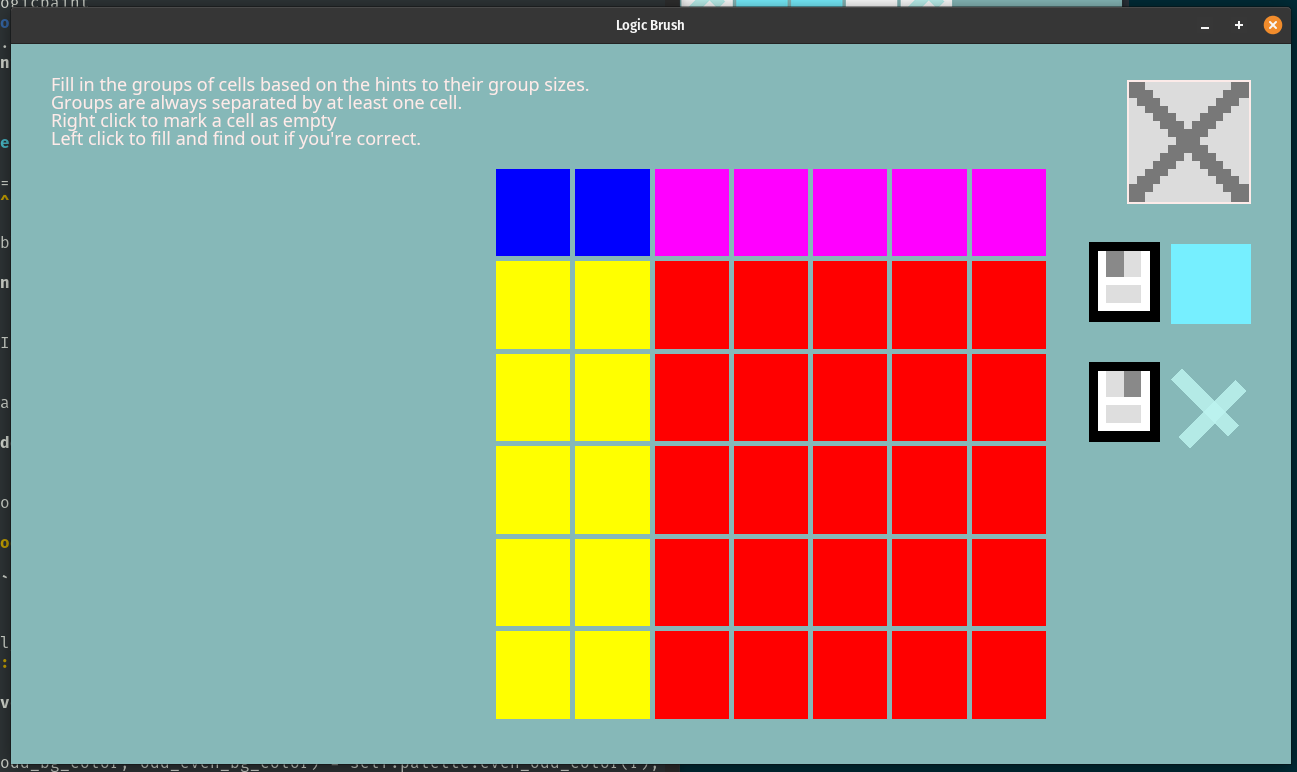
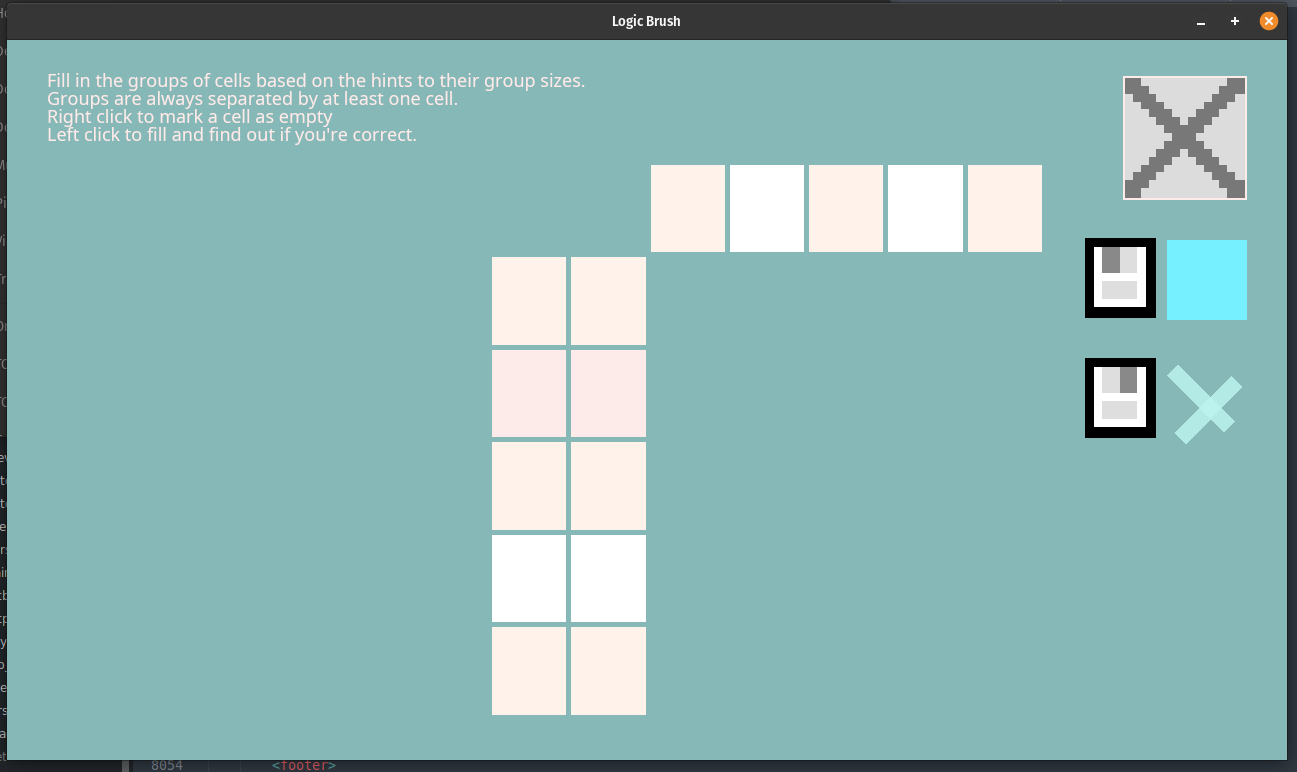
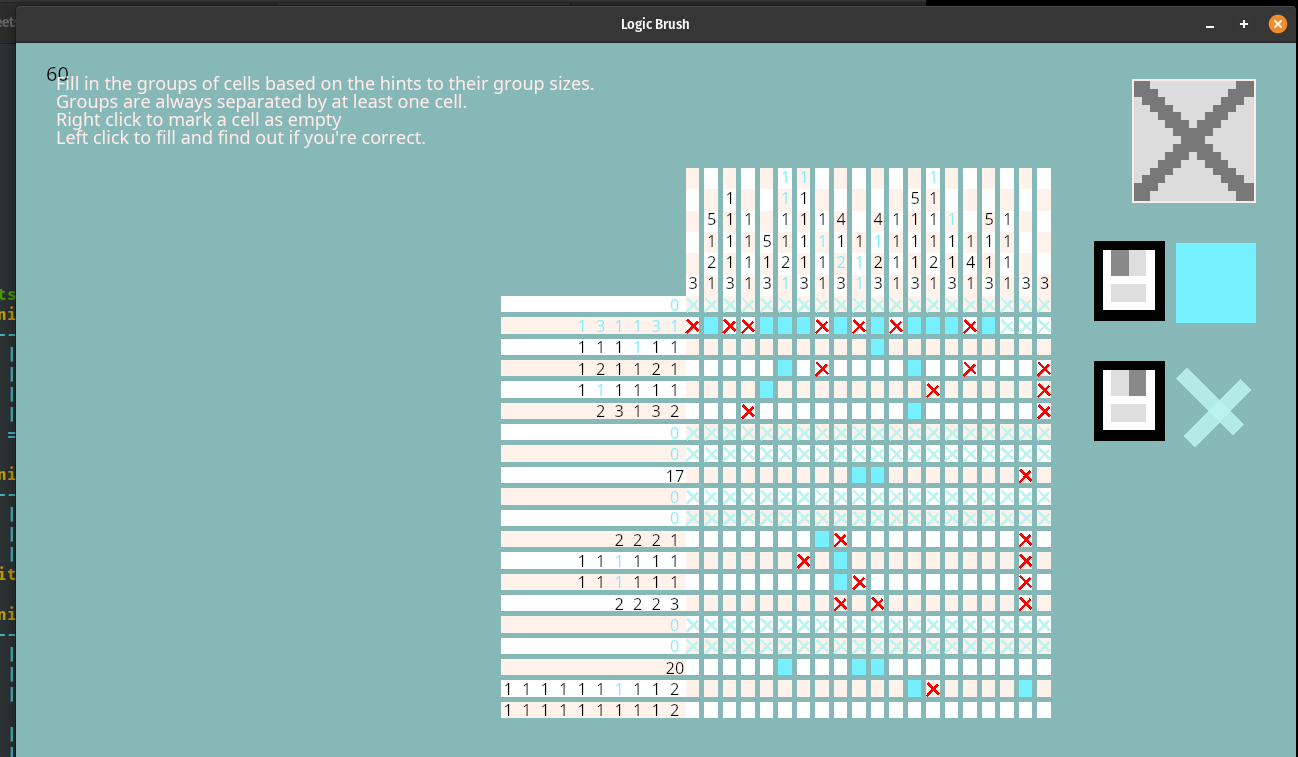
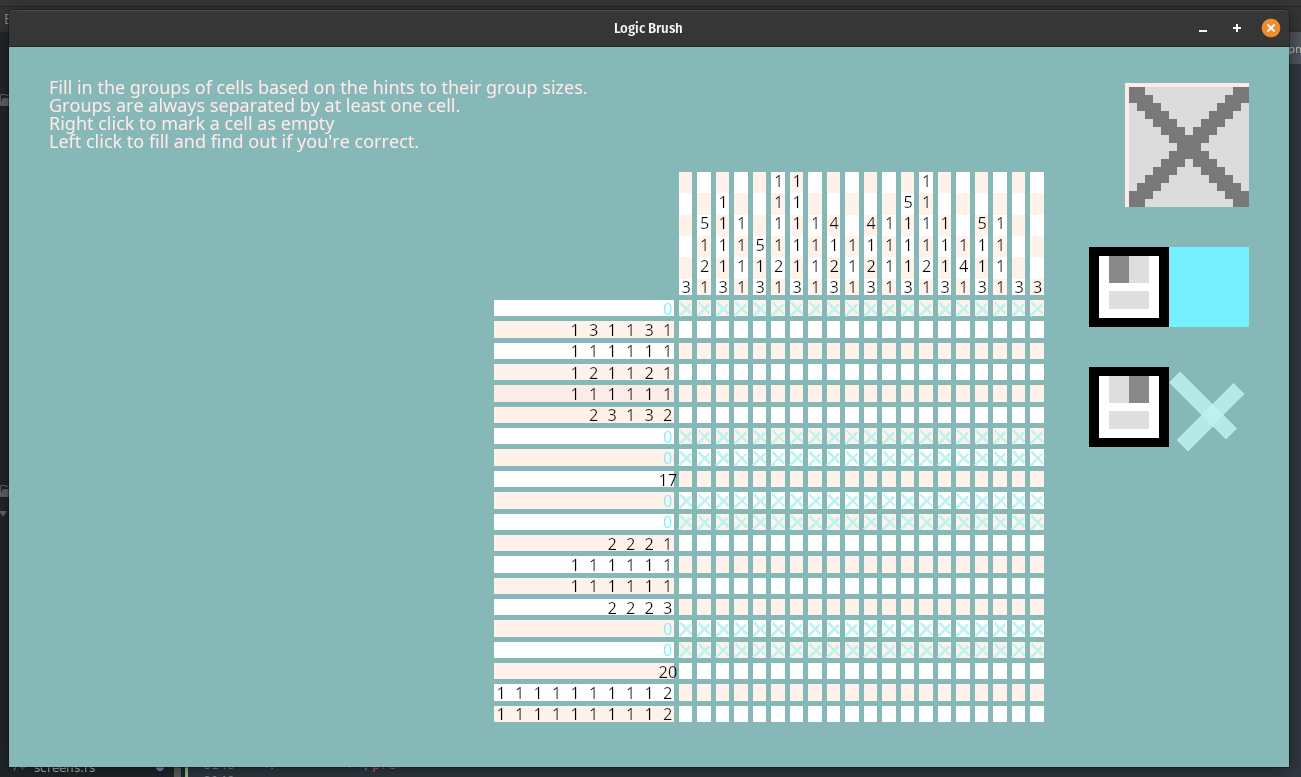
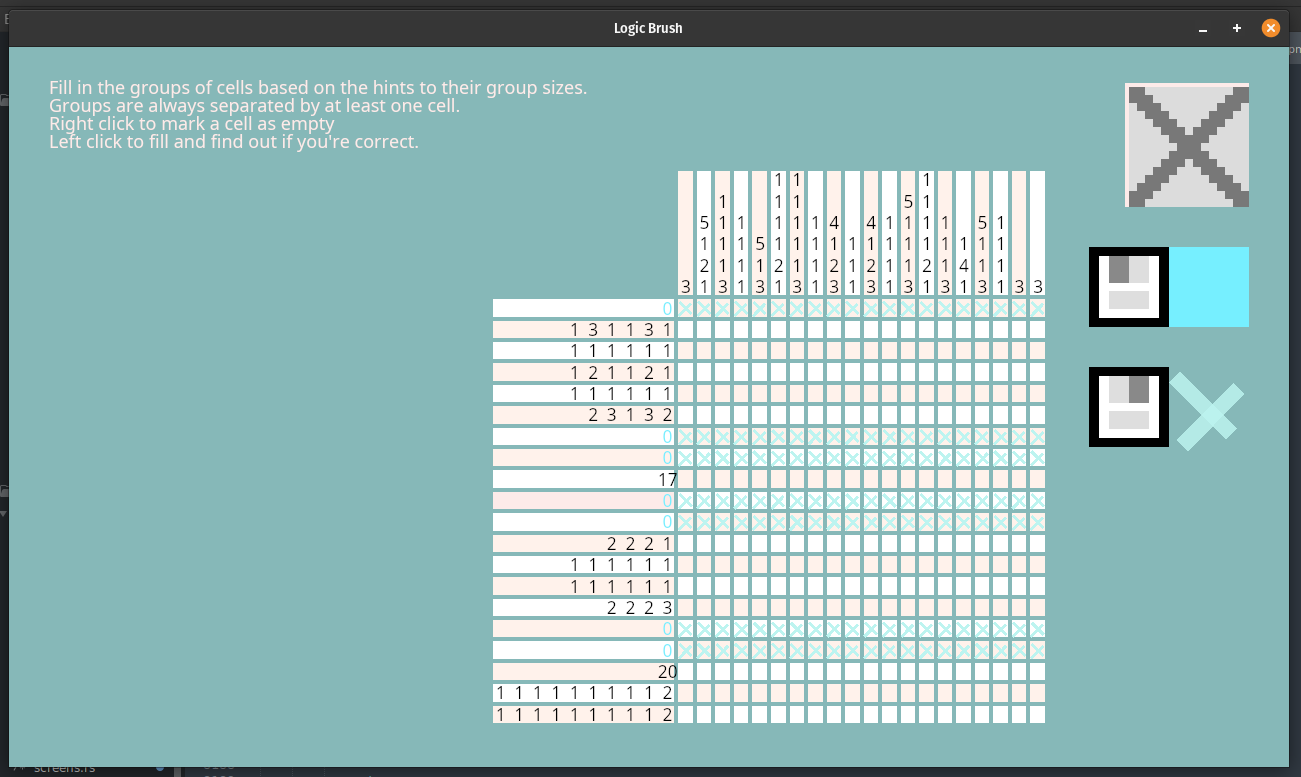
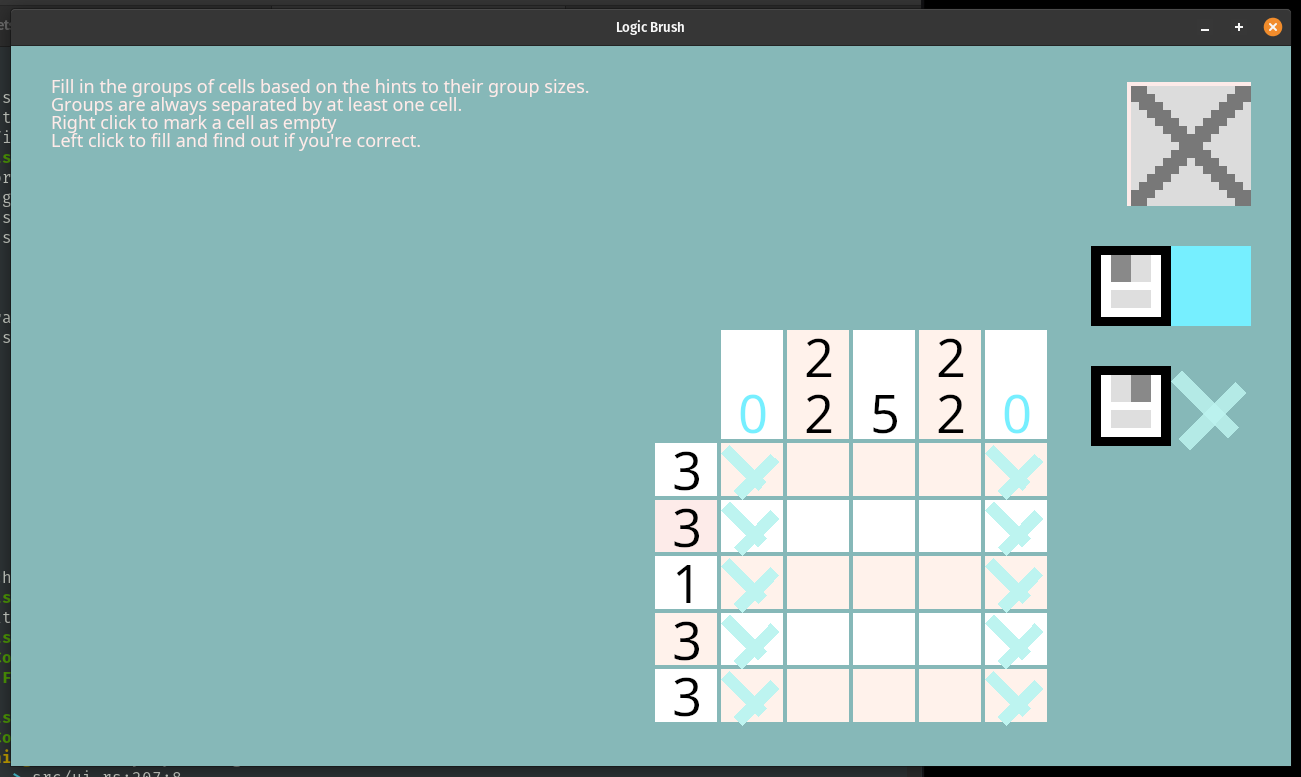
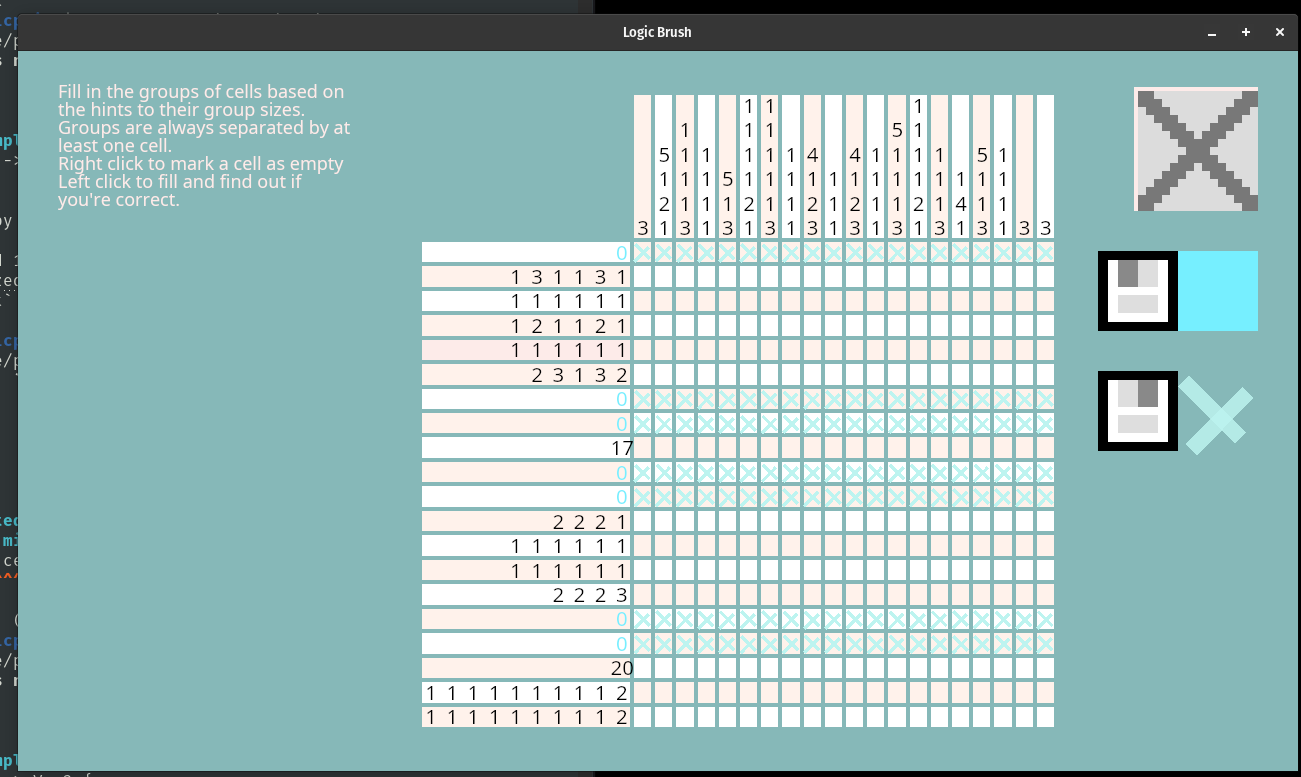


.png)